


13
Index Parts and Facilities—Continued
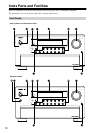
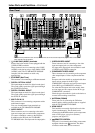
A LISTENING MODE button [59]
Press this button to enter the setup mode for the
listening mode. Turning the [SELECT/PRESET]
allows you to select the listening mode. To confirm
your selection and exit the setup mode, press the
[SELECT/PRESET].
B AUDIO SELECTOR button [55]
Press this button to enter the audio selector mode.
Turning the [SELECT/PRESET] allows you to
select the audio mode.
C TONE button [52]
Press this button to enter the tone adjustment mode.
Turning the [SELECT/PRESET] allows you to
select the channel to adjust the tone. To adjust the
tone level, turn the [CONTROL/TUNING].
D ZONE 2 button [68]
Press this button to enter the Zone 2 configuration
mode. Turning the [SELECT/PRESET] allows you
to select the input source for Zone 2. Also, if you
want to configure other Zone 2 settings such as
standby/on setting, listening mode, volume
adjustment, audio selector mode, and display
settings, press this button first.
E REC/ZONE 3 button [68, 70]
Press this button to enter the Rec/Zone 3 mode.
Turning the [CONTROL/TUNING] allows you to
select the input source for the Rec mode or Zone 3.
Also, if you want to configure the setting for Zone 3,
including standby/on setting or volume adjustment,
press this button first.
Note:
Recording and Zone 3 operations uses the same
circuit and therefore cannot be used at the same
time.
F VIDEO 7 INPUT terminals
For connecting a video camera or game device.
G ZONE 3 LEVEL button [68]
Press this button to enter the volume adjustment
mode for Zone 3. Turning the [SELECT/PRESET]
allows you to adjust the volume.
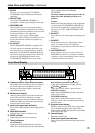
H CONTROL/TUNING dial [52, 60, 68, 70, 86]
When the input source is FM or AM, turning this jog
dial allows you to select the frequency to receive.
When used with other buttons, this [CONTROL/
TUNING] dial is used to select the mode settings or
values. Also the dial is pressed to confirm the
settings or values you select.
I SETUP button [86]
Press this button to enter the setup mode. First,
select the parameter to change by turning the
[SELECT/PRESET] and press the [SELECT/
PRESET] to confirm the parameter. Then, change
the parameter value by turning the [CONTROL/
TUNING] and press the [CONTROL/TUNING] to
confirm the value.
J EXIT button [86]
Press this button to return to the last menu. To exit
from the setup mode, press the [SETUP] button again.
K SELECT/PRESET dial [59, 61, 63, 68, 71, 86]
When the input source is FM or AM, turning this
jog dial allows you to switch between your preset
stations. When used with other buttons, the
[SELECT/PRESET] dial is used to select the mode
settings or parameters. Also the dial is pressed to
confirm the settings or parameters you select.
L ZONE 2 LEVEL button [68]
Pressing this button enters the volume adjustment
mode for Zone 2. To adjust volume, turn the
[SELECT/PRESET].
M DIMMER button (Other than European
models) [52]
Press to set the brightness of the front display. There are
four settings available: normal, dark, very dark, and
volume only.
For European models, this function can be operated
only with the remote controller.
M RT/PTY/TP button (European models only) [63]
This button is only available on European models.
Press this button to tune into the Radio Data System
(RDS) for FM broadcasting. RDS was developed
within the European Broadcasting Union (EBU)
and is available in most European countries. Each
time the button is pressed, the display changes from
RT (radio text) to PTY (program type) to TP (traffic
program) and then back to RT again.
N MEMORY button [61]
Press to assign the radio station, to which you are
currently tuned, as a preset channel or press to
delete a previously preset station.
O TUNING MODE button [60, 61]
This button is used to select the Auto or Manual
Tuning Mode.
P PHONES jack [52]
This is a standard stereo jack for connecting stereo
headphones.