


42
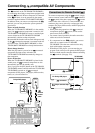
Connecting AV Components
—Continued
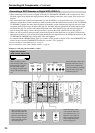
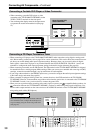
How to Configure i.LINK Connections
Selecting a Device
When the i.LINK connection is ready, you can use the setup menu to select any device which is connected via i.LINK.
Once you have configured the i.LINK setting, the next time you select the input source, it will be selected as the play-
ing source.
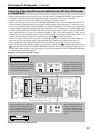
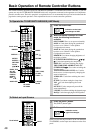
Using Remote Control
1. Press the [INPUT] button, and then turn the scroll wheel to select any source for setting.
2. Press the scroll wheel, and then press the [SETUP] button.
3. Use the [ ]/[ ] buttons to select “Input Setup,” and then press the [ENTER] button.
4. Use the [ ]/[ ] buttons to select “Audio Assign,” and then press the [ENTER] button.
5. Use the [ ]/[ ] buttons to select “g. i.LINK.”
6. Use the [ ]/[ ] buttons to select any device.
If you do not want to hear audio sound regardless if the i.LINK connection is ready, select “No.”
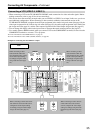
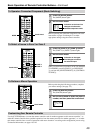
Using Control Buttons on TX-NR1000/TX-NR5000E
1. Select any input source, and then press the [SETUP] button.
2. Turn the [SELECT/PRESET] dial to select “Input Setup,” and then press the dial.
3. Turn the [SELECT/PRESET] dial to select “Audio Assign,” and then press the dial.
4. Turn the [SELECT/PRESET] dial to select “g. i.LINK,” and then press the dial.
5. Turn the [CONTROL/TUNING] dial to select any device.
If you do not want to hear audio sound regardless if the i.LINK connection is ready, select “No.”
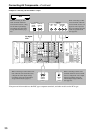
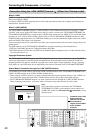
Using Useful Functions While the i.LINK Connection is Ready
If any other Onkyo product is connected to the TX-NR1000/TX-NR5000E via i.LINK and assigned as a input source
(Audio Assign), you can use the following functions. The connection must be disconnected to use them.
i.LINK Selector Change
When the i.LINK-connected device starts playing, the input source will automatically be changed to the one assigned
to the device even if another input source has been selected. See page 120 for detailed operations.
Note:
You cannot hear audio sound of i.LINK-connected devices in Zone 2.
Control of DVD Player
You can control a DVD player by emitting signals from the remote controller to the TX-NR1000/TX-NR5000E.
Auto Start (Wakeup Setup)
While the TX-NR1000/TX-NR5000E is in standby mode, you can configure the setting of any i.LINK-connected
device. See page 120 for detailed operations.
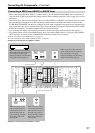
OSD for DVD
If DVD player is connected to the TX-NR1000/TX-NR5000E via i.LINK, you can output the OSD of the
TX-NR1000/TX-NR5000E on a TV, even if a DVD player is directly connected to the TV. You can configure the set-
ting to specify the display area on the TV, for example, right or left side of the screen. When multiple devices are con-
nected, you can select any specific device through which the output is sent. This function is also available in Zone 2.
See page 120 for detailed operations.
Note:
While the OSD for DVD is used, do not change mode to standby, nor turn on/off the player.
System Control Setup
You can select on/off of the i.LINK (AUDIO) output of a DVD player from the TX-NR1000/TX-NR5000E. See page
120 for detailed operations.
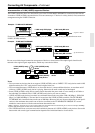
Notes on “DTCP ERROR XXXX” Message
“DTCP ERROR XXXX” message (where “XXXX” is a device name) indicates that the connected device does not
support DTCP (Digital Transmission Contents Protection). In this case follow the procedure described below.
1. From the Setup Menu, select “6. i.LINK Setup”
→
“6-1. Wakeup Setup” to set “a. Wakeup on i.LINK (IEEE1394)”
to “Disable.”
2. Disconnect the device from the main unit by removing the i.LINK cable from the rear panel.
3. Press the [STANDBY/ON] button so that the main unit enters the Standby mode.