


9
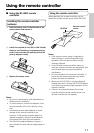
Part names and functions
The numbers within the brackets are the pages
where the part is introduced.
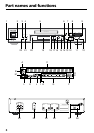
Front panel
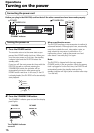
1 POWER switch (POWER ON/ OFF) [16]
Press in to turn on the main power.
2 STANDBY/ON button and STANDBY
indicator [16]
Press to turn the DX-R700 on or to put it in
standby state while the main power is on
( ON). When the DX-R700 enters the standby
state, the STANDBY indicator lights.
3 MEMORY (programmed playback) button
[40]
Press to program the tracks to play in memory.
4 CLEAR button [40]
Press to erase the programmed tracks one at a
time from the end. This button is also used to
erase the character entered.
5 Disc tray [17]
6 r (tray open/close) button [17]
Press to open and close the disc tray.
7 g PAUSE button [38]
Press during playback to pause the playback.
Press the s button to resume playback.
8 e STOP button [38]
Press to stop recording or playback.
9 s PLAY button [38]
Press to start analog recording, digital recording,
and playback.
10 PHONES LEVEL dial [41]
Adjusts the output level for the PHONES jack.
11 PHONES jack [41]
Connects stereo headphones with a standard
stereo plug.
12 d/f(rewind/fast forward) buttons
[38]
Press to rewind or fast forward through the
track currently playing.
13 o REC (recording) button [20, 22, 25]
For analog and digital recording, press to place
the DX-R700 in the recording standby state.
14 INPUT button [20, 22, 24]
Press to select the input source.
15 YES button [31-33]
Press to confirm displayed settings during
entering names, finalizing, and other operations.
16 q MULTI JOG w dial [21, 26, 28-32, 34-38]
Use to jump to tracks prior to or later than the
one currently playing. Use while playback is
stopped to select the track to play.
17 EDIT/NO button [21, 26, 28, 31, 32, 34-37]
Press to display the operations for erasing, name
input, and other operations. To select a displayed
operation, turn the MULTI JOG dial.
18 DISPLAY button [27-29]
Press to change the contents of the display.
19 Front display
A NAME indicator
B DISC/TRACK/ARTIST indicator
C Display
D MEMORY (programmed playback) indicator
E RANDOM (random playback) indicator
F REPEAT (repeat playback) indicator
G Recording level display
H CD/CD-R/CD-RW indicator
I ANALOG IN indicator
J DIGITAL IN 1/2 indicator
K FINALIZE indicator
L s (play) /g (pause) /o (recording) indicator
M LEVEL-SYNC indicator
20 Remote control sensor [11]
21 FINALIZE button [33]
Press to finalize discs onto which you have
finished recording.
22 REPEAT (repeat playback) button [39]
Press to repeat the playback of a disc or a track.
Rear panel
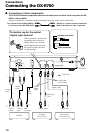
23 ANALOG INPUT (REC)/OUTPUT (PLAY)
terminals [15]
24 z REMOTE CONTROL terminals [15]
25 DIGITAL INPUT 1 OPTICAL/2 COAXIAL
terminals [15]
26 DIGITAL OUTPUT OPTICAL/COAXIAL
terminals [15]
27 Power cord [15]
28 VOLTAGE SELECTOR [4] (Worldwide models only)