


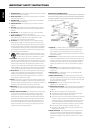
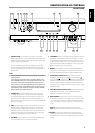


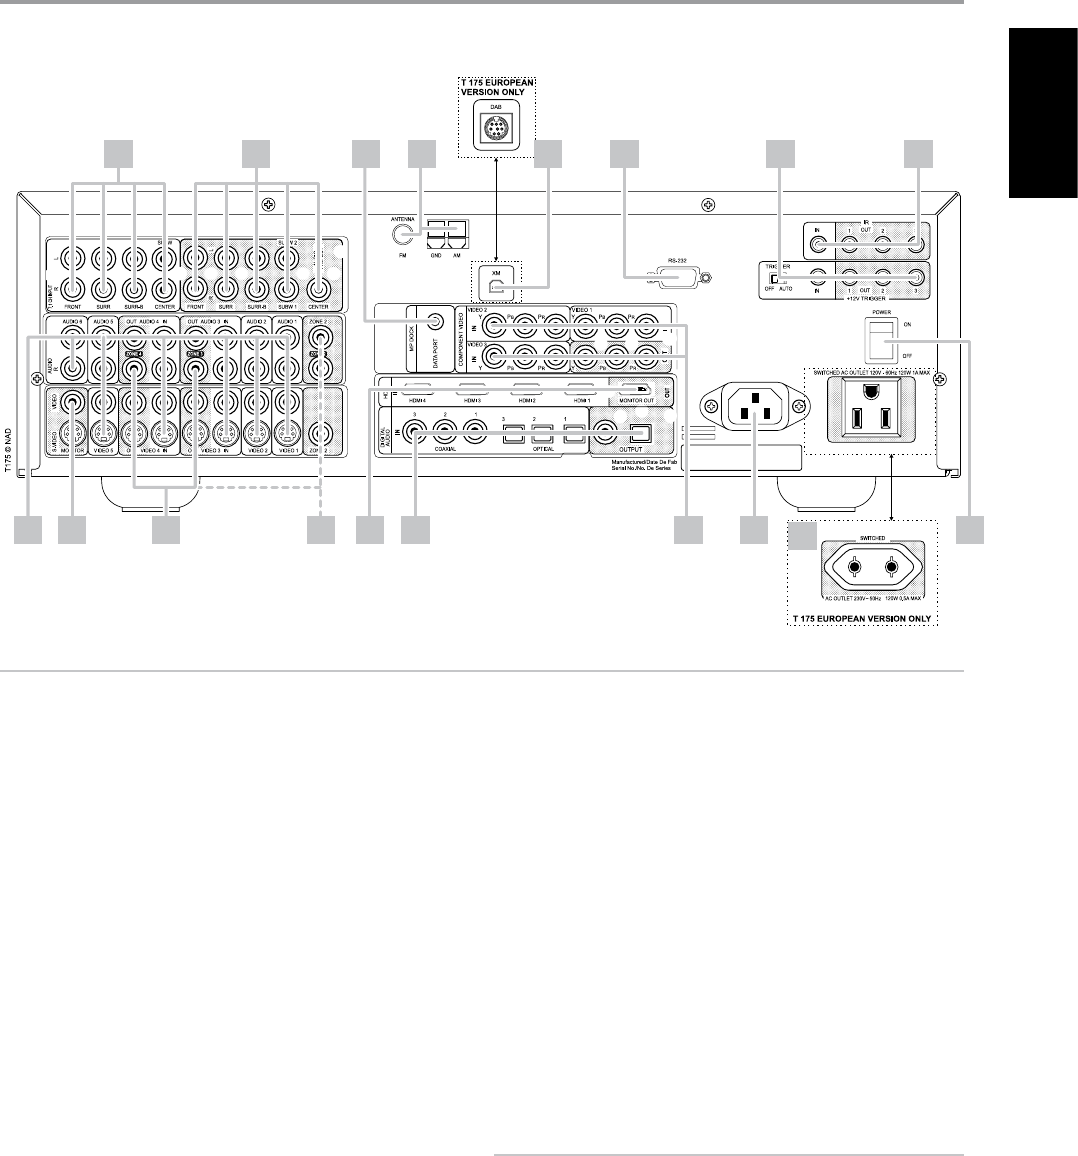
1 7.1 CH INPUT: Connect to the corresponding analog audio outputs
of a multichannel source component such as a DVD-Audio or
multichannel-SACD player or external multichannel decoder (disc copy
protected formats only allow analog signal transfer). Typically, these
sources will produce 5.1-channel output, in which case the Surround
Back jacks are left unconnected. The signals present at these jacks may
be heard by selecting Source 7 (7.1 Channel Input is defaulted to this
Source).
There is no bass-management or other processing (other than master-
volume control) available to this 7.1 Channel Input. While the multi-
channel audio outputs of a DVD-Video player can be connected to
these jacks, using the T 175’s own Dolby Digital and DTS decoding and
digital-analog converters via a digital connection will usually produce
superior results.
2 AUDIO PRE-OUT: The Audio PRE- OUT makes it possible to use the
T 175 as a pre-amplier to external power ampliers for some or all
channels. Connect FRONT L, FRONT R, CENTER, SURR R, SURR L, SURR-
BL, SURR-BR and CENTER to the respective channel input of a power
amplier or an amplier driving the corresponding applicable speakers.
Unlike the full range channels, there is no power amplier built-into the
T 175 for a subwoofer. Connect the SUBW 1 or SUBW 2 output or both
to powered (“active”) subwoofers or to power amplier channels driving
a passive system.
3 MP DOCK: The T 175 is equipped with a data port in the rear panel
where an optional “NAD IPD 1 Dock with iPod” (NAD IPD 1) can be
plugged in. Connect the “MP DOCK (DATA PORT)” jack of the T 175 to
the corresponding “DATA PORT” socket of the optional NAD IPD 1.
4 FM, AM ANTENNA INPUT: The supplied wire “dipole” FM antenna will
connect to the FM connector using the supplied “balun” adapter. It will
usually work best when mounted on a vertical surface such as a wall,
with arms fully outstretched forming a horizontal “T” perpendicular to
the origin point of the signal.
Connect the supplied AM loop antenna to these terminals. If an external
AM antenna is used, make connections to the AM and GND terminals
in accordance with the instructions supplied with the antenna. See also
section about “LISTENING TO RADIO”.
5 XM MODULE INPUT (North America version only): Connect XM
radio cable to this socket. Follow the instructions that came with your
XM radio. With XM radio, there are more than 100 channels of music,
news, sports, comedy, talk and entertainment. You will nd that the
coverage is continent wide. The music quality is digital with many
commercial-free music channels.
NOTES
Questions? Visit www.xmradio.com
Listeners can subscribe by visiting XM on the Web at www.xmradio.com
or by calling (at the time of printing this manual) XM’s Listener Care at
(800) 853 9696. Be ready with your Radio ID that can be found on the
radio by selecting Channel 0.
DAB MODULE INPUT (Europe version only): Plug-in the other end
of the Mini-Din connector from the NAD DAB Adaptor DB 1 module
output port into this socket. The T 175 is compatible only with NAD
DAB Adaptor DB 1 so check with your NAD dealer for this module’s
availability. With DAB, you can receive CD-like quality programs without
any annoying interference and signal distortion.
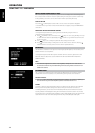
IDENTIFICATION OF CONTROLS
REAR PANEL
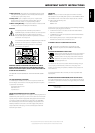
ATTENTION!
Please make sure that the T 175 is powered o or unplugged before making any connections. It is also advisable to power-down or unplug all associated
components while making or breaking any signal or AC power connections.
9
ENGLISHFRANÇAISESPAÑOLITALIANODEUTSCHNEDERLANDSSVENSKAРУССКИЙ
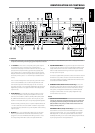
1 2 3 4 6 7 8
9 16
17
5
10 11 12 13 14 15 18