


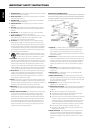
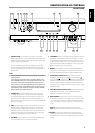

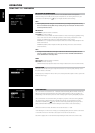

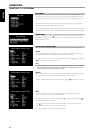

1 POWER BUTTON: Press this button or the HTRC 1 remote’s [ON]
button to switch ON the T 175. The Standby LED indicator will turn from
amber to blue and illuminate the VFD. Pressing the power button again
turns the unit back to standby mode.
The T 175 can also be switched ON from standby mode by pressing
any of the front panel buttons. When both Main and Zones are ON,
press and hold this button for more than ve seconds to place them at
standby mode.
NOTES
• The rear panel POWER switch must be in the ON position for the Power
button to activate.
• If Auto Trigger IN at Trigger Setup menu is assigned to “MAIN” or ‘“ALL”
and the TRIGGER switch is set to “AUTO” mode, the Power button in the
front panel as well as the corresponding ON/OFF function keys in the
HTRC 1 remote control will be disabled eectively handing this function
to an external controller. Switch TRIGGER to “OFF” to maintain normal
power ON/OFF function procedures. (See section also about “TRIGGER
SETUP” under the “SETUP MENU” discussions.
2 STANDBY LED: This indicator will light up amber when the T 175 is
in standby state. When the T 175 main or zones are in the ON state,
this indicator will illuminate blue. In the unlikely event that the T 175
switches to protection state, then this indicator will illuminate red.
When infrared command from the HTRC 1 is received, this indicator will
also ash momentarily.
3 INFO: Repeatedly toggle this button (press/hold rst if in Tuner mode
and then toggle) to display both at the Vacuum Fluorescent Display
(VFD) and On-Screen Display (OSD) the following – Current Source,
Volume level, Listening mode, Audio Source Format, and active Zones
with their corresponding Source Inputs. While at Tuner mode, toggle
this button to cycle through RDS name and RDS text.
4 AM/FM/DB: Toggle this button to select either AM, FM, DAB (Europe
version) or XM (North America version) tuner functions.
5 TUNER MODE: In FM mode, this button will toggle between FM Stereo
and FM mono. Select FM Mono (FM stereo and FM Mute icons at VFD
are extinguished) for stations that have too much interference or are
too weak. In DAB (European version only) or XM (North America version
only) radio, this button enables the digital radio menus in conjunction
with the Navigation button and Enter buttons.
6 MEMORY: Press this button to store tuned AM, FM and digital radio
stations to the T 175’s 40 preset-memory locations. One can store a mix
of any AM, FM and digital radio stations to the 40 available presets.
7 NAVIGATION and ENTER buttons: These buttons are used to
navigate the T 175 OSD, Tune Forward and Tune Backward ,
Preset Forward and Preset Reverse as well as navigation of DAB
(European version), XM (North American version) tuner functions and
iPod. The middle round button is designated as “ENTER” button; this is
normally pressed to complete a selection, procedure, sequence or other
applicable functions.
8 VACUUM FLUORESCENT DISPLAY (VFD): Provide visual information
on all important modes of the T 175 as well as the settings and
functions for both Main and Zone locations.
9 REMOTE SENSOR: Point the HTRC 1 remote control at the remote
sensor and press the buttons. Do not expose the remote sensor of the
T 175 to a strong light source such as direct sunlight or illumination. If
you do so, you may not be able to operate the T 175 with the remote
control.
Distance: About 23ft (7m) from the front of the remote sensor.
Angle: About 30° in each direction of the front of the remote sensor.
10 VOLUME: Use this control to adjust the volume level of the main
speakers. The default volume level is -20dB. The VOLUME knob is also
used to increment/ decrement other adjustable parameters like Tone
Controls.
IDENTIFICATION OF CONTROLS
FRONT PANEL
7
ENGLISHFRANÇAISESPAÑOLITALIANODEUTSCHNEDERLANDSSVENSKAРУССКИЙ
3 4 5 6 7 8 10
161514
1 2
17 18131211
9