


Technical information 26
562 User Guide
For advice on the type of cable we suggest you consult your dealer and
the manual supplied with the source equipment.
Meridian
has a range of suitable digital interconnects available as
accessories. We recommend you do not use cables intended for analogue
connection since these do not usually have the degree of shielding or an
impedance of 75
Ω. Cable intended for UHF applications like antenna
down-lead is also unsuitable since it does not shield adequately in the 1–
30MHz region.
Warning. We strongly recommend the use of well-screened precision
coaxial cable. Certain ‘audiophile' cables are not screened. Screened
cable will minimise RF interaction with your system. Unscreened cables
for digital connections may cause illegal levels of RF interference.
Digital input connection
1. Make digital connections from each of your digital sources to an
appropriate digital input on 562. The digital inputs on 562 are labelled:
• D1 to D5 for the five cable inputs.
These inputs are identical in performance and are assigned in Config.
Digital output connections
1. Make digital connections from each output to the equipment you have
chosen to follow it.
• DIGITAL OUT 1 and DIGITAL OUT 2 for the two cable outputs.
These outputs are functionally different. The second Digital output is
intended for a digital recorder since it follows the Copy source.
Communications connections
Communications connections are only made to other Meridian
equipment.
The following sections describe the major points.
To connect to other Meridian 500 Series equipment
1. Connect one of the COMMS sockets on the rear panel of the 562 to
one of the COMMS sockets on another 500 Series unit, using the 500
Comms lead supplied.
2. Connect all the 500 Series products together in this way to form a
chain (not a loop). The order in which they are connected is not
important.
If the system is to operate in 500 mode, then, configure the units with the
following automatic setup procedure.
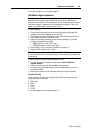
1. Switch all the units to standby.
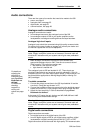
2. Press Clear on the handset.
Each unit will display:
One unit will then be designated as the controller and display:
All the other units will be configured as non-controllers and display:
The system is now set up and ready to use.
For details on
assigning the
digital inputs to
source keys see
page
23
.
Auto
Cont
Ncon