


11
Basic Operations
Basic adjustment of auto memory
This unit memorizes sound settings for each source:
• when you turn off the power,
• when you change the source, and
•
when you change the analogue/digital input mode (see page 13).
When you change the source, the memorized settings for the
newly selected source are automatically recalled.
The followings can be stored for each source:
• Analogue/digital input mode (see page 13)
• Input attenuator mode (see page 20)
• Balance (see page 20)
• Bass boost (see page 21)
• Tone adjustment (see page 21)
• Subwoofer output level (see page 22)
• Surround mode selection (see pages 33 – 37)
Note:
If the source is FM or AM, you can assign a different setting for
each band.
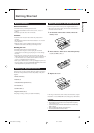
For recording
You can record sounds of any sources playing through the unit to
the VCR or the cassette deck.
While recording, you can listen to the selected sound source at
whatever sound level you like without affecting the sound levels
of the recording.
Note:
Sound adjustments (see page 20) and Surround adjustments (see
pages 32 to 37) cannot affect the recording.
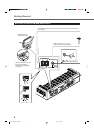
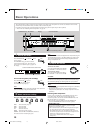
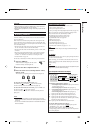
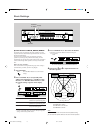
Signal and speaker indicators on the display
The following signal indicators light up —:
L : • When digital input is selected: Lights up when the left
channel signal comes in.
• When analog input is selected: Always lights up.
R : • When digital input is selected: Lights up when the right
channel signal comes in.
• When analog input is selected: Always lights up.
C:Lights up when the center channel signal comes in.
LS : Lights up when the left rear channel signal comes in.
RS : Lights up when the right rear channel signal comes in.
S:Lights up when the monaural rear channel signal or Dolby
Surround encoded signal comes in.
LFE: Lights up when the LFE channel signal comes in.
The speaker indicators light up as follows:
• The subwoofer speaker indicator (
SUBWFR
) lights up when
“SUBWFR” is set to “YES” (see page 15).
• The other speaker indicators light up only when the
corresponding speaker is activated, and also when required for
the current playback.
CAUTION:
Be sure to turn down the volume:
• Before connecting or putting on headphones, as high volume can
damage both the headphones and your hearing.
• Before removing headphones, as high volume may output from the
speakers.
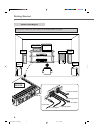
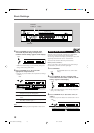
Activating TV Direct
TV Direct enables you to use this unit as an AV selector while the
unit is not turned on.
When TV Direct is activated, the pictures and sounds go from the
video components such as DVD player to the TV through this unit.
In this case, you can use the video components and the TV as if they
were connected directly.
• This function takes effect only when the video components and
TV are connected to this unit with SCART cables.
• This function takes effect for the following sources—DVD, STB,
and VCR.
• This unit can be automatically turned on or off, and/or select the
source automatically when you set the Auto Function mode to
“AUTO1” or “AUTO2.” For details, see “Setting the Auto
Function Mode” on page 19.
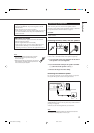
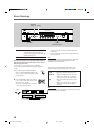
To activate (or deactivate) TV Direct, follow the procedure below:
1
Press TV DIRECT.
All the indications disappear, then the source
indicator currently selected lights red.
2
Turn on the video component and TV.
3
Press one of the source selecting buttons—DVD,
STB, or VCR.
The indicator corresponding to the selected source lights red.
To cancel TV Direct and turn off the unit, press
STANDBY/ON
(or AUDIO on the remote control).
The unit is turned off and the STANDBY lamp lights up.
To cancel TV Direct and turn on the unit, press TV DIRECT on
the unit (or AUDIO
on the remote control).
The unit is turned on and the source indicator currently selected
lights green.
Notes:
• When TV Direct is activated, you cannot enjoy any of the sound
effects this unit produces, and cannot use the speakers connected
to this unit.
• You can use T-V LINK function between TV and VCR while the TV
Direct is activated.
DVD STB VCR
Signal indicators
ANALOG
PL ΙΙ
SUBWFRLFE
AUTO SR
INPUT ATT
DSP HP
LCR
LS S RS
LPCM
DOLBY D
DTS
SUBWFR
LCR
LS RS
LFE
LCR
LS S RS
Speaker indicators
TV DIRECT
EN10-19.RX-E111&112RSL[B]_f 02.1.17, 9:18 AM11