


9
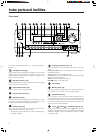
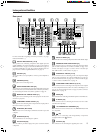
Index parts and facilities
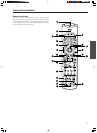
When FM is selected as the input source, you can hold down either
the Tuning
or button and then release it to activate the auto-
search feature. It will search for a station in the direction of the
button you pressed and stop when it tunes into one. When navigating
through the menu settings, these buttons move the cursor up or down
(or change the highlighted item).
To select a radio station that was stored using the Memory button,
press the Preset
/ buttons.
When navigating through the menu settings, these buttons select the
value or item that you selected with the Tuning
/ buttons.
When you press the Setup button, the Tuning and Preset buttons
become cursor buttons to be used for Setup Menu operations.
Rec Out/Zone 2/Off buttons [36-38]
These buttons allow you to use the DTR-7.3 to output to a remote
zone (Zone 2) or to another component for recording (Rec Out).
Press the Rec Out button to output the audio and video signals to a
recording component for recording. Press the Zone 2 button to enjoy
the output from the DTR-7.3 in a different room, which is referred to
as the remote zone (Zone 2).
When either button is pressed, the currently selected input source for
recording or outputting to the remote zone is displayed in the front
panel display. If “SOURCE” is displayed, then the same input
source as that selected for the main zone will be output.
To select an input source, press the desired button (Rec Out or Zone
2) and then press one of the input source button within 8 seconds.
That source will be output for recording or viewing in the remote
zone.
To set the output to the source channel, press the desired button (Rec
Out or Zone 2) twice in succession. To turn off the output, press the
desired button (Rec Out or Zone 2) and then press the Off button
within 8 seconds.
Note:
The Rec Out and Zone 2 buttons use the same circuit and therefore
cannot be used at the same time. When Rec Out is selected, nothing
is output to Zone 2. When Zone 2 is selected, Rec Out is
automatically fixed to SOURCE.
Setup button [40]
Press to enter the Setup Menu. The OSD Menu will appear on the TV
monitor as well as the front display on the DTR-7.3.
Enter button [40]
Press to display the screen for the item that is selected in the Setup
Menu.
Return button [40]
When in the Setup Menu, press to go back one level. If pressed while
at the Main Menu, you will exit the Setup Menu.
Master Volume dial [29]
Use to control the volume in the main zone. The volume for the
remote zone (Zone 2) is independent
Video 5 Input terminals [19]
Protective caps are provided
for the Video 5 jacks. Be
sure to always attach the
protective caps when you
are not connecting a device
to the Video 5 jacks.
Protective caps
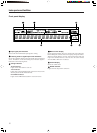
Input source buttons and indicators (DVD, Video
1–5, Tape, Tuner, Phono, CD, and Net Audio) [29,
36-38]
Press these buttons to select the input source for the main zone.
To select the input source for the remote zone (Zone 2) or recording
out (Rec Out), first press the Zone 2 or Rec Out button, and then
press the desired input source button. The input channel with its
indicator lit red is output to REC OUT and the one with its indicator
lit green is output to ZONE 2.
Upsampling indicator [54]
Lights during upsampling. This function is available when the input
source is Analog/PCM and the listening mode is set to the stereo or
surround mode.
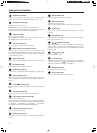
Phones jack [30]
This is a standard stereo jack for connecting stereo headphones.
Pure Audio indicator [31]
Lights during pure audio playback.