


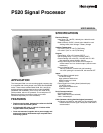


P520 SIGNAL PROCESSOR
66-2066—01 8
change the displayed value. Once the desired value is
displayed, press the STORE button. When the set point is
stored, four dashes are displayed momentarily, indicating that
the new value was stored into the EEPROM. Illogical settings
are not accepted; A display of four “E’s” when the STORE
button is pushed indicates that an error was made when
selecting the set points. For instance, selecting a flame out set
point that is equal to or greater than the flame on set point will
result in this error indication.
The set points can also be selected remotely through the
serial communication port using a host computer.
Additional Set Points
Table 3. Additional Set Points.
Only adjustment information pertinent to the attached viewing
head(s) will be visible to the user; for a UV only viewing head,
no IR GAIN or IR FILTER settings would be shown and for an
IR only viewing head, no UV GAIN setting would be shown.
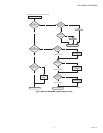
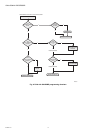
To change or adjust any of the 3 additional setpoints shown in
Table 3, refer to the programming flowcharts towards the back
of this manual. IR gain adjustments are covered in the next
section as well.
IR Gain Adjustment
The adjustable range for IR Gain is 0-699 with a factory
default value of 450. When adjusting IR gain, the user will
notice gain “jumps”. As the gain is increased, the user will
notice the following:
a. 000 – 099 is linear and then it jumps to 150
b. 150 - 199 is linear and then it jumps to 250
c. 250 - 299 is liner and then it jumps to 350
d. 350 - 399 is linear and then it jumps to 450
e. 450 - 499 is liner and then it jumps to 550
f. 550 - 599 is linear and then it jumps to 650
g. 650 - 699 is linear
With each step change or “jump”, the gain is double but values
in between are liner. For example, a setting of 250 doubles the
gain setting of 150. When gain is adjusted to 000, the IR
contribution is zero.
There are 8 high pass filter settings available for most IR
viewing heads (model dependent) as shown below.
1 = 16 HZ
2 = 24 HZ
3 = 33 HZ
4 = 52 HZ
5 = 75 HZ
6 = 100 HZ
7 = 155 HZ
8 = 215 HZ
Flame Failure Response Time (FFRT)
The flame failure response time, or F.F.R.T., is defined as the
time it takes for the flame relay to de-energize after the flame
signal (from the viewing head) is below the programmed
Flame Off setpoint. This time delay is programmable from
both the front panel of the P520 and a remote, host computer.
Only three settings are possible: one, two and three seconds.
The maximum time delay is limited to three seconds in
compliance with the FM (Factory Mutual) limit of the F.F.R.T. to
be less than four seconds.
4-20mA Remote Output
The standard remote meter output has a 0-20mA range and is
designed to drive remote meters, as explained earlier in this
manual. You can convert this output to a 4-20mA range, as
follows:
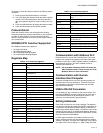
Press the front panel push-buttons (indicated in Table 4) while
holding down both the up arrow and down arrow buttons.
Press all buttons in each row together (i.e., three in the first
row, two in the second row, and three in the last row).
Doing this toggles the function back and forth between the 0-
20mA and 4-20mA ranges.
The change will be verified by four dashes “----” and “4-20”
momentarily displayed. If the signal processor is programmed
for the 4-20mA range, “4-20” will be displayed; toggling back
to the 0-20mA range will again cause four dashes to appear
on power-up of the unit. The factory default setting is 4-20.
The 4-20mA signal from the P520 is powered from the P520
itself. When sending the signal to a remote device (such as a
distributed control system, PLC or burner management
system), the input must be isolated. If there is a ground
potential difference between the two systems, then there
could be noise and performance problems. When using a
remote meter by itself, this will not occur, because it will not be
tied into another electrical system (will not be sharing
grounds).
The bargraph reading on the front panel will not be affected by
this change to 4-20mA output. It will remain the same as
before (i.e., show zero on no signal detected). The 4-20mA
output will still perform the same way on the high end (i.e., on
a strong signal, it will saturate at the same level, slightly above
22mA).
Specifications for the analog current output signal are
provided in the SPECIFICATIONS section.
Set Point Display Number
IR GAIN 3 DIGIT NUMBER 0-699
IR FILTER 1 DIGIT NUMBER 1-8
UV GAIN 2 DIGIT NUMBER 0-99
Table 4. Remote Output Setting.
FLAME
ON
FLAME
OFF
GAIN
SET F.F.R.T.
TIME DELAY
ON
XX X
XX
XX X