


–
8
–
EN
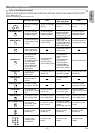
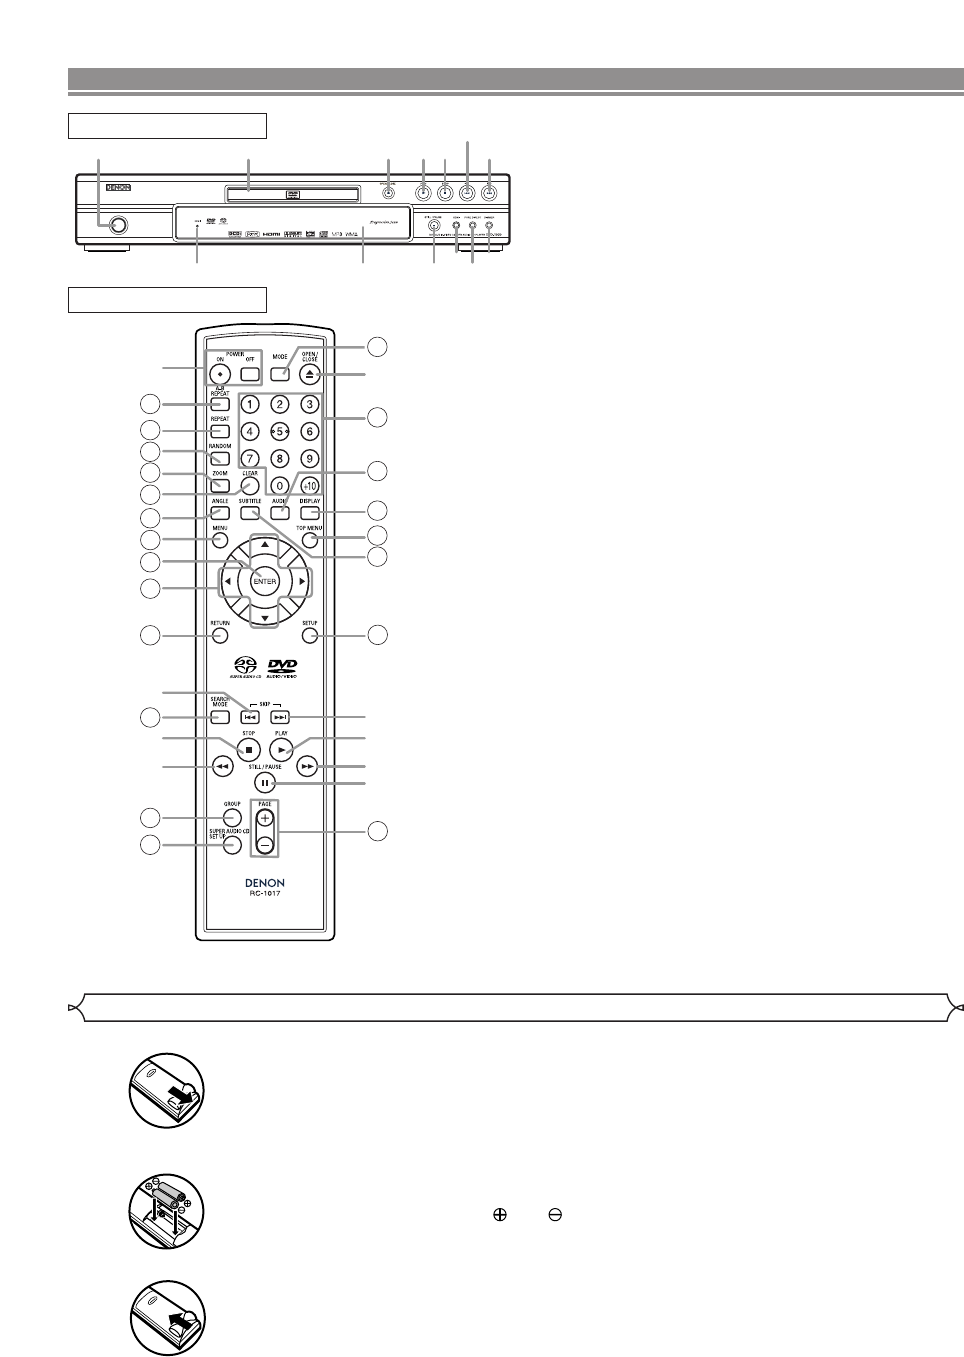
FUNCTIONAL OVERVIEW
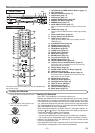
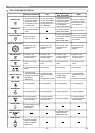
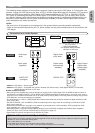
FRONT PANEL
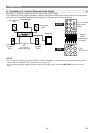
REMOTE CONTROL
The buttons with circled numbers can only be operated with
the remote control.
ON / STANDBYON / STANDBY
1 2 3 4 5
6/25
7/29
1213 11
10
9
8
14
15
16
17
19
20
21
22
24
5
1
36
3
33
34
32
31
30
29
11
28
7
4
35
18
6
23
25
26
27
1. ON/STANDBY (POWER ON/OFF) Buttons [page 17]
2. Disc loading tray
3. OPEN/CLOSE Button [page 17]
4. PLAY Button [page 17]
5. STOP Button [page 17]
6. H (SKIP DOWN) Button [page 20]
7.
G (SKIP UP) Button [page 20]
8. DIMMER Button [page 17]
9. PURE DIRECT Button [page 17]
Press to activate Pure Direct function to reduce noise
level.
10. HDMI Button [page 17]
Press to set the HDMI connector’s video signal output
mode.
11. STILL/PAUSE Button [page 18]
12. Display, Remote Sensor Window
13. HDMI indicator [page 17]
Lights up when there is video signal output from the
HDMI OUT jack.
14. A-B REPEAT Button [page 22]
15. REPEAT Button [page 21]
16. RANDOM Button [page 23]
17. ZOOM Button [page 20]
18. CLEAR Button [page 21]
19. ANGLE Button [page 28]
20.
MENU Button [page 18]
21. ENTER Button [page 18]
22. Cursor Buttons [page 18]
23. RETURN Button [page 18]
24. SEARCH MODE Button [page 20]
25. h (Fast Reverse SEARCH) Button [page 19]
Press more than 2 seconds when you use the front
panel button for this function.
26. GROUP Button [page 18]
27. SUPER AUDIO CD SET UP Button [page 28]
28. PAGE Buttons [page 18]
29. g (Fast Forward SEARCH) Button [page 19]
Press more than 2 seconds when you use the front
panel button for this function.
30. SETUP Button [page 29]
31. SUBTITLE Button [page 27]
32. TOP MENU Button [page 18]
33. DISPLAY Button [page 26]
34. AUDIO Button [page 27]
35. Numeric Buttons [page 17]
36. MODE Button [page 18]
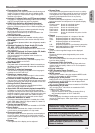
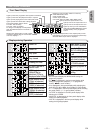
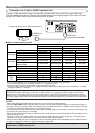
Loading the Batteries
1. Open the battery compartment cover.
2. Insert two “R6P” (AA) batteries, with
each one oriented correctly.
3. Close the cover.
Cautions On Batteries
• Use “R6P” (AA) batteries in this remote control unit.
•
Replace the batteries with new ones approximately once a year, though
this depends on the frequency with which the remote control unit is used.
•
If the remote control unit does not function within a close proximity of the main
unit, replace the batteries with new ones, even if less than a year has passed.
• The included batteries are only for verification purpose. Replace them
with new batteries as soon as possible.
•
When inserting the batteries, be careful to do so in the proper direction, fol-
lowing the and marks in the remote control unit’s battery compartment.
• To prevent damage or battery fluid leakage:
• Do not mix a new battery with an old one.
•
Do not mix two different types of batteries such as alkaline and manganese.
•
Do not short-circuit, disassemble, heat or dispose of batteries in flames.
• Remove the batteries when not planning to use the remote control
unit for a long period of time.
• If the batteries should leak, carefully wipe off the fluid from the inside
of the battery compartment, then insert new batteries.