


18 TASCAM TA-1VP
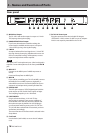
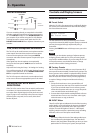
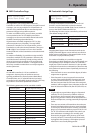
Rear panel
4 – Names and Functions of Parts
# MAIN Line Output
The TA-1VP’s main audio output. It accepts a 1/4-inch
TRS (tip-ring-sleeve) phone plug.
$ DOUBLE TRACK Line Output
If you have selected stereo double tracking, the
second track is available at this output. It accepts a
1/4-inch TRS (tip-ring- sleeve) phone plug.
% LINE IN
Accepts a balanced line level signal on a 1/4-inch TRS
(tip-ring-sleeve) phone plug. Unbalanced sources can
also be connected, but they will be quieter, so extra
input level adjustment will be required.
NOTE
This input is NOT a microphone input. A line level signal is
required. Connect Microphones to the front panel MIC IN
jack.
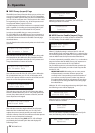
^ MIDI OUT
Connect to the MIDI Input of a MIDI sequencer to
dump.
Preset and Setup Data via MIDI SysEx.
& MIDI IN
If you will be controlling your TA-1VP via MIDI, connect
the MIDI Out from a MIDI sequencer, keyboard, or
other MIDI source here. Connect the MIDI Out from a
sequencer to load previously saved SysEx data files.
* DIGITAL OUT
This RCA jack outputs a S/PDIF digital signal with the
main output on Left, Double Track output on Right.
The Sampling Frequency is 44.1 kHz fixed.
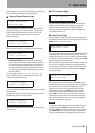
( FOOT SWITCH
Plug in a footswitch here. A 1/4-inch TS (tip-
sleeve) plug is required. There are two varieties of
footswitches: those that are shorted by default and
those that are open by default. You should plug in
your footswitch and then power on the TA-1VP. The
TA-1VP will detect which kind of footswitch you have
and behave accordingly.
The actual function of the footswitch is selected in the
Setup Menu.
) Cord hook
Use the hook (cord holder) to secure the AC adaptor
cord.
Q DC IN 12V Power Input
Plug the connector from the included AC adaptor
(TASCAM PS-1225L) in here. Do NOT use an AC adaptor
which is not expressly intended for the TA-1VP.