


User's Manual
29
CHAPTER 3
MACRO
The macro mode allows you to set
up certain buttons to transmit up to 20
commands in sequence. For ex am ple,
a single button press could turn on all
of your home theater equipment, and
set the TGP-5 to DVD, set the TV to
channel 3, and set the DVD to play,
make the tea and put the cat out.
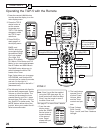
The buttons which can be pro-
grammed as macros are: M1, M2 and
M3 at the bottom of the remote, and
Power and System at the top. The
ten device buttons can also be pro-
grammed as macros, although these
will only be activated if the device but-
ton is held down for a few seconds.
Note that the macro buttons are in-
dependent of which device the remote
is set for. So there is only one M1
macro, only one power macro etc.
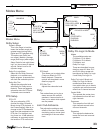
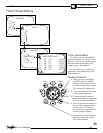
1. In the SETUP mode, press
MAC RO.
2. Press one of the buttons you wish
to program as a macro, such as
M3, Power, or a device button.
3. Press up to 20 buttons you would
like the macro to store. Do this in
the exact order you want them to
be trans mit ted. Use the PAGE,
FAV and the direct buttons to fi nd
buttons to use in the macro.
4. To add a delay between steps, you
can add 0.2 seconds each time
you press PAUSE (
II
). This does
not take up a step.
5. Press the Chan nel UP button to
save your macro.
6. Repeat this procedure to program
more macros, and press MAIN to
return to the main menu.
7. Try out the macros to see if they
work OK. It may take some time
to transmit all the commands in
se quence, so keep the remote
pointing at your equipment and do
not move it during this time.
Note that the remote's Zone 2,
Page 2 has discrete on and off codes
for the Main Zone and Zone 2. You
can use these within Macros instead
of the main power button commands
(which toggle on/off).
RECAL (Recall)
This mode lets you quickly see the
three digit codes you have assigned
to each device. This is useful if you
want to check the tables and fi nd
other codes which may work better.
1. In the SETUP mode, select RE-
CAL. The device labels and their
codes will fl ash alternately, before
returning to the SETUP menu.
Make a note of the codes.
2. Press MAIN to return to the main
device menu.
EDIT
This mode allows you to change the
labels in the display to suit your sys-
tem. You can change device labels, or
the buttons on page 1 or page 2 of a
device, or the FAV labels.
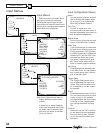
1. In the SETUP menu, press EDIT.
2. To edit a device label, press PAGE
and then the device button. Go to
step 5.
3. To edit a button on a device’s page
1 or 2, press the device button and
its page 1 will appear. Press PAGE
to reach page 2 if re quired. Go to
step 5.
4. To edit a FAV button, press FAV
and select the button you want
from the fi ve pages. Use PAGE or
FAV to change pages to fi nd the
one you want. Go to step 5.
5. Press the button you want to edit
and the fi rst character will fl ash.
6. Use the keypad to enter up to 5
characters. This is like using a
telephone keypad to enter letters.
For ex am ple, if you press 1 a few
times, it will step through A, B, C,
1. Press 2 for D, E, F and 2. The
number 0 has a se lec tion of spe-
cial char ac ters to choose from.
7. Press the joystick right to move on
to the next character, or press it
down to delete a char ac ter.
8. When fi nished, press the button
next to the label you just edited.
You can edit other but tons, or
press MAIN a few times to return
to the main menu.
CLONE
This feature allows you to easily
copy all of the commands and labels
from one Sunfi re remote (of the same
type) to another.
1. Set both remotes on a fl at surface,
with their IR windows pointing
towards each other, about 1 or 2
inches apart.
2. In the SETUP menu for both
remotes, press CLONE and the
display will change to show SEND,
RCV (receive) and EXIT.
3. Press SEND on the remote you
want to copy from. Press DEVIC
to only clone a single device, then
press the device button. Press ALL
to clone all programming.
4. Press RCV on the remote you
want to copy to.
5. When you are ready, press START
on both remotes. It may take up
to 40 seconds, so do not move
the remotes during this time. The
remote will fl ash “GOOD” if it has
successfully learned all the com-
mands. If it fl ashes “FAIL,” then
repeat this procedure.
6. Press MAIN to return to the main
menu.
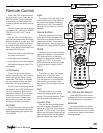
Remote Setup continued