


User's Manual
28
CHAPTER 3
PUNCH
This mode allows you to set up the
volume, channel up/down and trans-
port buttons so they will work for your
main de vic es, no matter which device
the remote is set for. For ex am ple, the
volume buttons can operate the TV,
even if the remote is set to VCR. The
channel buttons can operate the VCR,
even if the remote is set to TV.
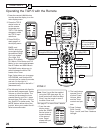
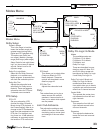
1. In SETUP, select PUNCH and the
display chang es to show VOL, CH,
and PLAY. The PLAY selection will
make the eight transport buttons
around the joystick punch through.
2. Select one of these buttons, for
example VOL.
3. Press a device button for the
device you want the Volume com-
mands to appear in (punch TO).
4. Press a device button for the de-
vice you want to learn from (punch
FROM). These settings are saved.
5. Repeat steps 2 to 4 until you have
punched to all devices you want.
6. Use MAIN to return to SETUP.
NOTE: To erase Punch commands
from a device (return buttons
to their previous programming):
Repeat steps 1 and 2, then press
the device button twice. Repeat for
other devices, then press MAIN to
return to SETUP.
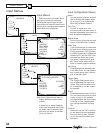
ERASE
Use this mode to erase commands
stored in the remote. This does not
affect the labels, just the stored IR
commands. The pre-pro grammed
com mands for the TGP-5 will not be
lost, as they can be recalled.
1. In the SETUP mode, select
ERASE and the display will show
LEARN, FAV, MACRO and EXIT.
2. If you select LEARN, press ALL to
erase all learned but tons, or KEY
to erase one device at a time. If
you use KEY, press MAIN and
EXIT when you have erased all the
devices you want.
3. If you select FAV, press ALL to
erase all favorites, or KEY to erase
single fa vor ites. Note that the
labels are not erased.
4. If you select MACRO, press ALL to
erase all macros, or KEY to erase
macros, one device at a time.
5. Press EXIT to return to the SETUP
menu, and press MAIN to return to
the main device menu.
LIGHT
This mode allows you to either dis-
able the light, or change the number
of sec onds it stays on. (The light is
inactive while in the SETUP mode).
1. In the SETUP menu, select LIGHT
and the display will show ON, time
in seconds, SAVE and EXIT.
2. If you press ON, it changes to OFF
and disables the light. This is use-
ful if you want to save battery life,
or if the kids like to use the remote
as a fl ash light or Light Saber
®
.
3. Use the keypad to enter the num-
ber of seconds you want the light
to stay on. If you enter 00, it only
stays on while the light button is
held down.
4. Select SAVE, or press EXIT to
make no change. Either of these
will return you to the SETUP menu.
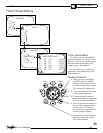
LEARN
The remote can learn commands
from other remote controls. This is
useful if the pre-pro grammed com-
mands do not operate some of your
equip ment, or certain buttons do not
work, or you want to customize key
functions.
NOTE: PAGE, MAIN, FAV, M1, M2
and M3 cannot be learned over.
1. Find your original remote and
make sure it has good batteries,
and it operates your equip ment
per fect ly. In the following example,
the Sunfi re remote will learn the
PLAY com mand from a DVD re-
mote.
2. Point the DVD remote into the Red
IR top window of the Sunfi re re-
mote. Place them on a fl at surface,
about 1 to 2 inches apart, and
avoid bright lighting or sunlight.
3. In the SETUP mode, press
LEARN.
4. Select the DVD device button and
the display will change to show
some common DVD labels (re-
mem ber there are two pages).
5. Select the PLAY button just above
the joystick pad. The display will
show “READY.”
6. Press your DVD remote’s PLAY
button. The display will show
“GOOD” if it has been accepted. If
it shows “FAIL,” press PLAY again.
7. Press another button on the
Sunfi re remote and repeat the
pro ce dure until all the DVD buttons
you need are learned.
8. Press MAIN once to return to the
LEARN mode, twice for SETUP
and three times for the MAIN
menu.
9. Try out the Sunfi re remote and see
if the learned buttons will suc cess -
ful ly operate your equipment. You
may fi nd that some commands
cannot be learned, because some
are non-conventional, or too long
or too short.
10. The EDIT command can be used
to change the labels if some of the
standard labels do not correspond
to your original remote buttons.
continued..
Remote Setup continued