


7
Getting Started
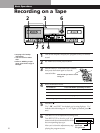
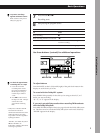
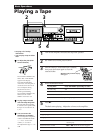
Basic Operations
Hookups
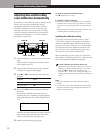
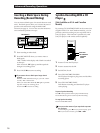
Be sure to match the color-coded cord to the
appropriate jacks on the components: Red (right) to
Red and White (left) to White. Be sure to make
connections firmly to avoid hum and noise.
Connect the tape deck to the amplifier as shown below.
Unpacking
Check that you received the following items:
• Audio connecting cords (2)
• Remote commander (remote) RM-J903 (1)*
• Sony size AA (R6) batteries (2)*
* not supplied with the U.S.A. and Canadian models
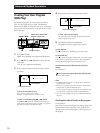
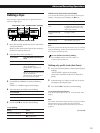
Inserting batteries into the remote
Insert two size-AA (R6) batteries, matching the + and –
on the batteries with the markings inside the battery
compartment. When using the remote, point it at the
remote control sensor g on the tape deck.
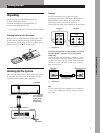
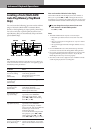
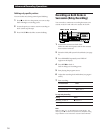
Hooking Up the System
This section describes how to hook up the tape deck to
an amplifier. Be sure to turn off the power of each
component before making the connections.
TC-WA9ES
to a
wall outlet
to an AC outlet
(or a switched
outlet on the
amplifier for
using a timer)
to REC OUT
Amplifier
to LINE OUT
to LINE IN
to TAPE IN
ç: Signal flow
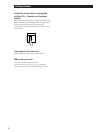
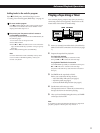
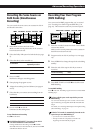
Connecting the tape deck to a Sony amplifier or a receiver
through CONTROL S connectors (U.S.A. and Canadian
models only)
Connect the components through the CONTROL S connectors
using a CONTROL S cable (not supplied). When using this
connection, the deck accepts only remote commands from the
amplifier or receiver. The remote control sensor on the tape
deck will not function.
CONTROL S
IN
CONTROL S
OUT
Tape deck Amplifier/receiver
CONTROL S cable
(not supplied)
ç: Signal flow
Note
For more information on the availability of Sony amplifier or
receiver with a CONTROL S connector, contact your nearest
Sony dealer.
Ç
Ç
ç
REC OUT IN
LINE
OUTIN
L
R
TAPE
L
R
L
R
L
R
Tape deck Amplifier