


Advanced Recording Operations
13
Dubbing a Tape
You can copy a tape in deck A to a tape in deck B at
normal or high speed.
Additional tasks during normal-speed dubbing
You can make the following tasks only during normal-speed
dubbing. During high-speed dubbing, only p works.
1 Insert the recorded cassette into deck A and a blank
cassette into deck B.
Make sure the record-protect tabs on the cassette in
deck B have not been removed.
2 Select the side(s) to be recorded on.
To record on Press DIR MODE repeatedly to
select
One side A
Both sides a. Recording on the reverse
side on deck B starts
independently of playback on
deck A.
RELAY. Recording on the reverse
side on deck B starts
simultaneously with playback of
the reverse side on deck A.
3 Press HIGH or NORMAL to select the dubbing
speed.
“HIGH” or “NORM” appears in the display.
4 Select the side from which to start dubbing.
(
9
Press
The front side
The reverse side
To record from
5 Press PAUSE P on deck B to start dubbing.
To stop dubbing
Normal-speed dubbing
High-speed dubbing
p on deck B
p on either deck
During
Press
To
Adjust the dubbing
level
Do the following:
Adjust the pitch
Select the Dolby NR
system
Skip over blank spaces
on the original
Turn DUBBING LEVEL.
To dub at the same level as the
original, turn the control to the
center-click position.
See page 6.
See pages 5 and 6.
Press BLANK SKIP before you
start dubbing (see page 9).
Note
If a TV set is placed near the tape deck, noise may occur during
high-speed dubbing. In that case, turn the television set off or
move it away from the tape deck.
You can add fade-in/out during dubbing
Turn DUBBING LEVEL clockwise to fade in, or
counterclockwise to fade out.
Dubbing only specific tracks (Auto Pause)
1 Press AUTO PAUSE before or during normal-speed
dubbing.
“AUTO PAUSE” appears in the display.
At the end of each track, both deck A and deck B
pauses.
2 Locate the track you want to record next on deck A
(see page 9), then stop the tape.
3 Press PAUSE P on deck B to resume dubbing.
To cancel the Auto Pause function
Press AUTO PAUSE again to turn off “AUTO PAUSE” in the
display.
Note
Do not turn on the Pitch Control function (see page 6) or Blank
Skip Function (see page 9) while using the Auto Pause
function. If you do, the Auto Pause function may not work
properly.
(Continued)
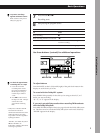
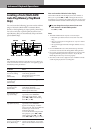
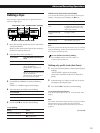
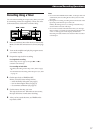
HIGH DUBBING LEVELAUTO PAUSE
NORMALDIR MODE
PAUSE P
9/(
9/(p
9(
PHONE LEVEL
A -AUTO CAL-B
POWER
0
(AMS)
p
)
(AMS)
PRr
- RMS +
CLEAR BACK FRONT
PAUSE
§
OPEN/
CLOSE
RESET
PITCH CONTROL
SYNCHRO DUBBING A B
START P
MEMORY
COUNTER BA
RESET MEMORY
REC LEVEL
REC MUTE REC
ON/OFF
MPX FILTER
TIMER
OFF
REC PLAY
DIR MODE
p
PRr
PAUSE REC MUTE REC
DUBBING LEVEL
BALANCE
PHONES
4
7
1
BLANK SKIP
A -DOLBY NR-B
5
8
2
AUTO PAUSE
RMS / START DISPLAY
RMS
CHECK SET
6
9
A+B REC
10
HIGH
>10
NORMAL
+–
– +
3
§
OPEN/
CLOSE
START (DECK B P)
5
46
37
28
19
100
MAXMIN R
L
0
(AMS)
)
(AMS)
9(