


4
Basic Operations
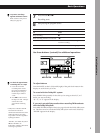
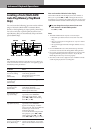
L
R
–
∞
dB
+
2
–
4
a
0
+
8
+
6
+4
–
10
–
20
–
30
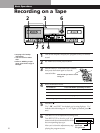
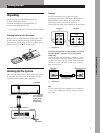
• See page 7 for hookup
information.
• You can record on either
deck.
• Refer to "Dubbing a Tape"
(page 13) to make a copy of
the tape.
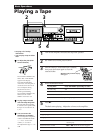
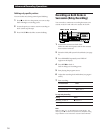
1
Turn on the amplifier and play the program source you want to
record.
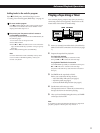
2
Set TIMER to OFF and press POWER.
3
Press § OPEN/CLOSE and insert a cassette,
then press the button again to close the
cassette holder.
4
Select the direction mode.
Recording on a Tape
Basic Operations
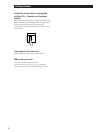
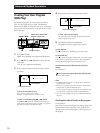
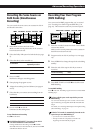
To record on
Only one side
Press DIR MODE repeatedly to select
Both sides*
A
a
RELAY (see page 14)
* Recording stops when the tape reaches the end of reverse side.
5
Press REC r.
”·”, “P”, and “REC” for the deck you’re using light up. “·”
indicates the side facing you. If “ª” lights up instead, press (
once.
6
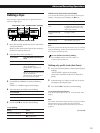
Turn REC LEVEL to adjust the recording level.
Turn REC LEVEL so that the peak level
meters reach the recommended level for
the corresponding tape type.
After you’ve done the adjustments, stop
playing the program source.
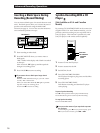
Both decks in succession
For type I or
type II tape
For type IV tape
2 3
5
47
6
PHONE LEVEL
A -AUTO CAL-B
POWER
0
(AMS)
p
9
(
9
(
)
(AMS)
PRr
- RMS +
CLEAR BACK FRONT
PAUSE
§
OPEN/
CLOSE
RESET
PITCH CONTROL
SYNCHRO DUBBING A B
START P
MEMORY
COUNTER BA
RESET MEMORY
REC LEVEL
REC MUTE REC
ON/OFF
MPX FILTER
TIMER
OFF
REC PLAY
DIR MODE
p
PRr
PAUSE REC MUTE REC
DUBBING LEVEL
BALANCE
PHONES
4
7
1
BLANK SKIP
A -DOLBY NR-B
5
8
2
AUTO PAUSE
RMS / START DISPLAY
RMS
CHECK SET
6
9
A+B REC
10
HIGH
>10
NORMAL
+–
– +
3
§
OPEN/
CLOSE
START (DECK B P)
5
46
37
28
19
100
MAXMIN R
L
0
(AMS)
)
(AMS)
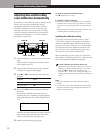
With the side you want to record
facing you.