


19
Additional Information
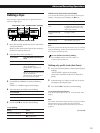
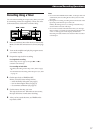
POWER
§ OPEN/CLOSE
PHONE LEVEL
A -AUTO CAL-B
POWER
0
(AMS)
p
)
(AMS)
PRr
- RMS +
CLEAR BACK FRONT
PAUSE
§
OPEN/
CLOSE
RESET
PITCH CONTROL
SYNCHRO DUBBING AB
START P
MEMORY
COUNTER BA
RESET MEMORY
REC LEVEL
REC MUTE REC
ON/OFF
MPX FILTER
TIMER
OFF
REC PLAY
DIR MODE
p
PRr
PAUSE REC MUTE REC
DUBBING LEVEL
BALANCE
PHONES
4
7
1
BLANK SKIP
A -DOLBY NR-B
5
8
2
AUTO PAUSE
RMS / STARTDISPLAY
RMS
CHECK SET
6
9
A+B REC
10
HIGH
>10
NORMAL
+–
– +
3
§
OPEN/
CLOSE
START (DECK B P)
5
46
37
28
19
100
MAXMIN R
L
0
(AMS)
)
(AMS)
9( 9(
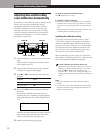
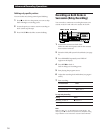
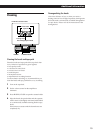
Cleaning
Cleaning the heads and tape path
Clean the heads and tape path of the tape deck after
every 10 hours of operation to guard against:
• low-quality sound
• a decrease in sound level
• excessive wow or flutter
• sound dropout
• incomplete erasure
• impairment of recording function
To ensure better recording, we recommend that you
clean the heads and tape path before every recording.
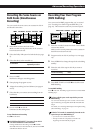
1 Turn on the tape deck.
2 Set the volume control on the amplifier to
minimum.
3 Press § OPEN/CLOSE to open the cassette holder.
4 Wipe the heads, the pinch rollers and the capstans
with a cotton swab slightly moistened with alcohol
or a commercially available cleaning fluid for tape
decks.
Do not insert a cassette until the cleaned areas are
completely dry.
Demagnetizing the heads
After 20 to 30 hours of use, or when you notice a
hissing sound or loss of high frequencies, demagnetize
the heads with a commercially available demagnetizer
for tape decks. Please refer to the instructions of the
demagnetizer.
Pinch rollers
Capstans
Erasing head
Recording/playback head
Inside the cassette holder