8
GB
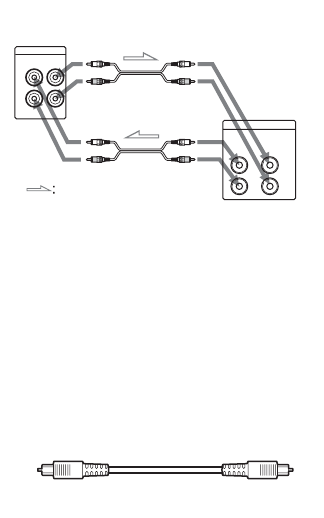
2 Connect the deck to an amplifier.
Connect the amplifier to the ANALOG IN/
OUT jacks using the audio connecting
cords (supplied), making sure to match the
color-coded cords to the appropriate jacks
on the components: red (right) to red and
white (left) to white. Be sure to make
connections firmly to prevent hum and
noise.
Connecting the deck to a digital
component such as a digital amplifier,
CD player, or an MD deck
Connect the digital component (digital
amplifier, CD player, MD deck or DAT
deck, etc.) to the DIGITAL OPTICAL IN/
OUT connectors on the deck with an optical
cable (not supplied).
Be sure to insert the plug until it clicks into
place.
Tips
• If “Din Unlock” and “C71” alternate in the display,
the optical cable is not connected properly. Check
that the connections are secure.
• A built-in sampling rate converter automatically
converts the sampling frequency of various digital
sources to the 44.1 kHz sampling rate of this deck.
This allows you to record source such as 32- and 48-
kHz DAT or satellite broadcasts, as well as compact
discs and MDs.
3 Connect the power cord to a wall
outlet.
4 Turn on the amplifier and set the
source selector to the position for this
deck.
5 To turn on the deck, press ?/1.
The STANDBY indicator turns off.
ANALOG
IN
L
R
OUT
TAPE/MD
L
R
IN
OUT
Signal flow
MXD-D400
Amplifier


