


71
Erasing tracks, the entire disc
or groups (Erase)
Erasing tracks
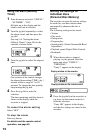
1 While playing the track you want to
erase, enter the menu and select
“EDIT” - “Erase” - “ : Erase”.
“Erase OK?” and “PushENTER”
appear in the display.
2 Press the jog lever to erase a track.
To erase the whole disc
1 Play the disc you want to erase to
check the contents.
2 Press x to stop.
3 Enter the menu and select “EDIT” -
“Erase” - “ : Erase”.
“AllErase?” and “PushENTER”
appear in the display.
4 Press the jog lever to erase the whole
disc.
For details and the recorder
operation, see page 48.
To erase a group
1 Select a group you want to erase and
check the contents (see “To cue to the
start of a group (Group Skip)”
(page 51)).
2 Press x to stop.
3 Enter the menu and select “EDIT” -
“Erase” - “ : Erase”.
“GP Erase?” and “PushENTER”
appear in the display.
4 Press the jog lever to erase a group.
For details and the recorder
operation, see page 56.
Assigning tracks or groups as
a new group (Group Setting)
1 Enter the menu and select “EDIT” -
“: Set”.
2 Slide the jog lever repeatedly until the
number of the desired first track
appears in the display, and then press
the jog lever.
3 Slide the jog lever repeatedly until the
number of the desired last track
appears in the display, and then press
the jog lever.
4 Label a group (see “Labeling
recorded groups” (page 70)).
For details and the recorder
operation, see page 53.
Releasing a group setting
1 Select a group that you want to
release and check the contents (see
“To cue to the start of a group (Group
Skip)” (page 51)).
2 Press x.
3 Enter the menu and select - “EDIT” -
“ : Release”.
“Release?” and “PushENTER”
appear in the display.
4 Press the jog lever to enter the
selection.
For details and the recorder
operation, see page 54.