


1-10
DFS-700/700P
Chapter 2 Location and Function of
Parts and Controls
2-8
Chapter 2 Location and Function of Parts and Controls
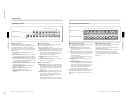
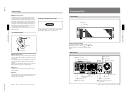
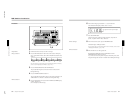
MASK button: Press this button to mask off a part
of the key source signal. When you press this
button, it lights, and the system is now in mask
mode, and you can select a rectangular mask in
the effect control section. Normally, the area
outside the mask rectangle is the area which is
masked. To invert the mask, so that the area inside
the rectangle is masked, set INVERT (F5) to ON
in the effect control section.
Press the button once more to turn it off and end
mask mode.
2 DSK (downstream keyer) section
Using a downstream key, you can add characters or
graphics to an image to which an effect has already
been applied. Unlike a title key, you can add this to an
image with a foreground and background
superimposed. To insert a downstream key, press the
DSK button in the fade-to-black and DSK section.
LUM (luminance) button: Press this to display a
menu in the effect control section for adding a key
based on the luminance level of an input signal. In
the effect control section you can select the input
signal to the DSK KEY IN connector on the rear
panel or the input signal selected by the DSK
FILL button in the delegation section as the key
source signal.
BORDER button: Press this button to apply a border
to the characters and graphics inserted as a
downstream key. When you press this button, it
lights, and you can adjust the border settings in the
effect control section.
Press the button once more to turn it off, and
remove the border.
MASK button: Press this button to mask unwanted
parts of the characters and graphics inserted as a
downstream key. When you press this button, it
lights, and the system is now in mask mode, and
you can select a rectangular mask in the effect
control section. Normally, the area outside the
mask rectangle is the area which is masked. To
invert the mask, so that the area inside the
rectangle is masked, set INVERT (F5) to ON in
the effect control section.
Press the button once more to turn it off and end
mask mode.
3 EDGE section
This controls the edge effects applied to the boundary
between the foreground and background images.
TRAIL SHADOW button: Press this button to
apply a trail, drop border, or shadow effect. When
you press this button, it lights, and you can select
and adjust the effect in the effect control section.
•Trail: The foreground pattern leaves a trail of
afterimages.
•Drop border: This applies a border in the
background of the foreground image.
•Shadow: This applies a shadow behind the
foreground image.
Press the button once more to turn it off and
remove the edge effect.
BEVELD (beveled) EDGE button: Press this button
to apply a three-dimensional beveled effect to the
boundary between the foreground and background
images. When you press this button, it lights, and
you can adjust the beveled edge settings in the
effect control section.
Press the button once more to turn it off and
remove the beveled edge effect.
SOFT button: Press this button to soften the
boundary between the foreground and background
images. When you press this button, it lights, and
you can adjust the degree of softness in the effect
control section.
Press the button once more to turn it off and
remove the soft edge effect.
BORDER button: Press this button to apply a border
to the boundary between the foreground and
background images. When you press this button, it
lights, and you can adjust the border settings in the
effect control section.
Press the button once more to turn it off and
remove the border.
Adjusting the cropping: To adjust the cropping, use
the second page (CROP) of the adjustment menu
for beveled edge, soft edge, or border.
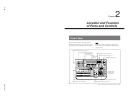
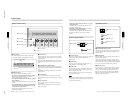
Control Panel
Chapter 2 Location and Function of
Parts and Controls
Chapter 2 Location and Function of Parts and Controls
2-9
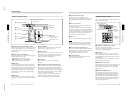
4 CCR, LIGHTING, and MATTES buttons
CCR (color corrector) button: Press this button to
use the color corrector. When you press this
button, it lights, and you can adjust the color
corrector settings in the effect control section.
Press the button once more to turn it off and exit
the color corrector.
LIGHTING button: Press this button to apply
lighting effects to the foreground image. When
you press this button, it lights, and you can adjust
the lighting settings in the effect control section.
Press the button once more to turn it off and
remove the lighting effect.
MATTES button: By pressing this button, you can
carry out various matte adjustments, matte copies,
and internal video signal selections in the effect
control section.
5 SHIFT button
When a button in the menu control section is lit, but
the corresponding menu is not displayed in the effect
control section, hold down the SHIFT button and press
the lit button. This brings up the menu, without
interrupting the function selection, and leaving the
button lit.
This applies to the following buttons:
•MASK buttons in the TITLE section
•BORDER and MASK buttons in the DSK section
•TRAIL SHADOW, BEVELD EDGE, SOFT, and
BORDER buttons in the EDGE section
•CCR button and LIGHTING button
6 SET UP button
To access the setup menus for system and control
panel settings, press this button. The setup menu
appears in the effect control section.