


1-9
DFS-700/700P
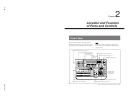
Chapter 2 Location and Function of
Parts and Controls
2-6
Chapter 2 Location and Function of Parts and Controls
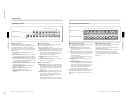
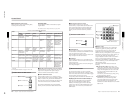
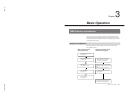
5 PATTERN/KEY PAD buttons
These function as shown in the following table,
according to the selected mode.
Changing labels
You can change the labels on the buttons, using the
supplied labels.
For details of how to change the labels, see page A-63.
Button
Mode
DIRECT
PATTERN
PATTERN
TRANS USER PGM
SNAP SHOT
DIRECT RECALL
0 to 9 Select the
pattern shown
on the button.
a)
Set the pattern
number.
Set the
transition time.
–
Specify a
snapshot
number.
Recall one of
snapshots 0 to 9.
LAST X/INS –
–
– Add a key
frame.
Return to the
state before
recalling a
snapshot.
(Press LAST X
while holding
down the
ENTER button.)
Return to the state
before recalling a
snapshot. (Press
LAST X while
holding down the
ENTER button.)
DEL –
Delete the last
character
entered.
Delete the last
character
entered.
Delete a key
frame.
Delete the last
character
entered.
–
P IN P/RST
Select the
pattern shown
on the button.
a)
Reset the input
value.
Reset the input
value.
Initialize the
parameters.
Reset the input
value.
–
UP Increment the
pattern number.
Increment the
pattern number.
Increment the
transition time
by one frame.
Increment the
key frame
number.
Increment the
snapshot
number.
Increment the
snapshot number.
DOWN Decrement the
pattern number.
Decrement the
pattern number.
Decrement the
transition time
by one frame.
Decrement the
key frame
number.
Decrement the
snapshot
number.
Decrement the
snapshot number.
ENTER – Confirm the
input value.
Confirm the
input value.
Change the key
frame.
Confirm the
input value.
–: Not used
a) For the pattern allocation, see pages 3-18 to 3-20.
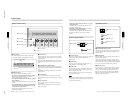
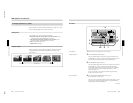
5 Fade-to-black and DSK section
FADE
TO
BLACK
DSK
DSK PVW
1 DSK PVW button
2 FADE TO BLACK button
1 DSK PVW (downstream keyer preview) button
When this button is pressed, turning it on, the program
output video is output from the preview output
connectors with the downstream key inserted.
2 FADE TO BLACK button
Press this button, turning it on, to change the entire
program output video to a preset color (factory default:
black). To set the color, press the MATTES button in
the menu control section, and display the setting menu
in the effect control section ((F1) SELECT-FTB).
By pressing the SET button in the effect transition
section, you can set the fade-to-black transition time.
Control Panel
Functions of the PATTERN/KEY PAD buttons
Return to the state
before recalling a
snapshot. (Press
LAST X while
holding down the
ENTER button.)
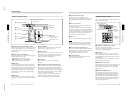
3 DSK button
Chapter 2 Location and Function of
Parts and Controls
Chapter 2 Location and Function of Parts and Controls
2-7
3 DSK (downstream keyer) button
Press this button, turning it on, to insert the
downstream key set by the DSK section buttons in the
menu control section into the program output video.
By pressing the SET button in the effect transition
section, you can set the downstream key transition
time.
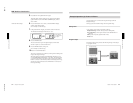
6 EDITOR and GPI buttons
1 EDITOR button
Press this button, turning it on, to accept control from
an external editor connected to the EDITOR connector
on the rear panel of the processor unit.
Press this button once again to turn it off; control is no
longer accepted from the external editor.
2 GPI button
Press this button, turning it on, to accept GPI signals
input to the GPI/T 1 and 2 connectors on the rear panel
of the processor unit.
Press this button once again to turn it off; GPI signals
are no longer accepted.
7 Menu control section
For various effect settings, you press a particular
button in the menu control section, to display a setting
menu in the effect control section. Some buttons toggle
on and off when pressed: in this case the
corresponding effect is disabled when the button is off.
Displaying the menu for a button already lit
Hold down the SHIFT button and press the button
again. This leaves the button lit (and the effect
enabled), while bringing up the menu in the effect
control section. For the LUM and CRK buttons in the
TITLE section, it is not necessary to hold down the
SHIFT button.
EDITOR
GPI
2 GPI button
1 EDITOR button
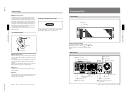
1 TITLE section
The title key function allows you to superimpose
characters or graphics by cutting out part of the
foreground video with a key source signal, and
applying the effect to the background video.
There are two ways of using the key source signal: as a
luminance key depending only on image intensity, or
as a chroma key, based on a particular color.
Using the buttons in columns 1 and 2 of the TITLE
section, you can insert two title keys (TITLE 2
requires the optional BKDF-711 board to be installed).
To insert a title key, press the TITLE button in the
effect transition section.
The TITLE 1 and TITLE 2 buttons include the
following.
CRK (chroma key) button: Press this to use a
chroma key to cut out the image. When pressed,
this button lights, and portions of the foreground
image of the designated color are cut out as the
key source signal. When this button is lit, the
LUM button is off.
You can carry out chroma keying simply, using
the auto chroma key function.
LUM (luminance) button: Press this to use a
luminance key to cut out the image. When
pressed, this button lights, and portions of the
foreground image are cut out based on the
luminance level. When this button is lit, the CRK
button is off.
TITLE
12
LUM LUM LUM
DSK EDGE
TRAIL
SHADOW
CRK CRK BORDER BEVELD
EDGE
SET UP MASK MASK MASK SOFT
SHIFT CCR LIGHTING BORDERMATTES
2 DSK section
4 CCR, LIGHTING, and
MATTES buttons
1 TITLE section
5 SHIFT
button
6 SET UP
button
3 EDGE
section