


43
English
Change settings on the OTHER OPTIONS menu
by highlighting the desired line using the UP/
DOWN buttons and using the +/– buttons to
step through the available settings. To return
to the MAIN menu, press the ENTER button.
Press the MENU/OSD button on the remote
to cancel the display and return to normal
operation.
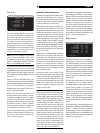
Zone 2 Setup
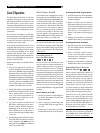
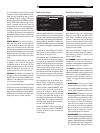
ZONE2 SETUP
SOURCE:Off
VOLUME SETUP:Variable
VOLUME:60
TURN ON VOL:Last
MAX VOL:Max
12V TRIGGER:Off
MAIN MENU
The ZONE 2 SETUP menu provides settings
and configuration options related to the op-
eration of Zone 2. This menu is reached by
highlighting the ZONE 2 line on the MAIN
menu and pressing ENTER.
SOURCE: Specifies a source for listening in
Zone 2. Options are CD, TUNER, TAPE, VIDEO
1–5, SOURCE, and OFF. Selecting the
SOURCE option links the Zone 2 source to the
source selected for the main zone so that Zone
2 will hear the same source as the main zone.
Selecting the OFF option turns Zone 2 off.
VOLUME SETUP: configures the Zone 2
outputs for VARIABLE or FIXED volume levels.
VARIABLE allows control of the volume settings
in Zone 2 from the RSX-1056 front panel or
from a remote control/IR repeater in Zone 2.
FIXED output disables the Zone 2 volume
control. In this mode, the Zone 2 level can be
fixed at the level specified on the next line,
thus optimizing system performance when send-
ing a fixed level signal to a preamp or ampli-
fier with its own volume adjustment.
VOLUME: In VARIABLE output mode, this line
shows the current volume setting for Zone 2.
In FIXED output mode, this volume setting es-
tablishes a permanent fixed output level for
Zone 2.
Move the highlight to the desired line using
the UP/DOWN buttons and use the +/– but-
tons to adjust the volume level. To return to the
MAIN menu, press the ENTER button. Press
the MENU/OSD button on the remote to cancel
the display and return to normal operation.
TURN ON VOL: Specifies a default volume
level to be used each time Zone 2 is activated.
You can select LAST to have Zone 2 activate
with the last previously used volume setting.
Or, you specify a volume from MIN (full mute)
to MAX, in 1dB increments. Note that this setting
cannot exceed the MAX VOL established in
the next line of the menu.
MAX VOL: Specifies the maximum volume
level for Zone 2. The volume cannot be ad-
justed above this level. Settings range from MIN
to MAX, in 1dB increments.
12V TRIGGER: The RSX-1056 has three12V
trigger outputs that supply a 12V DC signal
to turn on Rotel components and other com-
ponents as needed. The 12V Trigger labeled
ZONE 2 is assigned to Zone 2 and can send
a turn-on signal to remote components when-
ever Zone 2 is activated. Select the appropri-
ate setting from eight options to have the ZONE
2 trigger output send the turn-on signal. The
options that will activate the Zone 2 trigger
are: zone, 1+zone, 2+zone, and ALL. The
options that will disable the Zone 2 trigger are:
1, 2, 1+2, and No.
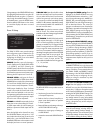
Default Setup
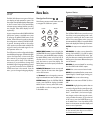
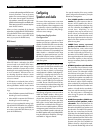
DEFAULT SETUP
TUNER SETTING:N.America
FRONT REDIRECT:Front
FACTORY DEFAULT:No
USER DEFAULT:No
SET USER DEFAULT:No
MAIN MENU
The DEFAULT SETUP menu provides access to
six functions:
• Set the tuning function for North American
or European frequencies.
• Redirect the front channel amplifiers to
power center back speakers or speakers
in Zone 2 speakers.
• Restore all features and settings to the origi-
nal FACTORY DEFAULT settings.
• Memorize a custom group of settings as
a USER DEFAULT.
• Activate the memorized USER DEFAULT set-
tings.
To change the TUNER setting: Place the
highlight on the TUNER SETTING line using
the UP/DOWN buttons and use the +/– but-
tons to change the setting to N. AMERICA or
EUROPE. Then, move the highlight to the FAC-
TORY DEFAULT line and change the setting to
YES as described above. The screen will
change to a confirmation screen. Press the EN-
TER button to proceed with resetting the FAC-
TORY DEFAULT settings and changing the
TUNER SETTING. To return to the MAIN menu
without resetting the FACTORY DEFAULT and
TUNER settings, change the entry to NO and
press the ENTER button.
To change the FRONT REDIRECT setting:
Place the highlight on the FRONT REDIRECT
line using the UP/DOWN buttons and use the
+/– buttons to change the setting to FRONT
SP (for powering front speakers), CB SP (for
powering center back speakers), or ZONE SP
(for powering speakers in zone 2). If you re-
direct the internal amplifiers, then you will need
a separate stereo amplifier to drive your front
speakers.
NOTE
: Changing the default TUNER SETTING
or REDIRECT SETTING can only done at the
same time as restoring the FACTORY DEFAULT
settings. Therefore, we recommend selecting
your default TUNER and REDIRECT settings
and resetting to the FACTORY DEFAULT set-
tings as the first step in configuring the unit,
before you change or memorize any other
configuration settings.
To restore the FACTORY DEFAULT set-
tings: Place the highlight on the FACTORY
DEFAULT line using the UP/DOWN buttons
and use the +/– buttons to change the setting
to YES. Press the ENTER button to proceed with
resetting the FACTORY DEFAULT settings. The
unit will power off and then on, with the fac-
tory settings restored. To return to the MAIN
menu without resetting the FACTORY DEFAULT
settings, change the entry to NO and press
the ENTER button.
NOTE
: Resetting to factory default settings will
erase all stored settings including delay set-
tings, speaker settings, balance settings, in-
put settings and more. You will lose ALL system
configuration settings. Be certain that you wish
to do so before resetting the factory defaults.