


21
English
are two CENTER jacks, use either jack for a
single center channel or both if you have two
center channels. In six or seven channel sys-
tems, you will make one or two additional
connections for center back speaker(s). These
jacks are labeled CB1 and CB2. Use CB1 for
a single center back channel.
Make sure that you have each output connected
to the correct amplifier channel (front right, left
rear, etc.).
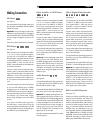
AM Antenna
See Figure 11
The RSX-1056 includes a plastic loop antenna
to receive AM radio signals. Remove this
antenna from the box and locate it near the
RSX-1056. It can be tacked to a wall, using
the mounting tab provided. Alternatively, you
can fold the center portion of the antenna to
form a tabletop stand.
Connect the 300 ohm twin-conductor wire from
the loop antenna to the push terminals labeled
AM LOOP, attaching one wire to each termi-
nal. It does not matter which wire attaches to
which terminal, but make sure that the con-
nections are solid and that the two wires do
not touch.
You may need to rotate or otherwise reorient
the antenna to find the best position.
NOTE
: To use an outdoor antenna, connect its
300 ohm twin-conductor wire to the termi-
nals in place of the loop antenna.
FM Antenna
See Figure 11
The RSX-1056 is supplied with a T-shaped in-
door FM antenna. Connect the coax F-type plug
to the FM antenna connector on the RSX-1056.
For best reception, unfold the T-shaped antenna.
Eyelets at both ends of the T allow tacking the
antenna to a wall, if desired. Experiment with
positioning for best reception.
NOTE
: To use an outdoor antenna, connect its
75 ohm coax lead wire to the FM connector
instead of the indoor wire antenna, only af-
ter a professional contractor has installed the
antenna system in accordance with local elec-
trical codes.
OPERATING THE RSX-1056
Considering its large number of features, set-
tings, and options, the RSX-1056 is remark-
ably easy to operate. The key to operating the
RSX-1056 is its system of On-Screen Displays
(OSD) which guide you through various
choices.
The RSX-1056 can be operated from the front
panel or the remote control. Front panel con-
trols are unusually simple to use, with just a
few knobs and buttons to guide you through
OSD menu options. The remote control pro-
vides more complete control options.
To guide you through the operation of the
RSX-1056, this section of the manual starts with
explaining the basic layout and function of the
front panel and the remote control. Then, we
explain the basic operations such as turning
the unit on and off, adjusting volume, select-
ing a source for listening, etc. Following that
is a detailed explanation of surround sound
modes and how to configure the RSX-1056
for various types of recordings. Finally, there
are instructions for additional features and Zone
2 operations. All of these are features that may
be used in normal use. The last section of the
manual (Configuration) details options that may
be selected during initial setup and configu-
ration of the unit, many of which will be set
once and left untouched.
Throughout this manual, numbers in gray boxes
refer to the RSX-1056 illustration at the front
of this manual. Letters refer to the RR-1050 re-
mote illustration. When both appear, the func-
tion is found on both the RSX-1056 and the
remote. When only one appears, that func-
tion is found only on the RSX-1056 or the re-
mote.
Front Panel Overview
The following is a brief overview of the con-
trol and features on the front panel of the
RSX-1056. Details concerning the use of these
controls are provided in subsequent sections
of this manual describing various tasks.
Front-panel Display
The fluorescent (FL) display in the upper por-
tion of the RSX-1055 provides information about
the status of the unit, tuner reception, and ac-
tivation of special features. The main portion
of the display typically shows the current in-
put source (or radio station frequency) selected
for listening on the left side and the current
input source selected for recording on the right.
Icons along the left side of the display show
the currently selected digital input. Icons at the
right of the display show individual surround
channels and are used in configuring the sys-
tem. Icons across the bottom of the display show
the current surround mode and other special
features. Icons at the top of display assist in
tuning radio stations and operation of RDS/
RBDS features.
The FL display can be turned off, if desired.
See the MENU button section for instructions.
Remote Sensor
This sensor receives IR signals from the remote
control. Do not block this sensor.
NOTE
: The remainder of the buttons and con-
trols on the front panel are described in the
Overview of Buttons and Controls section.
Remote Control Overview
The RSX-1056 includes a full-function learn-
ing remote control that can operate the
RSX-1056 plus nine other audio/video com-
ponents.
A separate manual gives detailed instructions
on programming and using the RR-1050 to
replace all of the remote controls in your sys-
tem. The RR-1050 manual covers many extra
features (such as custom labeling of remote
buttons that appear in its LCD display). To avoid
duplication, we provide only basic informa-
tion about using the RR-1050 to operate the
RSX-1056 in this manual.