


42
RSX-1056 Surround Sound Receiver
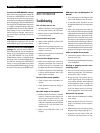
Contour Setup
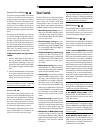
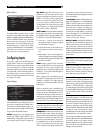
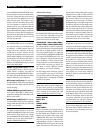
CONTOUR SETUP
SPEAKER:Front
DEFEAT:On
HF CONTOUR:+5
LF CONTOUR: 0
MAIN MENU
The CONTOUR SETUP menu allows digital
adjustment of the bass and treble response of
each group of speakers in the system. For
example, if your center channel speaker sounds
too bright, you could roll off the extreme high
frequencies.
SPEAKER (front/center/surround/cen-
ter back/all): Select which speaker or group
of speakers to adjust. Selecting ALL permits
adjustment of the entire system as a whole.
DEFEAT (on/off): Selecting the ON setting
defeats the contour adjustment, bypassing the
contour processing entirely for that speaker
or group of speakers.
HF CONTOUR: Adjusts the extreme high fre-
quency slope over a range of -6dB (MIN) to
+6dB (MAX). Negative number settings reduce
the high frequency output; positive number
settings increase it.
LF CONTOUR: Adjusts the extreme low fre-
quency slope over a range of -6dB (MIN) to
+6dB (MAX). Negative number settings reduce
the low frequency output; positive number
settings increase it.
The contour adjustments are designed to work
at the frequency extremes and be relatively
subtle so that they do not have a negative impact
on midrange sounds. We recommend accli-
mating to the sound of the system with the
contour adjustments defeated and then mak-
ing adjustments, if necessary, to address spe-
cific speaker response issues or personal taste.
NOTE
: You can also make temporary contour
adjustments using the TONE and UP/DOWN
buttons on the remote. See the Contour/Tone
Settings section of this manual for details.
Miscellaneous Settings
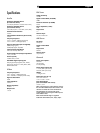
Other Options
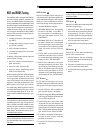
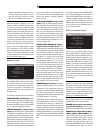
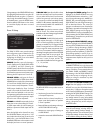
OTHER OPTIONS
RECORD:Source
TURN ON VOL:Last
MAX VOL:Max
VOL SPEED:Slow
POWER:Standby
LANGUAGE:English
VIDEO:NTSC
OSD:On
PROGRESSIVE:NO
MAIN MENU
This OTHER OPTIONS menu, accessed from
the MAIN menu, provides access to several
miscellaneous settings as follows:
RECORD: Select which source signal to be
sent to the recording outputs by choosing one
of the input sources. The options are: CD, TAPE,
TUNER, VIDEO 1–5, and SOURCE. You can
either select a specific component or select
SOURCE which will send the signal to the
record outputs from whatever source is selected
for listening.
TURN ON VOL: Specifies a default volume
level to be used each time the RSX-1056 is
activated. You can select LAST to have the
RSX-1056 power up with the last previously
used volume setting. Or, you specify a volume
from MIN (full mute) to MAX, in 1dB incre-
ments. Note that this setting cannot exceed
the MAX VOL established in the next line of
the menu.
MAX VOL: Specifies the maximum volume
level for the RSX-1056. The volume cannot be
adjusted above this level. Settings range from
MIN to MAX, in 1dB increments.
VOL SPEED: Provides three options for how
rapidly the volume control responds to inputs.
The SLOW setting adjusts the volume 1dB with
each control input. The MID setting adjusts in
2dB increments. The FAST setting adjusts in
3dB increments.
POWER: This setting determines how the
RSX-1056 powers up.
With the default STANDBY setting, the unit
powers up in standby mode when AC is ap-
plied and the rear panel POWER button is ON.
The unit must be activated using the front panel
STANDBY button or the remote ON/OFF
buttons.
With the DIRECT setting, the unit is fully acti-
vated when AC power is applied and the rear
panel POWER button is ON; however, it may
be put in standby mode using the front panel
STANDBY button or the remote ON/OFF
buttons.
In ALWAYS-ON mode, the unit remains fully
active whenever AC is present and the rear
panel POWER button is ON; the front panel
STANDBY button and the remote ON/OFF
buttons are disabled and the unit cannot be
put in standby mode.
LANGUAGE: Selects a language for the On
Screen Display.
VIDEO: Specifies whether an NTSC or PAL
television monitor is connected to the TV
MONITOR outputs of the RSX-1056. This set-
ting must be correct for the upconversion and
OSD menus to work properly.
OSD ON/OFF: Select whether or not status
information (such as the volume setting) is
displayed on the TV monitor.
PROGRESSIVE: The OSD menus cannot be
displayed on the TV monitor when progres-
sive scan or 1080i HDTV video signals are
being used at the Component Video inputs.
This setting enables a feature that allows the
display of the main OSD setup menus (but not
the information displays such as volume, etc.)
on the TV monitor by interrupting the progressive
scan video signal and restoring it after the OSD
menus are cancelled. Choose the video input
or combination of video inputs for progres-
sive scan or HDTV video signals (480p, 720p,
1080i). All other video inputs will be assigned
as standard interlaced video inputs. Video 4
and 5 cannot be assigned as progressive scan
inputs.
NOTE
: When a video input or inputs are se-
lected for progressive mode, the conversion
from composite or S-Video to Component
Video output is not available for those inputs.
The conversion from composite or S-VIDEO
to Component Video output is only available
for the other video inputs. For example, if
Video 1 and Video 2 are selected for pro-
gressive scan signals (V1+V2), conversion
from composite or S-Video is only available
for Video 3, 4, and 5.