


30
RSX-1056 Surround Sound Receiver
NOTE
: In addition to the options that follow,
you can select Pro Logic II Cinema, Pro Logic
II Music, Pro Logic IIx Cinema, Pro Logic IIx
Music, 5-channel stereo, or 7-channel stereo
by pressing one of the surround mode but-
tons on the remote (PLC, PLM, 5CH, 7CH).
• To select Stereo or Analog bypass
mode for 2-channel analog record-
ings. Press the 2CH button on the remote
to toggle between Stereo (with digital pro-
cessing) or Analog Bypass (no digital pro-
cessing) modes.
• To select any mode for 2-channel
digital recordings. Press the SUR+ button
on the remote, then use the +/– buttons to
step through the optional modes until the
desired mode is displayed.
• To select Dolby multichannel modes
for 2-channel digital recordings. Yo u
can also step through the Dolby options
(Pro Logic II, Pro Logic IIx, or 3-Stereo) by
repeatedly pressing the DOLBY PLIIx/3ST
button on the front panel. You can select
Pro Logic or Pro Logic IIx Cinema or Mu-
sic modes by pressing the PLC or PLM
buttons on the remote.
To change the Cinema or Music option in
Pro Logic II mode, press the SUR+ button
the remote twice while in Pro Logic II or
Pro Logic IIx modes. Then, press the +/–
buttons to select the option.
• To select DTS Neo:6 modes for 2-
channel digital recordings. You can
also step through the DTS options (Neo:6
Cinema or Neo:6 Music) by repeatedly
pressing the DTS Neo:6 button on the front
panel.
To change the Cinema or Music option in
Neo:6 mode, press the SUR+ button the
remote twice while in Neo:6 mode. Then,
press the +/– buttons to select the option.
• To select DSP multichannel modes
for 2-channel digital recordings. Yo u
can also step through the DSP options
(MUSIC 1-4, 5CH, 7CH) by repeatedly
pressing the DSP button on the front panel.
Directly select 5CH mode by pressing the
5CH button on the remote. Directly select
7CH mode by pressing the 7CH button on
the remote.
Other Settings
Speaker Level
The levels of all channels should be calibrated
using the TEST TONE procedure during the
initial setup of the RSX-1056. You can make
a temporary change in the relative volume of
the center, surround, center back, or subwoofer
channels using buttons on the remote control
or the front panel controls. These temporary
adjustments only remain in effect until a dif-
ferent input is selected or until the RSX-1056
is turned off.
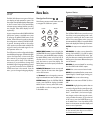
To adjust speaker levels using the
remote:
1. Press a selection button on the remote to select
a channel (or pair of channels) for adjust-
ment. Press the C button to adjust the CEN-
TER channel. Press the S button to adjust the
SUBWOOFER channel. Press the R button
to adjust the rear SURROUND or CENTER
BACK channels (each press of the R button
toggles between the SURROUND channels
and the CENTER BACK channels). The se-
lected speaker and its current setting appear
briefly in the display.
2. Use the UP or DOWN buttons on the re-
mote to adjust the output level of the se-
lected channel(s).
NOTE
: If no level adjustment is made for 10
seconds, the levels revert to the default cali-
brated settings.
As you select a speaker in the above adjust-
ments, you may notice an addition choice,
“group delay”. See the following for an ex-
planation of this feature.
Group Delay
The SPEAKER adjustments (described above)
can also be used to make a temporary ad-
justment to the group delay or “lip-synch” delay.
Group delay delays the overall audio signal
(to all speakers) by a specified amount to correct
for situations where the video and audio sig-
nals are out of synch. This can occur with
upconverted digital TV signals or when trying
to match a radio broadcast with the video from
a sports event. The settings range from 0 to
500 milliseconds in 5 ms increments.
Like the speaker settings, this is a temporary
adjustment that overrides the permanent de-
fault setting for a video source until a differ-
ent input source is selected or the unit is turned
off.
To adjust group delay using the re-
mote:
1. Press the C button on the remote twice.
2. Use the UP or DOWN buttons on the re-
mote to adjust the amount of delay applied
to all channels.
Dynamic Range
Dolby Digital recordings are capable of wide
dynamic range (the difference between the soft-
est and loudest sounds). In some cases, this
may tax amplifiers and/or speakers. In other
cases, you may want to reduce the dynamic
range when listening at low volume levels. This
is particularly useful in order to keep dialog
loud enough to be intelligible while avoiding
excessively loud sound effects. Dolby Digital
dynamic compensation is a sophisticated fea-
ture that allows you to adjust the dynamic range
while still preserving fidelity. The actual amount
of compression relies on instructions embed-
ded in the Dolby Digital recording and var-
ies to best suit the specific program content.
There are three dynamic range settings avail-
able for Dolby Digital recordings:
MAX: full dynamic range.
MID: slightly reduced dynamic range, roughly
comparable to the signal from a compact disc.
MIN: more heavily reduced dynamic range,
but still comparable to the signal from a typi-
cal VHS Hi-Fi recording.
To adjust dynamic range:
Press the DYN button on the remote repeat-
edly until the desired setting appears in the
front panel display. This setting remains in effect
for all Dolby Digital program material until it
is changed.
NOTE
: The dynamic range compensation fea-
ture is only available in Dolby Digital mode.
The setting is ignored with all other types of
recordings.