


41
English
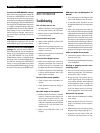
Test Tone
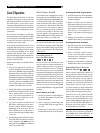
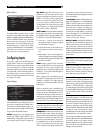
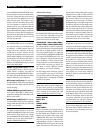
TEST TONE
LEFT:+ 1dB
CENTER:- 1dB
RIGHT:+ 2dB
R SURROUND:+ 5dB
R CTR BACK:+ 2dB
L CTR BACK:+ 2dB
L SURROUND:+ 4dB
SUBWOOFER:+ 9dB
MAIN MENU
This menu uses filtered pink noise test tones
to set equal volume levels for all speakers (left
front, center, right front, right surround, cen-
ter back, left surround, and subwoofer) to en-
sure proper surround sound reproduction.
Setting the output levels using the test proce-
dure provides the most accurate adjustment
so that digital surround sound material will be
reproduced as it was intended and is a criti-
cal step in calibrating the system.
NOTE
: If you have configured your system to
use two center back speakers, there will be
an additional line in the menu, giving you the
ability to independently adjust the CENTER
BACK 1 and CENTER BACK 2 speakers.
To access this menu and perform the test tone
calibration, you can be in any surround mode
except BYPASS with any input except the MULTI
INPUT. Enter the OSD menu system and select
TEST TONE from the MAIN MENU to reach
this screen.
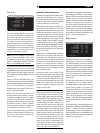
When you enter the TEST TONE menu, you
will hear a test tone coming from the highlighted
speaker. Highlight different speakers by moving
the cursor to the desired line using the UP/
DOWN buttons. The test tone will shift accord-
ingly to the selected speaker.
Seated in the normal listening location, shift
the test tone to the various speakers. Using the
one speaker as a reference, listen for any speak-
ers that are noticeably louder or quieter. If so,
adjust that speaker’s levels up or down (in 1dB
increments) using the +/– buttons. Continue
switching among the speakers and adjusting
until all speakers are the same volume.
To return to the MAIN menu, press the EN-
TER button. Press the MENU/OSD button on
the remote to cancel the menu display and
return to normal operation.
Calibration with an SPL meter:
Calibrating the system with an SPL meter, rather
than by ear, provides more precise results and
improves the system’s performance significantly.
Inexpensive SPL meters are widely available
and the procedure is quick and easy.
Both Dolby and DTS specify a standard cali-
bration level for all theaters to ensure that
soundtracks can be played at the volume level
intended by the director of the film. This ref-
erence level should result in spoken dialog
played at a realistic level for normal speech
with the loudest peaks in any single channel
at about 105dB. The RSX-1056’s test tones
are generated at a precise level (-30dBFs)
relative to the loudest possible digitally recorded
sound. At the Dolby or DTS reference level,
these test tones should produce a 75dB read-
ing on an SPL meter.
Set the meter to its 70dB dial setting with SLOW
response and C-weighting, held away from
your body at your listening position (mount-
ing the SPL meter on a camera tripod makes
this easier). You can point the SPL meter at each
speaker as it is being measured; however,
positioning the meter in a fixed position pointing
at the ceiling is easier and probably produces
more consistent results.
Increase the master volume control on the
RSX-1056 until the meter reads 75dB (+5dB
on the meter scale) when playing the test tone
through one of the front speakers. Then, use
the individual channel adjustments on the TEST
TONE menu to adjust each of the individual
speakers, including the subwoofer, to the same
75dB on the SPL meter.
NOTE
: Due to meter weighting curves and room
effects, the actual level of the subwoofer may
be slightly higher than you measure. To com-
pensate, Dolby suggests setting the subwoofer
several dB lower when calibrating with an SPL
meter (i.e. set the subwoofer to read 72dB on
the meter instead of 75dB). Ultimately, the
proper subwoofer level must be determined
by personal taste and some listeners prefer to
set it above 75dB for film soundtracks. Exag-
gerated bass effects come at the expense of
proper blending with the main speakers and
place stress on the subwoofer and its ampli-
fier. If you can localize bass from the sub-
woofer, the subwoofer level may be too high.
Music can be useful for fine-tuning the sub-
woofer level as excessive bass is readily ap-
parent. The proper setting will generally work
well for music and movie soundtracks.
Remember the setting of the master volume con-
trol used during this calibration. To play a Dolby
Digital or DTS soundtrack at the reference vol-
ume level, simply return to that volume setting.
Note that most home theater listeners find this
setting to be excessively loud. Let your own
ears be the judge for deciding how loud to
playback movie soundtracks and adjust the
master volume control accordingly. Regard-
less of your listening levels, using an SPL meter
to calibrate equal levels for all speakers in the
system is strongly recommended.
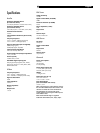
Delay Setup
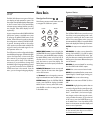
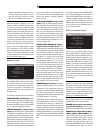
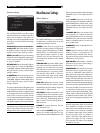
DELAY SETUP
LEFT: 12ft 3.6m
CENTER: 11ft 3.3m
RIGHT: 11ft 3.3m
R SURROUND: 6ft 1.8m
R CTR BACK: 8ft 2.4m
L CTR BACK: 9ft 2.7m
L SURROUND: 5ft 1.5m
SUBWOOFER: 5ft 1.5m
MAIN MENU
The DELAY SETUP menu, which is reached from
the MAIN menu, allows you to set the delay
for individual speakers. This ensures that the
sound from each speaker arrives simultaneously
at the listening position, even when the speakers
are not all placed at equal distances from the
listener. Increase the delay to speakers located
closer to the seating area and decrease the
delay to speakers located farther from the
seating area.
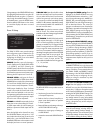
The RSX-1056 makes setting the delay time
for each speaker very easy. Simply measure
the distance (in feet or meters) from your seating
position to each speaker in your system. Set
the measured distance in the line for each
speaker. The menu provides a line for each
speaker configured in your system and pro-
vides a range of settings up to 99 feet (30
meters) in 1 foot (0.3 m) increments with each
increment equivalent to an additional delay
of 1ms.
To change a setting, place the highlight on the
desired line using the UP/DOWN buttons and
use the +/– buttons to increase or decrease
the delay setting. To return to the MAIN menu,
press the ENTER button. Press the MENU/OSD
button on the remote to cancel the display and
return to normal operation.