


For Customer Service, call 800-377-7655
13
12
Get more information and exclusive accessories, visit www.polkaudio.com
For Customer Service, call 800-377-7655.
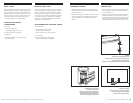
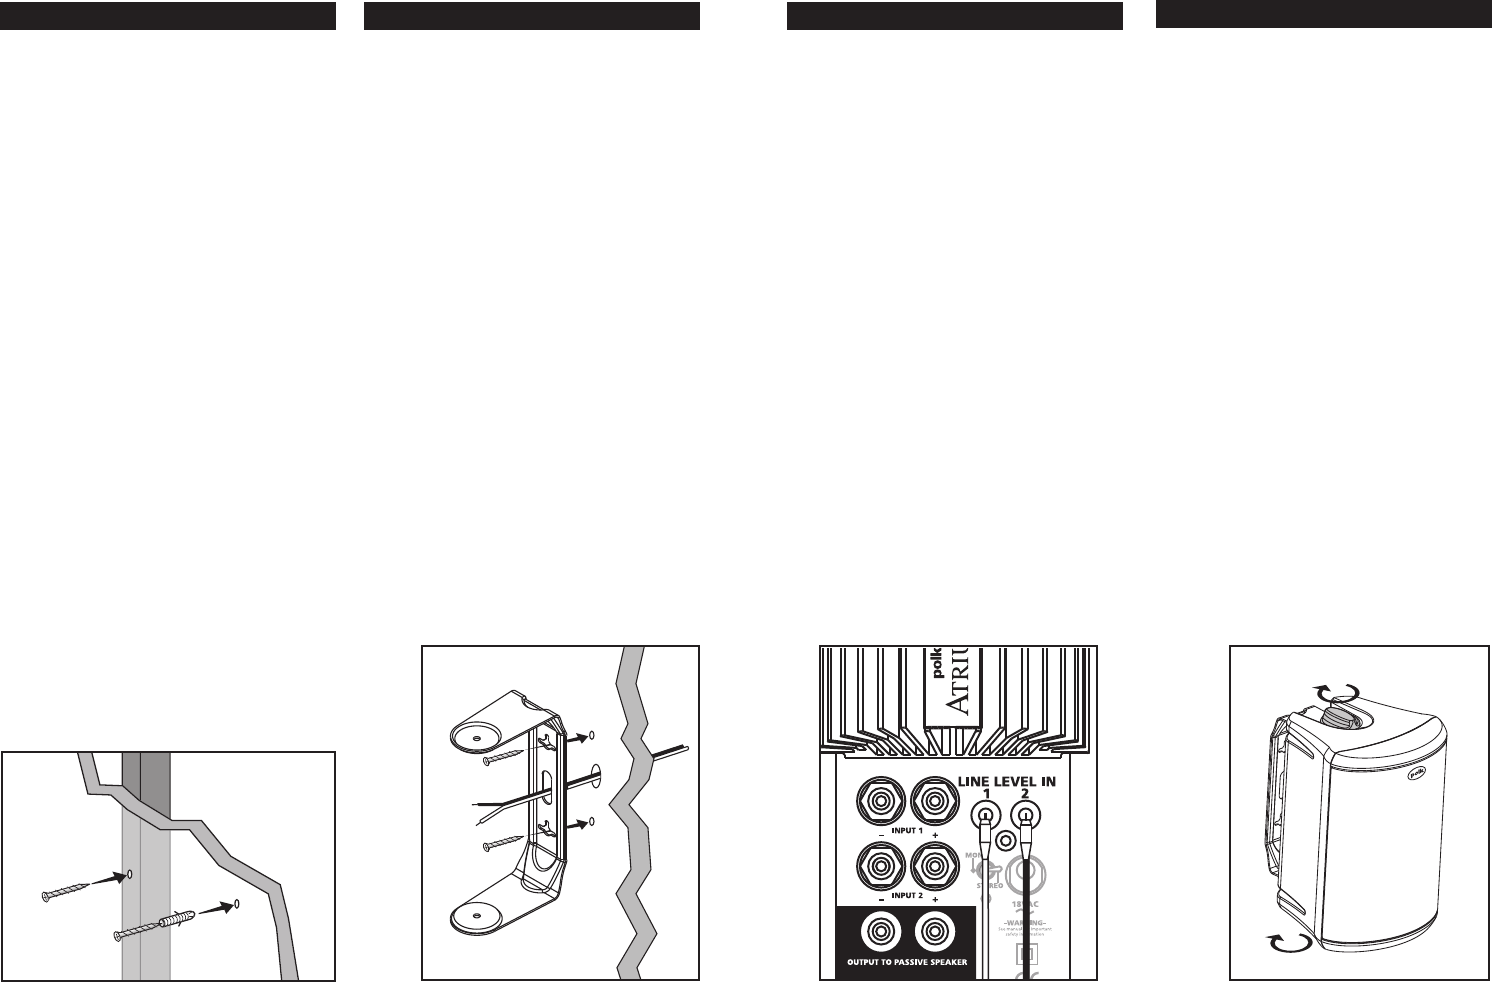
• Line upthe bracket,attached tothe speaker,so thatthe
screw headspass throughthe largecenter hole of the
bracket’s keyhole slots.
• Letthe speakerand bracketslide straightdown, allowing
the screwhead to slipbehind thesmaller end ofthe keyhole
slot [figure16].
• Tug gentlyon thespeaker tomake certainthat the screws
and bracketare properlyaligned andthat thewall anchors
are secure.
• If thebracket isnot heldsnug againstthe wallby thescrew
heads, remove thespeaker fromthe wall,drive the screws
in alittle furtherand thenremount thespeaker.
• Oncethe speakeris mounted,the bracketknobs canbe
loosened to “aim” thespeaker, andthen hand-tightened
to keepthe speakerangled correctly [figure17].
• Follow thespeaker pairhookup directionson the
previous page.
FIGURE17
Adjustthebracketknobstoaimthespeaker.
Ajustelasperillasdelsoporteparaorientarelaltavoz.
Ajustezlesboutonsdusupportpourdirigerl'enceinte.
StellenSiediePositiondesLautsprechers
überdieKnöpfeanderHalterungein.
FIGURE16
Slidethebracketdownonthescrewheads
tocatchthekeyholeslots.
Desliceelsoportehaciaabajosobrelascabezasdelostornillos
paraqueencajenenlasranurasenformadeojodecerradura.
Glissezlesupportsurlatêtedelavisjusqu'à
cequ'elles'enclenchedanslafente.
SchiebenSiedieHalterungaufdieSchraubköpfe
herunter ,sodasssieindenRitzeneinrastet.
• Alignez l’ensemblesupport/enceinte de façonà ce queles
têtes desvis pénètrent dansla partieévasée des fentesen
trou deserrure dusupport.
• Laissez glisserl’ensemble support/enceinte vers le bas, per-
mettant aux têtesde vis deglisser dans la partie étroite des
fentes entrou deserrure [figure16].
• Tirezsur l’enceintepour vousassurer queles viset lesupport
sont bien alignés etque lesancres defixation sontsolidement
enfoncées dans le mur.
• Si le support n’estpas retenufermement surle murpar les
t
êtes devis, retirezl’ensemble support/enceintedu mur,
resserrez unpeu lesvis puisréinstallez l’ensemble.
• Une foisl’enceinte installée,les boutons dusupport peuvent
être desserrés pourorienter l’enceinte puisresserrés àmain
pour garderl’enceinte correctement etsolidement orientée
[figure 17].
• Suivez lesinstructions de connexionde la paire
d’enceintes Atriumà la page précédente.
Get more information and exclusive accessories, visit www.polkaudio.com
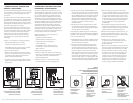
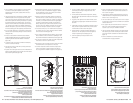
• Prior toinstallation, holdthe speakerin thechosen location
to makesure itsafely clearsobstacles such as c eiling,
adjacent walls, corners,beams, lightingfixtures anddoor/
window frames.
• Using thekeyhole slotsin thebracket a sa template,mark the
installation locationof thetwo keyholeslots w itha pencil.
Youcan dothis byremoving thebracket knobson thetop and
bottom ofthe speakerand removingthe b racket,or b yleaving
the bracketconnected tothe speaker [figure13]. Orient the
bracket sothat thesmall endsof thekeyhole slotsare facing
“up” accordingto thedirection ofinstallation. Reattachthe
bracket tothe speakers, ifyou have removed it, byreinserting
it intothe bracket gapand thentightening thebracket knobs.
• If you arecertain thatthere isa s tudbehind thewall surface,
drive #10screws (not included)through thewall andinto the
stud [figure14a].
• If thereis nostud behindthe wallat thechosen location,
install #10(M4.5) wallanchors (notsupplied) intothe w all
by followingthe wall-anchor-manufacturer's instructions
[figure 14b].
• For masonrywalls, usea m asonrydrill bitand #10masonry
anchor andscrew (notincluded).
• Drive screwsinto studor wallanchors, leavingscrew heads
protruding 1/16"(1.6mm).
• Ifspeaker wireis beingfed froma holein thewall behindthe
bracket, pullthis speaker wirethrough t hehole inthe bracket
before mounting thebracket [figure15].
• Avant d’installerl’enceinte, tenez-laà l’endroitchoisi pour
vous assurerqu’elle serasuffisamment dégagéedu plafond,
des murs adjacents,des coins,des poutres,des luminaires
et descadres deportes et de fenêtres.
• Utilisant lesupport commegabarit, marquezla positiondes
deux fentes entrou deserrure àl’aide d’uncrayon. Vous pou-
vez le faire en retirant lesboutons dusupport et en dégageant
l
’enceinte, ou en laissant l’enceinte dansson support[figure
1
3]. Placez le support (positionverticale ou horizontale au
choix) defaçon àce quela partierétrécie desfentes entrou
de serruresoit en haut.Replacez l’enceinte dans sonsupport
(si vousl’avez retirée) etresserrez lesboutons du support.
• Si vousêtes certainqu’il ya unmontant derrièrela surfacedu
mur, enfoncezdes visno 10(non fournies)à traversla surface
du muret dans lemontant [figure14a].
• S’il n’ya pasde montantderrière lasurface dumur àl’endroit
choisi, installez des ancresde fixationno 10(M4.5) (non four-
nies)suivant lesinstructionsdufabricant desancres.[figure 14b].
• Pourles mursen maçonnerie,utilisez unemèche àmaçonnerie
et desancres etdes vis no10 (nonfournies).
• Enfoncez lesvis dansle montantou dansles ancresde fixation
en laissantles têtesde vis dépasserde 3mm (1/8").
• Si lefil dehaut-parleur destinéà l’enceinteest passédans
le muret sortderrière lesupport, passezle filà traversle
trou du supportavant d’installerle supportau mur[figure 15].
FIGURES14a&b
Use#10screwforwallstud,
use#10wallanchors+screwfornowallstud.
Usetornillosn°10silaparedtieneparalesinternos,useanclasdeparedytornillos
n°10silaparednotieneparalesinternos.
Utilisezunevisno10pourfixerlesupportdansunmontant.
Utilisezunechevilled'ancrageetunevis
no10s'iln'yapasdemontant.
VerwendenSieeineSchraubeNr.10f ürWändemitHolzstielverstärkungbzw.Dübel
undSchrauben(Nr.10)fürWändeohneHolzstielverstärkung.
FIGURE15
Feedspeakerwirefromwallthrough
bracketwireholeforeasymounting.
Paramontarelaltavozconfacilidad,paseelcabledealtavozquesaledelapared
porelagujeroparacabledelsoporte.
Passezlefildehaut-parleuràtraversletroudu
supportpourfaciliterl'installation.
VerlegenSiedasLautsprecherkabeleinfachvonderWand
durchdieentsprechendeÖffnunginderHalterung.
FIGURE 14a
WallStud
FIGURE 14b
NoWallStud