


For Customer Service, call 800-377-7655
7
6
Get more information and exclusive accessories, visit www.polkaudio.com
• Notethat oneof the“OUTPUTTO PASSIVESPEAKER” termi-
nals onthe rearof the speakeris red(+) andthe otheris black
(-). Make certainthat you connectthe wirefrom thered termi-
nal of theamplified speakerto thered terminal on the passive
s
peaker andthe blackterminal ofyour amplifiedspeaker to
t
he blackterminal onthe passivespeaker [figures9 &10].
Most wirehas someindicator (suchas color-coding, ribbing
or writing)on oneof thetwo conductors to help you
maintain consistency.
• Only after youhave made yourspeaker connections,attach
the ExternalAC PowerPack to thePowered Speaker [figure
11]. Plugthe PowerPack intoa standard householdAC power
source, andthen turnon yourelectronics.
Hookup Hookup#2—Speaker Wire [figure8]. Usethis hookup
method with speakerwire to remotelocations, for“Multi-Room”
(selectable“A” or“B”speaker-setonyour e lectronics)applications.
• Turnyour sourceelectronics off.
• Attach SpeakerWire from yourreceiver oramplifier to the Left
and Right Speaker WireInput Posts onthe backpanel ofthe
Self-Powered AtriumPowered Speaker.
• Strip 1/2inch (12.7mm) ofinsulation fromeach of the two
conductors ofthe wireto exposethe baremetal and twist
each ofthe conductorsinto asingle unfrayedstrand (soyou
have twounfrayed strands).Note that one ofthe terminalson
the rearof the speakeris red(+) andthe otheris black(-).
Make certain thatyou connect the wirefrom thered terminal
of youramplifier or receiver to the redterminal onyour spea-
ker andthe wirefrom theblack terminalof youramplifier or
receiver to theblack terminal onyour speaker[figure 8].Most
wirehas someindicator(such ascolor-coding,ribbingor writing)
onone ofthetwo conductorstohelp youmaintainconsistency.
• Notez qu’unedes bornesà l’arrière del’enceinte active
«OUT- PUTTO PASSIVE SPEAKER»est rouge(+) etl’autre noire
(-). Assurez-vousde bienraccorder lefil provenant dela borne
rouge (+) del’enceinte activeà la borne rouge(+) del’encei-
nte passive etle filprovenant dela bornenoire (-)de l’encei-
nte active àla bornenoire (-)de l’enceintepassive [figures 9
et 10].La polaritéde laplupart desfils àdeux conducteurs
est codée(couleur, nervureou écriture)pour faciliter
son identification.
• Après (etseulement après)avoir raccordéles enceintes,
connectez lebloc d’alimentationCA externeà l’enceinte act-
ive [figure11]. Branchezle blocdans uneprise de courant CA
standard puisallumez voscomposants électroniques.
Méthode de connexion#2 [figure8]. Utilisezdu filde h.p.pour
raccorder lesenceintes Atriumaux sortiesh.p. «A»ou «B» de
votrecomposant électronique(avec sélecteurmulti-pièce«A/B»).
• Éteignez votre composantde source.
• Utilisant dufil de h.p., raccordezles bornes de sorties
h.p. gaucheet droitede votreampli/récepteur auxbornes
d’entrée h.p.gauche etdroite situéesà l’arrière de
l’enceinte activeAtrium.
• Retirez12,7 mm (1/2po) d'isolationde chacundes deux con-
ducteurs pourexposer lesbrins métalliqueset tordezles brins
de chaqueconducteur pourformer deux toronsnon éraillés.
Notez qu’une desbornes àl’arrière del’enceinte estrouge
(+) etl’autre noire(-). Assurez-vous de bien raccorderle fil
provenant de la bornerouge (+)de votreampli/récepteur
à la borne rouge(+) de votre enceinteactive et le fil noir(-)
provenant de la borne noire(-) devotre ampli/récepteur à
la bornenoire (-)de votre enceinteactive. Lapolarité de
la plupartdes filsà deux conducteursest codée (couleur,
nervure ou écriture)pour faciliterson identification.
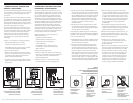
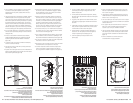
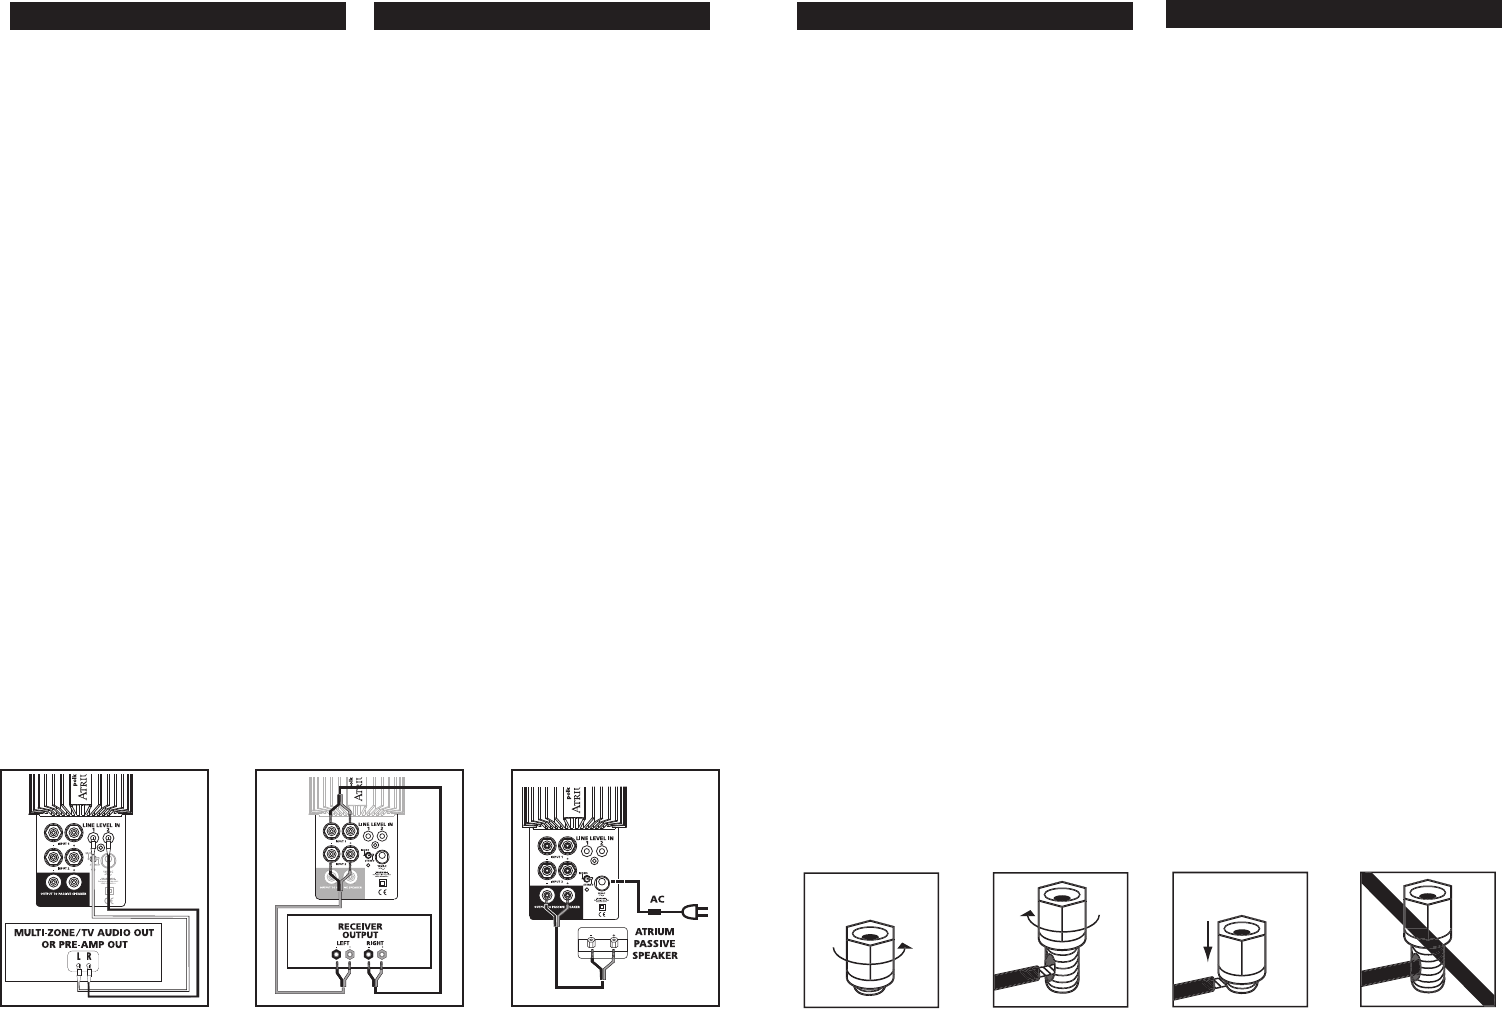
Insertspeakerwire
throughhole.
Inserteelalambrepara
labocinaenelorificio.
Insérerlefilduhaut-parleur
dansletrou.
Lautsprecher-Drahtdurch
dasLochschieben.
Loosenhexnut.
Desenrosqueparcialmente
latuercahexagona.l
Desserrerl’écrou.
Sechskantmutterlösen.
Tightenhexnut.
Enrosquelatuercadenuevo.
Serrerl’écrou.
Sechskantmutterf estschrauben.
Donotinsertinsulated
sectionofspeakerwire.
Noinsertealambrecon
materialaislante.
Nepasinsérerlapartieisolée
dufilduhaut-parleur.
IsolationdesLautsprecher-Drahtes
nichtindasLochschieben.
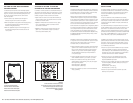
FIGURE10
USING5-WA YBINDINGPOSTS
ELUSODEPOSTESDECONEXIÓNDECINCOPOSICIONES
UTILISA TIONDESBORNIERSCINQFAÇONS”
GEBRAUCHVONFÜNFER-VERBINDUNGSBOLZEN
“POWERED-PASSIVE” SPEAKER PAIR
HOOKUP & ADJUSTMENT
This pairof Self-Powered AtriumSpeakers m akesit easyto take
your musicwith youto remotelocations. You can evenuse them
to addsuperb stereosound toa non-amplifiedsource such
as atelevision.
One speakerin thepair isthe Poweredspeaker. Ithas abuilt-in
power amplifierand mustbe pluggedinto astandard household
AC powersource inorder tooperate. Theother speakeris the
Passive (non-powered)speaker, whichis runby powerfrom the
Powered speaker.This passivespeaker canbe placedas nearor
far fromthe PoweredSpeaker asis convenient.
YourAtrium PoweredSpeaker can beeither theleft orright
speaker of astereo pair,depending onconvenient placement
near astandard household ACpower source.Use the“balance”
control of your electronics tosend thesignal alternatelyto
the leftand thento theright. Ifyou findstereo imagingis
“backwards” after you’vehooked up the LineLevel inputs,
simply switchthe 1&2inputsto flip-flopthe Left& Right
stereo images.
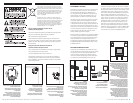
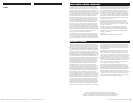
Hookup #1—LineLevel [figure7]. Usethis hookupoption for:
- Multi-Zone (separateelectronic z onecontrols)
- Television (audioLeft &Right outputsfrom TV)
- Portable MusicDevice (usea “stereomini plug”connected
to twinmale RCAplugs availableat RadioShack)
• Turnyour sourceelectronics off.
• Attach Line Levelconnections fromyour r eceiver,pre-amp
output or TV set audioout jackto theL&RLineLevelInputs
on theback panelof theSelf-Powered AtriumPowered
Speaker. Usewell-shielded RCAcables.
• Use speakerwire ofthe correctlength t oattach thePowered
Speaker toits Passivepartner viaBinding P ostconnections
[figures 9& 10].
CONNEXION ET RÉGLAGE D’UNE PAIRE
D’ENCEINTES «ACTIVE-PASSIVE»
Cette paired’enceintes Atriumvous permetd’avoir du son de
qualité audiophiledans toutela maison.Vouspouvez lesutiliser
avec desappareils non amplifiéscomme untéléviseur, unordina-
teur ouun lecteurportable. Une desenceintes decette paire
est active. Elle est dotéed’un amplificateur stéréoet doit être
branchée dans uneprise decourant CA standard pour fonction-
ner. L’autreenceinte estpassive (sansamplificateur) etreçoit sa
puissance del’amplificateur stéréode l’enceinteactive. Elle peut
être installéeà n'importe quelledistance del’enceinte active.
L’enceinte Atriumactive peutêtre utiliséepour reproduirele
canal gaucheou lecanal droit selonsa distance pratiqued'une
prise de courant. Utilisez le contrôlede «balance» de votre com-
posant électronique pourrégler l’équilibrede volume entreles
deux canaux.Si vousdésirez inverser lescanaux gaucheet droit,
inversez lescâbles desentrées del’enceinte active.
Méthode deconnexion #1- Niveaude ligne [figure 7].
Utilisezcette méthodepour:
- composants avecfonction «multi-zone»
(contrôles électroniques individuels deszones)
- téléviseur (sortieaudio descanaux gauche
et droitedu téléviseur)
- lecteur portable- utilisezun câbleaudio avecune
mini fichestéréo àun boutet deux connecteurs RCA
mâles àl’autre bout.
• Éteignez votrecomposant desource.
• Raccordez les sortiesniveau de ligne de votrerécepteur, pré-
ampli, téléou autrecomposant de source auxentrées niveau
de lignesituées àl'arrière del’enceinte activeAtrium.
Utilisez du câbleblindé RCA.
• Raccordez les bornesh.p. de l’enceinte passiveà celles
de l’enceinteactive avecdu filde h.p. [figures9 et 10].
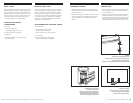
FIGURE7
RecommendedLineLevelHookup.
Conexiónrecomendadadelíneasdenivelvariable.
Branchement“niveaudeligne”recommandé.
EmpfohlenerLine-Level-Anschluss.
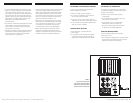
FIGURE9
Powered-PassiveConnection.
Conexiónalimentadaypasiva.
Branchementamplifié-passif.
Powered-Passive-Anschluss.
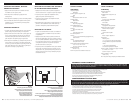
FIGURE8
SpeakerWireHookup.
Conexiónconcablesdealtavoz.
Connexiondesfilsdehaut-parleur.
Lautsprecherkabelanschluss.