


6
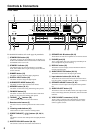
Controls & Connectors
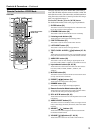
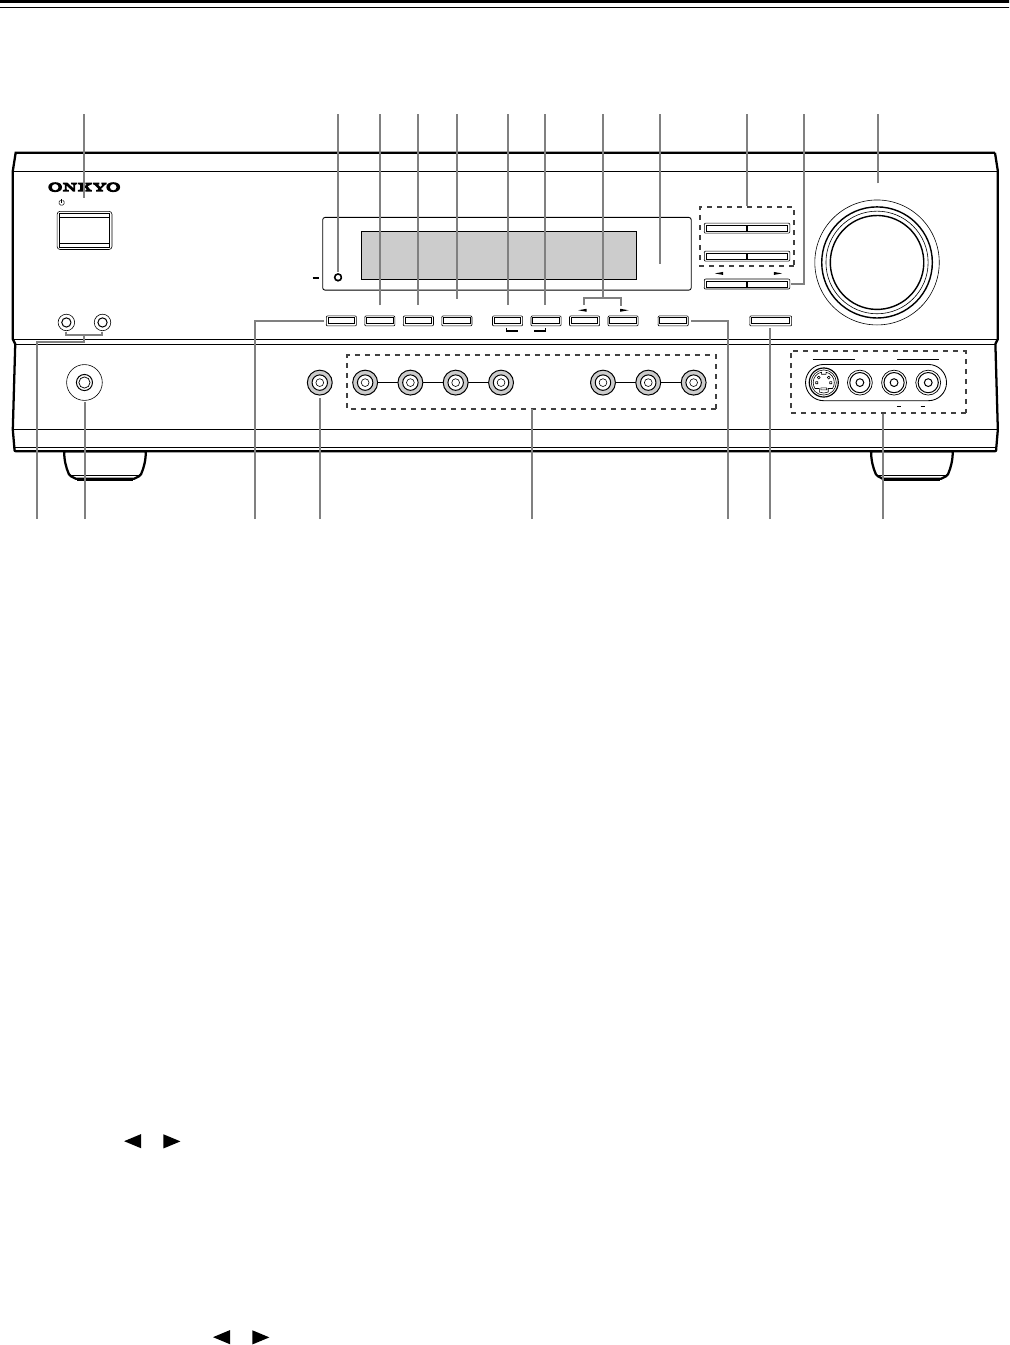
Front Panel
For detailed information, refer to the pages in parenthesis.
A
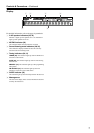
STANDBY/ON button (24)
This button is used to set the HT-R510 to On or Standby. For
models with a POWER switch, this button has no effect unless
the POWER switch is set to ON.
B
STANDBY indicator (24)
This indicator lights up when the HT-R510 is in Standby
mode, and it flashes while a signal is being received from the
remote controller.
C
DIMMER button (33)
This button is used to adjust the display brightness.
D
DIGITAL INPUT button (24)
This button is used to assign the digital inputs.
E
SUBWOOFER MODE button (25)
This button is used to select the Subwoofer modes.
F
MEMORY button (30, 31)
This button is used when storing and deleting radio presets.
G
FM MODE button (31)
This button is used to select the FM radio Stereo and Mono
modes. It’s also used when deleting radio presets.
H
TUNING [ ] [ ] buttons (30)
These buttons are used to tune into radio stations.
I
Remote control sensor (5)
This sensor receives control signals from the remote control-
ler.
J
Listening mode buttons (36)
These buttons are used to select the listening modes.
K
PRESET/ADJUST [ ] [ ] buttons (25, 26, 31,
37)
This button is used to select radio presets and adjust parameter
values.
L
MASTER VOLUME control (28, 30)
This control is used to set the volume of the HT-R510.
M
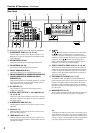
SPEAKER A & B buttons (28, 32)
These buttons are used to turn speaker sets A and B on and off.
N
PHONES jack (33)
This 1/4-inch phone jack is for connecting a standard pair of
stereo headphones for private listening.
O DISPLAY button (32)
This button is used to display various information about the
currently selected source.
P AUDIO SELECTOR button (28, 29)
This button is used to select the input signal format.
Q Input selector buttons (24, 28–30, 39)
These buttons are used to select the audio and video sources:
CD, DVD, TAPE, TUNER, VIDEO 1, VIDEO 2, or VIDEO 3.
R SPEAKER ADJUST button (25, 26)
This button is used to adjust various speaker-related parame-
ters.
S AUDIO ADJUST button (37)
This button is used to set the Bass, Treble, Late Night, Cinema
Filter, Center Image, Panorama, Dimension, and Center Width
functions.
T VIDEO 3 INPUT connectors (15, 39)
These S-Video, composite video (RCA/phono), and analog
audio (RCA/phono) inputs can be used to connect a video
camera or games console.
STANDBY/ON
PHONES
MASTER VOLUME
VIDEO
2
TAPE TUNER
C
D
VIDEO
3
DVD
AB
SPEAKERS
DIMMER
SURROUND
VIDEO 1
VCR
AUDIO
SELECTOR
DSP
STEREO
STANDBY
DISPLAY
AUDIO ADJUST
SPEAKER ADJUST
FM MODE
SUBWOOFER
MODE
DIGITAL INPUT
MEMORY
DIRECT
S VIDEO AUDIO
VIDEO L R
TUNING
CLEAR
PRESET/ADJUST
VIDEO 3
INPUT
NPQ STRO
1234789JLK5
M
6