


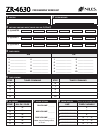


ALL ON/PAGE DIP SWITCH SETTINGS
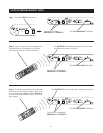
There are six All ON/PAGE switches located on the hidden
programming panel of the ZR-4630. Each of the ZR-4630's
zones has a corresponding numbered switch (see Figure 40).
The switches enable (Up) or disable (Down) the individual
zones from responding to ALL ON commands and incom-
ing audio pages.
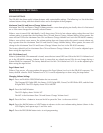
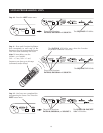
FIXED/VARIABLE PREAMPLIFIER SWITCH
Zones 4, 5, and 6 include a Fixed/Variable preamplifier
switch (see Figure 41) located on the rear panel of the ZR-
4630. The switch for these zones is set to either Variable or
Fixed depending on the configuration of the speakers in the
zone (see Configurations 8, 9, and 10 for more details).
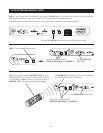
PROGRAMMING MASTER/SLAVE MODE
The factory default mode of the ZR-4630 MultiZone Receiver is "Master," but it can also be programmed to
function as "Slave 1" or "Slave 2" in expanded systems (refer to System Configuration 2). To change the mode
of any unit, follow the steps below:
1. Turn the ZR-4630 OFF.
2. Depress the PROGRAM button.
3. Turn the ZR-4630 ON and keep the PROGRAM button depressed.
4. The ZR-4630 then displays a message on the LCD Display Panel for 2 seconds, identifying its version ("Ver X.XX").
5. The ZR-4630 then displays a new mode, either "Master," Slave 1," or Slave 2.” Which mode is selected
depends on the last setting (i.e., if the last mode was of "Master," it will display "Slave 1.” If last the mode was
"Slave 1,” it will display "Slave 2.” And if the last mode was "Slave 2," it will display "Master").
6. Release the PROGRAM button. Unit is now set to a new mode.
7. Repeat Steps 1 through 6 until the ZR-4630 is in the desired mode.
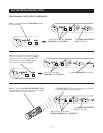
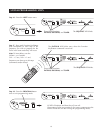
INSTALLING ZONE LABELS
Each ZR-4630 is included with pre-printed Zone/Room
Labels that are designed to be placed in the Zone Label Slots
(see Figure 42) to identify the names of each of six zones.
To install these labels follow the steps below:
1. Remove the label chosen for Zone 1 from the included
Room/Zone Labels.
2. Affix the label in Zone Label Slot #1.
3. Repeat steps 1 and 2 for Zones 2 through 6.
INSTALLATION SETTINGS
1
2
3
4
5
6
Up
Down
Figure 41
Figure 40
58
Figure 42
BEDROOM