21
Advanced versionSimple version Information
ENGLISHDEUTSCHFRANÇAISITALIANOESPAÑOLNEDERLANDSSVENSKA
Basic version
ENGLISHDEUTSCHFRANÇAISITALIANOESPAÑOLNEDERLANDSSVENSKA
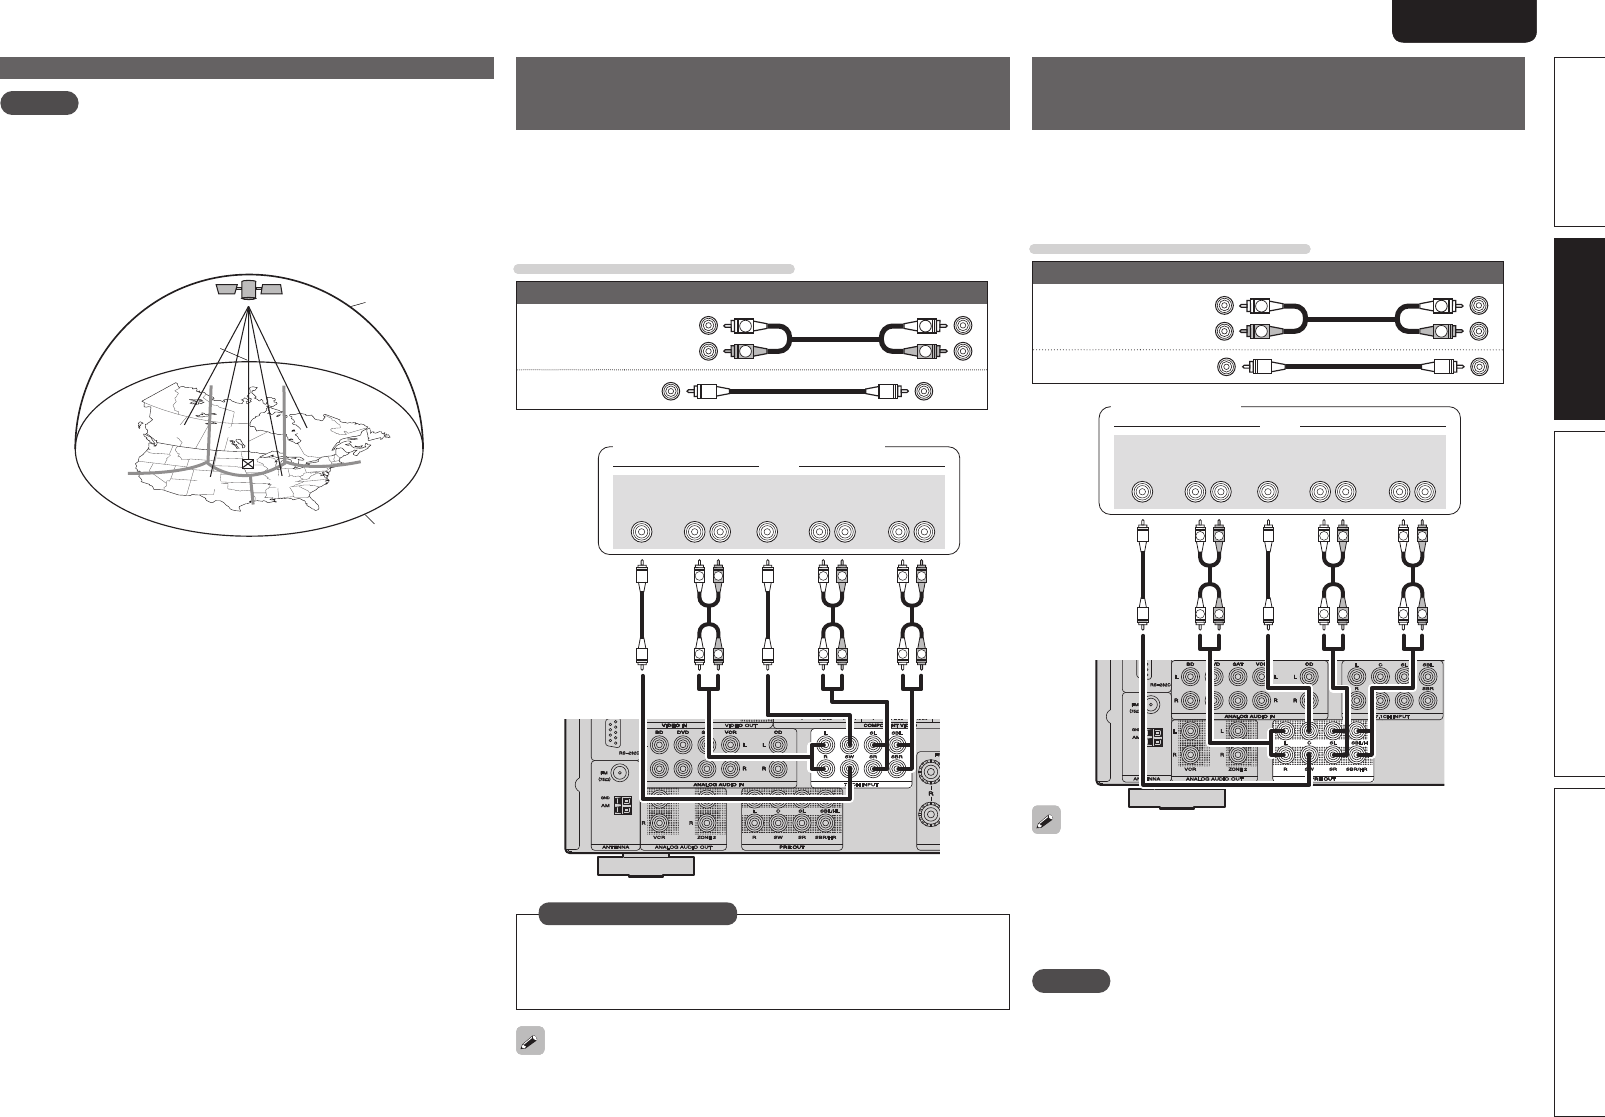
Connect a device that has a
multichannel output terminal
• You can connect this unit to an external device fitted with multi-
channel sound audio output jacks to enjoy music and video.
• The video signal can be connected in the same way as a Blu-ray Disc
player / DVD player (vpage16 “Connecting a Blu-ray Disc player /
DVD player”).
Cables used for connections
Audio cable (sold separately)
Audio cable
(White)
(Red)
R
L
R
L
Audio cable
R
L
R
L
R
L
R
L
R
L
R
L
SUB-
WOOFER
CENTER SURROUND
BACK
RL
SURROUND
RL
FRONT
RL
AUDIO
Blu-ray Disc player / DVD player /
External decoder
To play analog signals input from 7.1CH INPUT terminals, set
“Input Mode” (vpage50) to “7.1CH INPUT”.
“7.1CH INPUT” can also be selected with
A/D on the remote
control unit.
in Set as Necessary
When a device is connected to the SBL/SBR terminal of 7.1CH INPUT
terminals, set “Amp Assign” (vpage56) to “Normal”.
Connecting a external power
amplifier
• You can use this unit as a pre-amp by connecting a commercially
available power amp to the PRE OUT connector. Adding a power amp
to each of the channels provides an even greater sound presence.
• Select the connector to use and connect the device.
Cables used for connections
Audio cable (sold separately)
Audio cable
(White)
(Red)
R
L
R
L
Audio cable
R
L
R
L
R
L
R
L
R
L
R
L
SUB-
WOOFER
CENTER SURROUND
BACK
RL
SURROUND
RL
FRONT
RL
AUDIO
Power amplifier
• When using just one surround back speaker, connect it to the left
channel (L) terminal.
• Use the volume control on the subwoofer to control subwoofer
volume.
• If the subwoofer volume sounds low, use the volume control
provided on the subwoofer to adjust the volume.
NOTE
• When speakers have been connected to PRE OUT terminals, do not
connect the speakers to the speaker terminals.
• The output channels for the PRE OUT connector change to SBL and
SBR in the “Amp Assign” (vpage56) settings in the menu.
Connecting an antenna
NOTE
Keep the power cord unplugged until the SiriusConnect Home Tuner
connection have been completed.
n Positioning the antenna
For a consistent satellite signal, the antenna must be positioned
correctly. Use the following map to determine which area you are
in and position the antenna accordingly.
q
w
e
r
t
SOUTH
NORTH
WEST
SKY
EAST
HORIZON
Area 1 Point the antenna toward the sky in the east, northeast, or
southeast, either through a window or outside.
Area 2 Point the antenna toward the sky in the north or northeast,
either through a window or outside.
Area 3 Point the antenna toward the sky in the north or northwest,
either through a window or outside.
Area 4 Point the antenna toward the sky in the west, northwest, or
southwest, either through a window or outside.
Area 5 Put the antenna outside and point it straight up. The antenna
cannot be used indoors.


