


32
ENGLISH
5 PL
II
(PRO LOGIC
II
)
MUSIC PARAMETER
Pro Logic II-Music mode creates a rich and enveloping
surround ambience from stereo sources such as
CDs.
In this mode, SR4002/SR5002 includes three controls
to fi ne-tune the soundfi eld as follows.
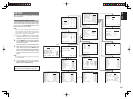
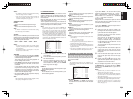
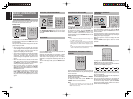
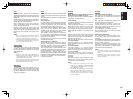
5 PLIIx MUSIC PARAMETER
PARAMETER : DEFAULT
PANORAMAA : OFF
DIMENSION : 0
CENTER WIDTH : 3
MAIN EXIT
Select “PL
II
MUSIC” in the SETUP MAIN MENU
with the 3 or 4 cursor buttons, and press the ENTER
button.
PARAMETER:
Select “DEFAULT” or “CUSTOM” with the 1 or 2
cursor buttons.
If you select “CUSTOM”, you can adjust three
parameters as listed below.
PANORAMA:
Select the Panorama mode On or Off with the
1 or 2 cursor buttons.
Panorama wraps the sound of the front left and right
speakers around you, for an exciting perspective.
DIMENSION:
Set the Dimension level between +3 and –3 level in
1 level intervals with the 1 or 2 cursor buttons.
Adjust the soundfi eld either towards the front or
towards the rear.
This can be useful to help achieve a more
suitable balance from all the speakers with certain
recordings.
CENTER WIDTH:
Set the Center width level between 0 and 7 in 1
level intervals with the 1 or 2 cursor buttons.
Center Width allows you to gradually spread the
center channel sound into the front left and right
speakers.
At its widest setting, all the sound from the center
is mixed into the left and right.
This control may help achieve a more spacious
sound or a better blend for the front image.
If “NONE” was selected for the Center speaker
setting, in the Speaker size set up menu, then this
setting will not appear.
After you complete this portion of the set up, move
cursor to “MAIN” with the 3 or 4 cursor buttons and
press the ENTER button.
7 7.1 CH INPUT LEVEL
This sub-menu is to adjust the speaker levels for 7.1-
channel input sources.
Here you will adjust the volume for each channel so
that they are all heard by the listener at the same
level.
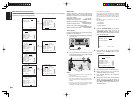
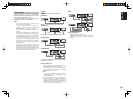
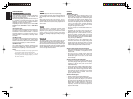
7 7.1 CH. INPUT LEVEL
VIDEO-IN : LAST
FRONT L : 0 dB
CENTER : 0 dB
FRONT R : 0 dB
SURR.R : 0 dB
SURR.B R : 0 dB
SURR.B L : 0 dB
SURR.L : 0 dB
SUB W : 0 dB
MAIN EXIT
1.
Select “7.1CH INPUT” in the SETUP MAIN
MENU with the 3 or 4 cursor buttons, and
press the ENTER button.
2.
To select “VIDEO IN”, press 3 or 4 cursor
button.
3.
Using the 1 or 2 cursor buttons, select the
video input source which is emitted from
Monitor out in the 7.1 CH INPUT function.
The input source is switched by pressing the
1 or 2 cursor buttons as follows;
LAST ↔ TV ↔ DVD ↔ VCR ↔ DSS ↔ AUX1
↔ V-OFF ↔ LAST ↔
Notes:
•
When select LAST, the source is set previous source
before 7.1 CH INPUT function
is activated.
•
When select V-OFF, no signal is emitted from monitor
out terminal.
4.
To Select desired channel , press the 3 or 4
cursor buttons.
5.
Using the 1 or 2 cursor buttons, adjust the
volume level of each channel.
6.
After you complete this portion of the set up,
move the cursor to “MAIN” with the 3 or 4
cursor buttons and press the ENTER button.
Notes:
•
These settings will be memorized to 7.1CH INPUT
source.
• This feature can be directly selected with the
CH.SEL button of the remote controller.
6 CS
II
(CIRCLE SURROUND
II
) PARAMETER
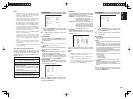
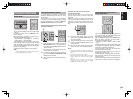
6 CSII PARAMETER
TRUBASS : 0
SRS DIALOG : 0
MAIN EXIT
1.
Select “CS
II
” in the SETUP MAIN MENU
with the 3 or 4 cursor buttons, and press the
ENTER button.
2.
To Select desired contents as below, press the
3 or 4 cursor buttons.
TRUBASS:
Set the TRUBASS level between 0 and 6 level in 1
level interval with the 1 or 2 cursor buttons.
TRUBASS produced by the speakers are an octave
below the actual physical capabilities of the speakers
adding exciting, deeper bass effects.
SRS DIALOG:
Set the SRS DIALOG level between 0 and 6 in 1
level intervals with the 1 or 2 cursor buttons.
This can be popped out of the surround audio
effects, allowing the listener to easily discern what
the actors say.
If “NONE” was selected for the Center speaker
setting, in the Speaker size set up menu, then this
setting will not appear.
After you complete this portion of the set up, move
cursor to “MAIN” with the 3 or 4 cursor buttons and
press the
ENTER
button.
8 MULTI ROOM (SR5002 only)
SR5002 has features in MULTI ROOM SYSTEM
such as source selector, sleep timer, Multi Room
Speaker output and remote control.
You can set these feature in this sub-menu.
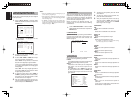
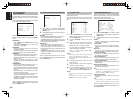
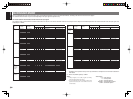
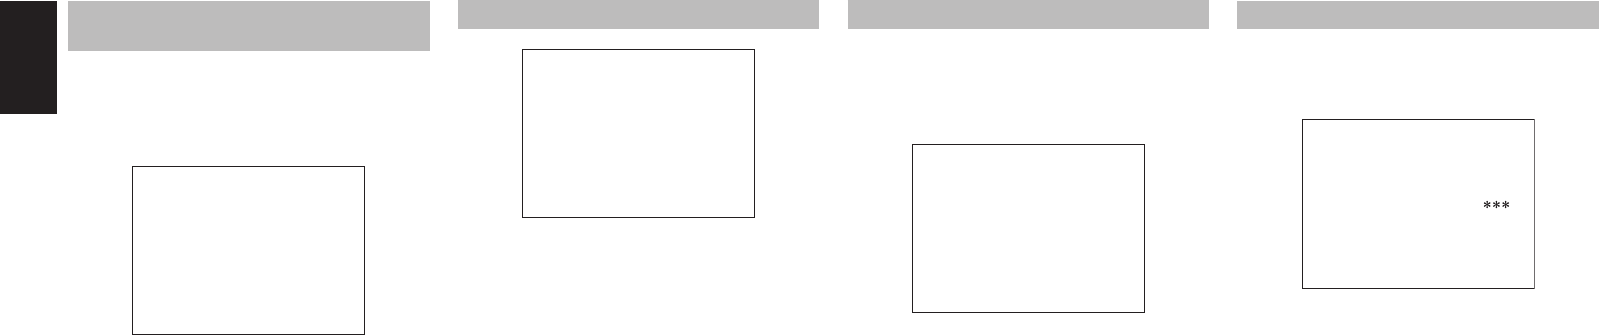
8 MULTI ROOM
AUDIO : DVD
SLEEP TIMER : OFF
MULTI:OUT : STEREO
MULTI:OFF MSPK :
VOL : VARI
LEVEL : -90dB
--- MAIN ROOM STATUS ---
VIDEO:DVD AUDIO:DVD
MAIN RETURN EXIT
1.
Select “MULTI ROOM” in the SETUP MAIN
MENU with 3 or 4 cursor button, and press the
ENTER button.
2.
To Select desired contents, press 3 or 4 cursor
button
AUDIO:
Select the audio source of the Multi-room output
with 1 or 2 cursor buttons.
SLEEP TIMER:
SLEEP timer function is available during the
multiroom is active, set the time with 1 or 2 cursor
buttons.
MULTI OUT:
To switch MULTI and MSPK outputs to either
STEREO or MONO, press 1 or 2 cursor button.
MULTI (MULTI ROOM):
To switch on the Multi-room output ON or OFF,
press 1 or 2 cursor button.
VOL (VOLUME SETUP):
Select whether the Multi-room output level is
variable or fi xed with a 1 or 2 cursor buttons.
LEVEL (VOLUME LEVEL):
Adjust the Multi-room output level with 1 or 2
cursor buttons.
MSPK (MULTI SPEAKER):
To switch on the Multi-speaker output ON or OFF,
press 1 or 2 cursor buttons.
Note:
This setting can be changed when the Surr Back is set
“NONE” in 2-1 SPEAKER SIZE menu. When this
setting is unavailable, “✽✽✽” is displayed
MAIN ROOM STATUS:
Selected input source in the main room will be
displayed.
Note:
If “VOLUME” is set to “FIXED”, the multi-room
output level cannot be adjusted from the second zone.
After you complete this portion of the set up, move
the cursor to “MAIN” with 3 or 4 cursor buttons and
press ENTER button.