


30
ENGLISH
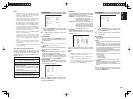
MRAC (Marantz Room Acoustic Calibration)
Speaker settings that were diffi cult by MANUAL setup can now be made by automatically measuring speaker
characteristics using the including microphone.
Measurement
During measurement, a test tone is output from the
speakers, which is then measured and analyzed
though the microphone. The measurement fl ow and
items are as follows.
Microphone connection check: MIC CHECK
Ambient noise measurement: AMBIENT NOISE
Speaker connected/not connected check:
SPEAKER CHECK
Speaker output level check: SPEAKER LEVEL
Distance from speaker (delay time) check:
SPEAKER DISTANCE
Speaker characteristics check: SPEAKER SIZE
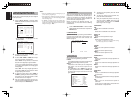
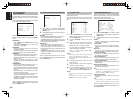
How to Operate
Settings are displayed on the monitor during setup,
therefore turn the monitor on.
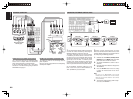
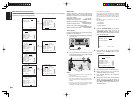
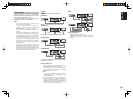
1.
Connect the included microphone to the MRAC
jack of the unit.
MULTI
SPEAKER
DIGITAL
RLVIDEO
S-VIDEO
AUX 1 INPUT
AUDIO
SETUP
SIMPLE
MULTI
PURE
T-MOD E
SURROUND
MEMORY
DISPLAY
ATT
MUTE
STANDBY
INPUT SELECTOR
VOLUME
UP
DOWN
AV SURROUND RECEIVER SR5002
DIRECT
AUTO
HT-EQ
EXIT
MENU
MODE
BAND
CLEAR
ENTER
PHONES
POWER ON/STANDBY
SETUP MIC
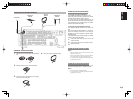
2.
Set the microphone at ear height as in the
actual listening position. Use a stand or tripod
to position the microphone.
Notes:
• Remove any obstructions between the speakers and
the microphone.
• Keep the room quiet during measurement.
• The test tone emitted during measurement is loud.
Take considerations for neighboring homes and
children.
• Step away from the listening position during
measurement and operate the unit with the remote
controller from outside the speaker path.
• About surround back speakers :
When the surround back speaker is set to NONE in
the SPEAKER SETUP, it is skipped in the AUTO
setup. To use the surround back speaker, set it to
YES by MANUAL setup before using the MRAC
feature.
• The MRAC feature is available except in the
following modes.
- 7.1 CH INPUT
- PURE-DIRECT
- SOURCE DIRECT
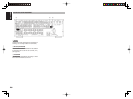
3.
Select “2. SPEAKER SETUP” on the SETUP
MAIN MENU, then select AUTO for “2-
1 SPEAKER SETUP”. Move the cursor to
“NEXT” with the 3 or 4 cursor buttons and then
press the ENTER button.
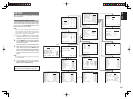
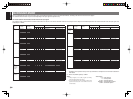
2-1 SPEAKER SETUP
SPEAKER SETUP : AUTO
SET MICROPHONE
MAIN NEXT EXIT
4.
Select START on the AUTO SETUP display
and press the ENTER button to start
measurements.
AUTO SETUP
START CANCEL
SPEAKERS CHECK :
SPEAKERS LEVEL :
SPEAKERS DISTANCE :
SPEAKERS SIZE :
MAIN RETURN NEXT EXIT
5.
For measurement items, see “Measurement”.
6.
When measurements are completed,
“FINISHED” appears on the monitor.
7.
Once finished, disconnect the microphone
from the unit.
8.
Measurement results can be seen by selecting
“NEXT” and press the ENTER button or
selecting “2. SPEAKER SETUP” on the SETUP
MAIN MENU. Then select MANUAL for “2-1
SPEAKER SETUP”.
2-1 SPEAKER SETUP
SPEAKER SETUP : AUTO
SET MICROPHONE
MAIN NEXT EXIT
AUTO SETUP
START CANCEL
SPEAKERS CHECK :
SPEAKERS LEVEL :
SPEAKERS DISTANCE :
SPEAKERS SIZE :
MAIN RETURN EXIT
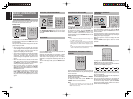
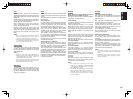
AUTO SETUP
START CANCEL
AMBI NOISE ERROR
SPEAKERS CHECK :
SPEAKERS LEVEL :
SPEAKERS DISTANCE :
SPEAKERS SIZE :
MAIN RETURN NEXT EXIT
AUTO SETUP
START CANCEL
SPEAKER SET ERROR
SPEAKERS CHECK :
SPEAKERS LEVEL :
SPEAKERS DISTANCE :
SPEAKERS SIZE :
MAIN RETURN NEXT EXIT
AUTO SETUP
START CANCEL
MIC SETUP ERROR
SPEAKERS CHECK :
SPEAKERS LEVEL :
SPEAKERS DISTANCE :
SPEAKERS SIZE :
MAIN RETURN NEXT EXIT
AUTO SETUP
START CANCEL
AMBIENT NOISE CHK
SPEAKERS CHECK :
SPEAKERS LEVEL :
SPEAKERS DISTANCE :
SPEAKERS SIZE :
MAIN RETURN EXIT
AUTO SETUP
START CANCEL
AMBIENT NOISE OK
&&&&&&&&&&&&&&&&
SPEAKERS CHECK :
SPEAKERS LEVEL :
SPEAKERS DISTANCE :
SPEAKERS SIZE :
MAIN RETURN EXIT
AUTO SETUP
START CANCEL
NOW ANALYZING
>
&&&&&&&&&&&&&&&&
SPEAKERS CHECK :
SPEAKERS LEVEL :
SPEAKERS DISTANCE :
SPEAKERS SIZE :
MAIN RETURN EXIT
AUTO SETUP
START CANCEL
FINISHED
SPEAKERS CHECK : OK
SPEAKERS LEVEL : OK
SPEAKERS DISTANCE : OK
SPEAKERS SIZE : OK
MAIN RETURN NEXT EXIT
NG
NG
NG