


5
ENGLISH
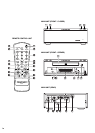
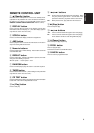
FRONT PANEL
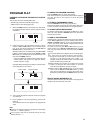
z Standby button
Press to switch the power ON, and press again to switch it OFF.
* If the SR110 is connected to the REMOTE CONTROL jacks on
the rear panel and its power is ON, the unit will not be set to the
standby mode even when this button is pressed.
x 7 (Stop) button
Press to stop play.
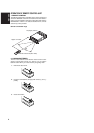
c Disc tray
Place a disc on the tray with its label surface facing up.
v 6 (Play/Pause) button
Press to start play or temporarily stop play.
b OPEN button
Press to open the front panel.
n 0 (Open/Close) button
When this button is pressed, the disc tray opens so place the
disc on the tray with its label surface facing up. When it is pressed
again the disc tray closes.
m Infrared sensor
This sensor is for receiving signals transmitted from the remote
control unit.
, ¡
/
¢, 4
/
1
(Track search/Skip) buttons
¡
/
¢ : When pressed once, play starts from the next track.
When held down for more than one second, the track
being played is searched in the forward direction.
4
/
1 : When pressed once, play resumes from the start of
the track now playing. When it is pressed again
within 1 second after it was pressed the first time,
play starts from the track before.
When held down for more than one second, the track
being played is searched in the reverse direction.
. Display panel
This panel displays the operating modes and statuses.
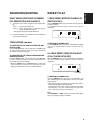
⁄0 REPEAT button
Press for repeat play. Each time the button is pressed, the mode
changes in sequence from "1-track repeat" fi "all track repeat"
fi "clear."
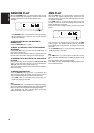
⁄1 DISPLAY button
Press to select the time display. Each time the button is pressed
during play, the display changes in sequence from "elapsed track
time" fi "remaining track time" fi "total remaining time" fi "clock
display" (when the unit is used on its own) fi "elapsed track time."
If this button is pressed in the standby mode when the unit is
being used on its own, the power-on mode is established for 10
seconds, during which time the clock display appears.
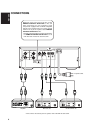
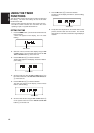
REAR PANEL
A ANALOG OUT jacks
These are the output jacks for the analog audio signals. Connect
them to the CD or AUX jacks, etc. on the amplifier using the
supplied analog connecting cord. Remember that the white jack
is for the LEFT channel and the red jack is for the RIGHT channel,
and connect the jacks correctly.
* Never connect these jacks to the PHONO jacks of the amplifier.
B REMOTE CONTROL IN/OUT jacks
The remote control operations of a system can be performed by
connecting the unit to a Marantz D-BUS compatible audio
component using the supplied remote control cable.
C REMOTE CONTROL SELECTOR
EXT./INT. switch
When the unit is to be used on its own, set this selector to "INT",
and when connecting the unit to Marantz audio components
equipped with a D-BUS compatible remote sensor window using
the remote control cable for use as part of a system, set the
selector to "EXT".
* Remote control operations cannot be performed if the REMOTE
CONTROL SELECTOR is set to "EXT" when the unit is to be
used on its own.
D DIGITAL OUT COAX. jacks
The CD signals during playback are output digitally to these jacks.
Connect these jacks to a recorder component, amplifier, D/A
converter or other unit equipped with coaxial digital input jacks
using a coaxial cable obtainable from your audio dealer.
E DIGITAL OUT OPT. jacks
The CD signals during playback are output digitally to these jacks.
Connect these jacks to a recorder component, amplifier, D/A
converter or other unit equipped with optical digital input jacks
using a square optical cable obtainable from your audio dealer.
F Power cord jack
Connect this to a household AC 120 V outlet.