


28
|
English
Sound management features
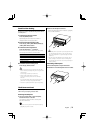
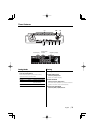
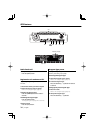
Function of the KDC-X979
Audio Setup (Easy mode)
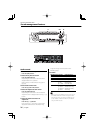
1
Selects the Easy mode of Audio setup
See the 'Audio Setup' (page 48) and select "Audio
Setup: Easy".
2 Select the source for adjustment
Press the [SRC] button.
3 Select the key function section
Press the [NEXT] button.
Repeatedly press the button until "AD SET" is
displayed above the [3] button.
Refer to 'Notes on Multi-function Key System'
(page 9).
4 Enter Audio Setup mode
Press the [3] ("AD SET") button.
5 Select the Audio Setup item for adjustment
Press the [2] — [5] button.
Each time the [2] — [5] button is pressed the
adjustable audio items are switched among
ranges of all stage section’s tables on the
following pages.
Multi-function key operation
Audio setup item
[2]
"CABIN"
Cabin setting
[3]
"
SP-SEL
"
[2] "FRONT"
[3] "REAR"
[4] "CNTR"
[5] "SW"
Speaker select Front
Speaker select Rear
Speaker select Center
Speaker select Subwoofer
[4]
"
SP-LEV
"
[2] "FRONT"
[3] "REAR"
[4] "CT/SW"
[5] "T-TONE"*
[2] "Front-L"
[2] "Front-R"
[3] "Rear-L"
[3] "Rear-R"
[4] "Center"
[4]
"Sub Woofer"
Speaker level Front Left
Speaker level Front Right
Speaker level Rear Left
Speaker level Rear Right
Speaker level Center
Speaker level Subwoofer
Speaker level Test tone
[5]
"CALL"
[2] "USER"
[3] "INST"
Call User
Call Insttaller
• You can recall the value you have adjusted in the
Audio setup PRO mode by selecting the "CALL". Refer
to 'Audio Setup memory Recall' (page 30).
• * You can listen to the "T-TONE" when you have
tuned it. The sound level is reduced when "T-TONE"
is selected. The sound returns to the normal level
when the original source is selected.
6 Adjust the Audio setup item
Press the [4] or [¢] button.
Each time the button is pressed the setting
switches as shown below.
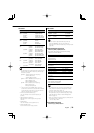
Audio setup Item Range
Cabin setting OFF/ Compact/ Full Size Car/
Wagon1/ Wagon2/ MiniVan1/
MiniVan2/ SUV/ MiniVan (Long)
Speaker select Front O.E.M./ 4/ 5/ 6½ / 6¾ / 7
(inch)
/
4
✳
6/ 5
✳
7/ 6
✳
8/ 6
✳
9/ 7
✳
10
Speaker select Rear None/ O.E.M./ 4/ 5/ 6½ /6¾ /
7
(inch)
/ 4
✳
6/ 5
✳
7/ 6
✳
8/ 6
✳
9/
7
✳
10
Speaker select Center None/ 2¾ / 1// 2/ 4/ 5/ 6½ /
Over
(inch)
Speaker select Subwoofer 6½ / 8/ 10/ 12/ 15 Over
(inch)
/
None
Speaker level Front Left
Speaker level Front Right
Speaker level Rear Left
Speaker level Rear Right
-10 — +10
Speaker level Center
Speaker level Subwoofer
-10 — +10
• The Adjustment item can also be controlled by the
rotary volume knob. Refer to 'Rotary Volume knob
operation mode select' (page 14).
• You can select the Speaker level only when you have
set the speaker to anything other than "None" using
the "SP-SEL".
7 Exit Audio setup mode
Press the [6] ("RTN") button.
Audio Setup (PRO mode)
1 Selects the PRO mode of Audio setup
See the 'Audio Setup' (page 48) and select "Audio
Setup: PRO".
2 Select the Audio Setup item for adjustment
Select an audio setup item you wish to adjust by
referring to Step 2-5 of 'Audio Setup (Easy mode)'
(page 28).