


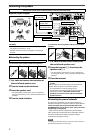

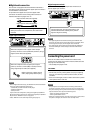

NOTES
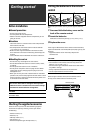
• If the AM loop antenna wire is covered with vinyl,
remove the vinyl while twisting it as shown on
the right.
• Make sure the antenna conductors do not touch
any other terminals, connecting cords and power
cord. This could cause poor reception.
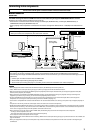
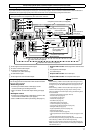
Connecting the antennas
Do not connect the AC power cord until all other connections have been made.
7 Connecting FM and AM antennas
AM antenna connection
Connect the AM loop antenna (supplied) to the AM LOOP
terminals: Connect the white cord to the AM EXT terminal, and
connect the black cord to the H terminal.
Turn the loop until you have the best reception.
• If the reception is poor, connect an outdoor single vinyl-
covered wire (not supplied) to the AM EXT terminal. Keep
the AM loop antenna connected.
FM antenna connection
Connect the supplied FM antenna to the FM 75 COAXIAL
terminal as a temporary measure.
Extend the supplied FM antenna horizontally.
• If the reception is poor, connect an outdoor FM antenna
(not supplied). Before attaching a 75 coaxial cable with a
connector, disconnect the supplied FM antenna.
AM loop antenna (supplied)If FM reception is poor, connect an
outdoor FM antenna (not supplied).
Snap the tabs on the loop
into the slots of the base
to assemble the AM loop
antenna.
If AM reception is poor, connect an
outdoor single vinyl-covered wire
(not supplied).
FM antenna (supplied)
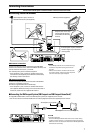
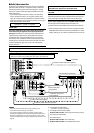
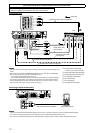
7 Connecting the XM Passport System (XM Passport and XM Passport Home Dock)*
To enjoy XM Satellite Radio, connect the XM Passport System (not supplied) to the receiver.
* You can also use the conventional XM Connect and Play Digital Antenna (not supplied) for the receiver.
XM Passport Home Dock (not supplied)
Black
White
NOTE
For the best reception:
– Place the XM Passport Home Dock antenna near a south-facing
window or where “Channel 1” can be heard clearly (see page 26).
– Make sure there is no obstruction between the XM Passport Home
Dock antenna and the sky.
XM Passport (not supplied)
7