


Do not connect the AC power cord until all other connections have been made.
Turn off all components before making connections.
• When you connect the components, refer also to their manuals.
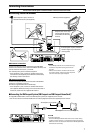
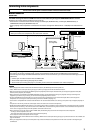
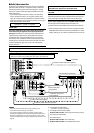
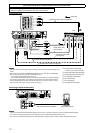
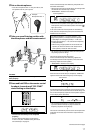
Connecting a VCR:
Component video cable (not supplied)
Stereo audio cable
(not supplied)
Composite video cable
(not supplied)
S-video cable (not supplied)
Composite video cable (not supplied)
VCR
Green
Blue
Red
White
Red
Red
White
: signal flow
NOTES
• Select the audio and video input settings according to the connection method. See page 21 for
details.
• When connecting a VCR to the COMPONENT VIDEO jacks, select “VCR” for the COMPONENT
select setting (see page 34); otherwise, the following occurs:
– You cannot view the playback picture on the TV.
– The AV COMPU LINK remote control system (see pages 45 and 46) cannot operate properly.
• You can enjoy digital audio if using a digital coaxial or optical cable. When shipped from the
factory, the digital optical terminal—DIGITAL IN 3(VCR) on the rear of the receiver is set for a
VCR. For details of the digital audio connection, see page 14.
Å
To component video output
• Connect Y, P
B, and PR correctly.
ı
To left/right audio channel output
Ç
To left/right audio channel input
Î
To composite video output
‰
To S-video output
Ï
To S-video input
Ì
To composite video input
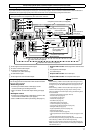
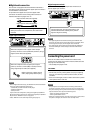
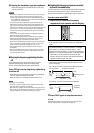
Connecting a SIRIUS Satellite Radio
NOTES
• To connect KT-SR2000 (JVC SIRIUS Satellite Radio) to this receiver, it is required to separately purchase KS-K6013 Home Docking Kit.
• You cannot use a digital audio cable (coaxial or optical) to connect a SIRIUS Satellite Radio to this receiver.
• After connecting a SIRIUS Satellite Radio to the TV/SIRIUS IN jacks, change the source name to “SIRIUS.” See page 20 for details.
Stereo audio cable (not supplied) SIRIUS Satellite Radio
White
Red
12