


51
VCR 1 (VCR connected to the VCR 1 jacks)
You can always perform the following operations:
VCR 1 POWER: Turns on or off the VCR 1.
After pressing VCR 1 (or selecting “VCR 1” by pressing
CONTROL repeatedly), you can perform the following operations
on the VCR 1:
1 – 9, 0: Selects the TV channels on the VCR.
3 PLAY: Starts playing.
REW: Rewinds a tape.
FF: Fast winds a tape.
7 STOP: Stops operations.
8 PAUSE: Pauses playing. To release it, press
3 PLAY.
REC PAUSE: Enters recording pause.
CH +/–: Changes the TV channels on the VCR.
Note:
You can use either VCR 1 or CONTROL to activate the buttons listed
above. If you press VCR 1, the playing source also changes. On the
other hand, if you press CONTROL repeatedly to select “VCR 1,” the
playing source does not change.
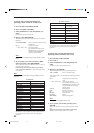
DVD player
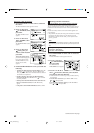
After pressing DVD or DVD MULTI, you can perform the
following operations on a DVD player:
3 PLAY: Starts playing.
4: Returns to the beginning of the current
(or previous) track.
¢: Skips to the beginning of the next track.
7 STOP: Stops playing.
8 PAUSE: Stops playing temporarily. To release it,
press 3 PLAY.
After pressing DVD or DVD
MULTI, these buttons can be used
for the DVD menu operations.
Note:
For detailed menu operations, refer to
the instructions supplied with the
discs or the DVD player.
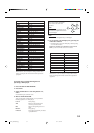
TV
You can always perform the following operations:
TV POWER: Turns on or off the TV.
TV VOL +/–: Adjusts the volume.
TV/VIDEO: Sets the input mode (either TV or
VIDEO).
After pressing TV/DBS, you can perform the following operations
on a TV:
CH +/–: Changes the channels.
1 – 9, 0, 100+: Selects the channels.
RETURN: Alternates between the previously
selected channel and the current
channel.
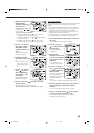
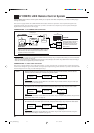
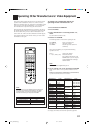
Operating Video Components
IMPORTANT:
To operate JVC’s video components using this remote control:
• You need to connect JVC video components through the AV
COMPU LINK jacks (see page 47) in addition to the connections
using cables with RCA pin plugs (see pages 6 and 7).
• Some JVC VCRs can accept two types of the control signals —
remote code “A” and “B.” Before using this remote control, make
sure that the remote control code of the VCR connected to the VCR 1
jacks is set to code “A.”
– When another JVC VCR is connected to the VCR 2 or VIDEO
terminals, set its remote control code to code “B.” (This remote
control cannot emit the control signals of code “B.”)
• When using the remote control:
– For the DVD player and VCR 1 operations, aim the remote
control directly at the remote sensor on each component, not on
the receiver.
– For the TV having the AV COMPU LINK EX or AV COMPU
LINK III terminal, aim the remote control directly at the remote
sensor on the TV.
EFFECT
TEST CTR TONE
∗L/R BAL
23
456
8
MENU
ENTER
ROOM
SIZE
LIVENESS
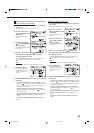
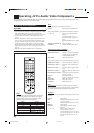
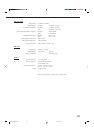
Buttons Indications
VCR 1 VCR 1
DVD or DVD MULTI DVD
TV/DBS TV
CONTROL (repeatedly)
VCR 1
TAPE
CDR
CDDSC
CONTROL
+
−
+
−
+
−
231
564
89
7/P
0
+1010
LINE DIF.ECT BOOST EFFECT
MENU
ENTER
SIZE
ROOMBASS
MODE
TEST
CTR TONE
LIVENESS
MIDNIGHT
SOUND
∗
SUBWFR
∗
DIGITAL EQ
∗
REAR L
∗
REAR R
∗
L/R BAL
∗
CENTER
MUTING
CH/
∗
LEVEL TV VOL
PLAY
STOP
/REW
DOWN – TUNING – UP
FF/
EXIT
∗
BAL L
∗
BAL R
VOLUME
CATV/DBS
CONTROL
TV/VIDEO
MENU
TEXT
REC
DISPLAY
PAUSE
PAUSE
SET
RETURN FM MODE 10 0
+
CONTROL
A/V CONTROL RECEIVER
RM-SRX8010J
CATV/DBS VCR 1 TV AUDIO
DSP
MODE INPUTON/OFF
DVD MUILTIDVD
USB
CD
CDR
TAPE/MD
TV/DBS VIDEO PHONO
FM/AM
VCR 1 VCR 2
SURROUND
ANALOG/DIGITAL
SLEEP
POWER
POWER
POWER POWER
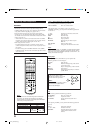
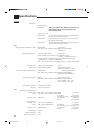
Note:
When you press one of the following buttons mentioned in
this section, the operation mode appears on the display
window for about 10 seconds. For example, above illustration
shows that you have pressed VCR 1.
EN47_58.RX-8010V[J]_f 01.1.11, 9:11 PM51