


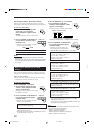

18
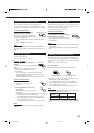
CONTROL
DOWN UP
C
T SETTING
E
CT SETTING
CONTROL
DOWN UP
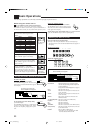
Center Delay Time Setting
Register the delay time of the sound from the center speaker,
comparing to that of the sound from the front speakers.
If the distance from your listening point to the center speaker is
equal to that to the front speakers, select 0 ms. As the distance to the
center speaker becomes shorter, increase the delay time.
• 1 msec increase (or decrease) in delay time corresponds to 11
13
/16
inches (30 cm) decrease (or increase) in distance.
• When shipped from the factory, the delay time is set to 0 ms.
On the front panel ONLY:
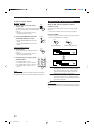
1. Press SETTING repeatedly until
“CTR DELAY” (Center Delay)
appears on the display.
The display changes to show the current setting.
2. Press CONTROL UP 5/DOWN ∞
to select the delay time of the
center speaker output (from 0 ms
to 5 ms).
Notes:
• Center delay time is not valid for the DVD MULTI playback mode.
• You cannot adjust the center delay time when you have set “CTR
SPK” to “NONE.”
Rear Delay Time Setting
Register the delay time of the sound from the rear speakers,
comparing to that of the sound from the front speakers.
If the distance from your listening point to the rear speakers is equal
to that to the front speakers, select 0 ms. As the distance to the rear
speakers becomes shorter, increase the delay time.
• 1 msec increase (or decrease) in delay time corresponds to 11
13
/16
inches (30 cm) decrease (or increase) in distance.
• Rear delay time for Dolby Digital and DTS Digital Surround is to
be set to 5 ms.
• When shipped from the factory, the delay time is set to 5 ms.
On the front panel ONLY:
1. Press SETTING repeatedly until
“REAR DELAY” appears on the
display.
The display changes to show the current
setting.
2. Press CONTROL UP 5/DOWN ∞
to select the delay time of the rear
speaker output (from 0 ms to
15 ms).
Notes:
• Rear delay time is not valid for the DVD MULTI playback mode.
• You cannot adjust the rear delay time when you have set “REAR
SPK” to “NONE.”
Crossover Frequency Setting
Small speakers cannot reproduce the bass sound very well. So, if
you have used a small speaker for any of the front, center, and rear
channels, this receiver automatically reallocates the bass elements,
originally assigned to the channel for which you have connected the
small speaker, to another channel (for which you have connected the
large speaker).
To use this function properly, you need to set the crossover
frequency level according to the size of the small speaker connected.
• If you have selected “LARGE” for all speakers (see page 17), this
function cannot be adjusted.
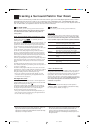
On the front panel ONLY:
1. Press SETTING repeatedly until
“CROSS OVER” appears on the
display.
The display changes to show the current setting.
2. Press CONTROL UP 5/DOWN ∞
to select the crossover frequency
level according to the size of the
small speaker connected.
• Each time you press the button, the display
changes to show the following:
• Use the following comments as reference when adjusting.
80Hz: Select this when the cone speaker unit built in the
speaker is about 4
3
/4 inches (12 cm).
100Hz: Select this when the cone speaker unit built in the
speaker is about 3
15
/16 inches (10 cm).
120Hz: Select this when the cone speaker unit built in the
speaker is about 3
3
/16 inches (8 cm).
Note:
Crossover frequency is not valid for the DVD MULTI playback,
5 CH /4 CH Stereo, 3D-PHONIC, and HEADPHONE DSP modes.
CONTROL
DOWN UP
80Hz 100Hz 120Hz
E
CT SETTING
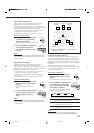
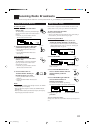
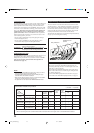
Center
speaker
Left front
speaker
Right front
speaker
2.1 m
2.4 m
2.7 m
3.0 m
Left rear
speaker
Right rear
speaker
Ex.Set the center delay time to “1 ms” and the rear
delay time to “2 ms.”
EN11_23.RX-8010V[J]_f 01.1.11, 5:52 PM18