


19
Low Frequency Effect Attenuator Setting
If the bass sound is distorted while playing back a source using
Dolby Digital or DTS Digital Surround, follow the procedure below.
On the front panel ONLY:
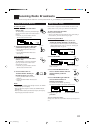
1. Press SETTING repeatedly until
“LFE ATT” (Low Frequency
Effect Attenuator) appears on the
display.
The display changes to show the current setting.
2. Press CONTROL UP 5/DOWN ∞
to select the low frequency effect
attenuator level.
• Each time you press the button, the display
changes to show the following:
0dB: Normally select this.
10dB: Select this when the bass sound is distorted.
Notes:
• Low frequency effect attenuator is not valid for the DVD MULTI
playback mode.
• This function takes effect only when the Dolby Digital or DTS Digital
Surround sounds with LFE signal comes in (with “SUBWOOFER”
set to “YES”).
Digital Input (DIGITAL IN) Terminal
Setting
When you use the digital input terminals, you have to register what
components are connected to which terminals (DIGITAL IN 1/2/3/4).
Before you start, remember...
• There is a time limit in doing the following steps. If the setting is
canceled before you finish, start from step 1 again.
On the front panel ONLY:
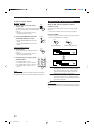
To set the DIGITAL 1 terminal:
1. Press SETTING repeatedly until
“DGTL COAX” (Digital Coaxial)
appears on the display.
The display changes to show the current setting
for DIGITAL 1 terminal.
2. Press CONTROL UP 5/DOWN ∞
to select the appropriate digital
terminal setting.
• Each time you press the button, the display
changes to show the following:
1: DVD “ 1: MD
**
“ 1: CDR “ 1 : TV (or DBS
*
) “
1: CD “ (back to the beginning)
*
If you have changed the source name from “TV” to “DBS,”
“DBS” appears (see page 16).
**
Change the source name to “MD” for TAPE/MD jacks when you
use an MD recorder (see page 16).
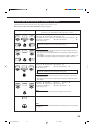
0dB 10dB
C
T SETTING
CONTROL
DOWN UP
DIGITAL 4 terminal setting
DIGITAL 2 terminal setting
DIGITAL 3 terminal setting
CONTROL
DOWN UP
C
T SETTING
T
SETTING
CONTROL
DOWN UP
To set the DIGITAL 2/3/4 terminals:
1. Press SETTING again until
DIGITAL 2/3/4 terminals' setting
appears on the display.
The display changes to show the current settings.
2. Press CONTROL UP 5/DOWN ∞
to select the appropriate digital
terminal settings.
• Each time you press the buttons, the
display changes to show the following:
When the DGTL COAX (DIGITAL 1) is set to “DVD”
2: CD 3: TV (or DBS
*
) 4: CDR “
2: CD 3: TV (or DBS
*
) 4: MD
**
“
2: CD 3: MD
**
4: CDR “
2: MD** 3: TV (or DBS
*
) 4: CDR “
(back to the beginning)
When the DGTL COAX (DIGITAL 1) is set to “MD”
**
2: CD 3: TV (or DBS
*
) 4: DVD “
2: CD 3: DVD 4: CDR “
2: DVD 3: TV (or DBS
*
) 4: CDR “
2: CD 3: TV (or DBS
*
) 4: CDR “
(back to the beginning)
When the DGTL COAX (DIGITAL 1) is set to “CDR”
2: MD
**
3: TV (or DBS
*
) 4: DVD “
2: CD 3: TV (or DBS
*
) 4: DVD “
2: CD 3: TV (or DBS
*
) 4: MD
**
“
2: CD 3: MD
**
4: DVD “
(back to the beginning)
When the DGTL COAX (DIGITAL 1) is set to “TV” or “DBS”
2: CD 3: MD
**
4: CDR “ 2: MD
**
3: DVD 4: CDR “
2: CD 3: DVD 4: CDR “ 2: CD 3: DVD 4: MD
**
“
(back to the beginning)
When the DGTL COAX (DIGITAL 1) is set to “CD”
2: DVD 3: TV (or DBS
*
) 4: MD
**
“
2: DVD 3: MD
**
4: CDR “
2: MD
**
3: TV (or DBS
*
) 4: CDR “
2: DVD 3: TV (or DBS
*
) 4: CDR “
(back to the beginning)
* If you have changed the source name from “TV” to “DBS,”
“DBS” appears (see page 16).
**
Change the source name to “MD” for TAPE/MD jacks when you
use an MD recorder (see page 16).
Note:
When shipped from the factory, the DIGITAL IN terminals have been
set for use with the following components.
• DIGITAL 1 (coaxial): For DVD player
• DIGITAL 2 (optical): For CD player
• DIGITAL 3 (optical): For digital TV broadcast tuner
• DIGITAL 4 (optical): For CD recorder
EN11_23.RX-8010V[J]_f 01.1.11, 5:52 PM19