


Troubleshooting and Removal/Replacement Procedures
3–9
Removing and Replacing the DDS-3 Drive
To open your system and to remove and reinstall the DDS-3 drive, refer to the owner’s
guide that came with your system. Read “Preparing to Install the DDS-3 Drive” in
Chapter 1 of this guide before beginning an installation.
Adding or Removing the DDS-3 Drive Bezels and Expansion Brackets
Depending on the size of the drive opening in your system, you may need to add or
remove a bezel or expansion brackets to ensure that your DDS-3 drive fits in your
system.
NOTICE: Before performing any of these changes, make sure there is not a
cassette in the drive.
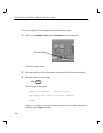
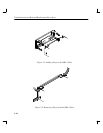
• To add a bezel (it can be a 3.5-inch bezel, or a 5.25-inch bezel) to your drive,
push onto the drive, making sure the tabs click into place. Refer to Figure 3–1.
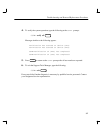
• To remove a bezel from a drive, use a straight blade screwdriver to lift the bezel
tabs from the top of the drive, and push in the tabs on the sides of the drive.
Refer to Figure 3–2.
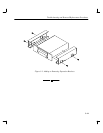
• To add or remove expansion brackets to the drive, use a T10 torx wrench to ei-
ther tighten or remove the four torx screws that hold each expansion bracket to
the drive. Refer to Figure 3–3.