


8
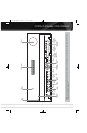
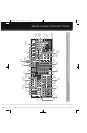
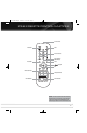
FRONT- PANEL CONTROLS
Power Indicator: This LED has three possible modes:
• Main Power Off: When the AVR is unplugged or the Main
Power Switch is off, this LED is off.
• Standby: Amber indicates that the AVR is ready to be turned on.
• On: When the AVR is turned on, this LED turns white.
NOTE: If the PROTECT message ever appears, turn off the
AVR and unplug it. Check all speaker wires for a possible short.
If none is found, bring the unit to an authorized Harman Kardon
service center for inspection and repair before using it again.
Standby/On Switch: This electrical switch turns the
receiver on, or places it in Standby mode for quick turn-on.
Front-Panel Door (not shown): Most of the controls
and connectors described below are hidden behind this door. To
open it, gently grab the right or left edge of the door and pull it
forward and down.
Main Power Switch: This mechanical switch turns the
power supply on or off. It is usually left on, and cannot be turned
on or off using the remote control.
AVR Settings Button: Press this button to access the
AVR’s main menu.
Info Settings Button: Press this button to directly access
the AVR’s Source Info submenu, which contains the settings for the
current source.
Resolution: Press this button to access the AVR’s video output
resolution setting: 480i, 480p, 720p, 1080i or 1080p.
IMPORTANT NOTE: If the AVR’s video output resolution
is set higher than the capabilities of the actual connection,
you will not see a picture. If the best available video connection
from the AVR to the TV is either composite or S-video, press
this button and change the resolution to 480i.
Audio Effects: Press this button to directly access the Audio
Effects submenu, which allows adjustment of the tone and other
audio controls. See the Initial Setup section for more information.
Video Modes: Press this button for direct access to the Video
Modes submenu, which contains settings that may be used to
improve the picture, if necessary, after you have adjusted the
picture settings using the video display or TV.
Surround Modes: Press this button to select a surround
sound (e.g., multichannel) mode. The Surround Modes menu will
appear on screen, and the menu line will appear in the front-panel
display. See the Advanced Functions section for more information
on surround modes.
Source List: Press this button to select a source device,
which is a component where a playback signal originates, e.g., DVD.
Menu Button: Press to display the menus for the tuner, the
USB device, The Bridge II, the Network or Internet Radio, when any
of those sources is in use.
Back/Exit: Press this button to return to the previous menu,
or to exit the menu system.
1/57/3Navigation: These buttons are used to navigate the
AVR’s menus, including the menus for the tuner, the USB device,
The Bridge II, the Network and Internet Radio.
OK: Press this button to select the currently highlighted item.
Headphone Jack: Plug a 1/4" stereo headphone plug into
this jack for private listening.
USB Port: Connect a USB flash drive, to play audio files in
the MP3 or WMA format or still images in the JPEG format. DO NOT
connect a PC, keyboards, pointing devices or other peripheral prod-
ucts to the AVR 7550HD. Do not connect an iPod here; use The
Bridge II instead. Do not connect a USB hub or multi-card device.
Digital Audio, Video and Analog Audio Front
Inputs: Connect a source component that will only be used
temporarily, such as a digital camera or game console, to these
jacks. Use only one type of audio and one type of video connection.
NOTE: The AVR’s menus refer to these jacks as the Optical
Front, Coaxial Front, Composite Front, S-Video Front and
Analog Front inputs.
EzSet/EQ II Microphone Input: This jack is used to
connect the supplied microphone for the EzSet/EQ II procedure
described in the Initial Setup section.
Volume Knob: Turn this knob to raise or lower the volume.
Message Display: Various messages appear in this two-line
display in response to commands and changes in the incoming signal.
In normal operation, the current source name appears on the upper
line, while the surround mode is displayed on the lower line. When
the on-screen display menu system (OSD) is in use, the current
menu settings appear.
Remote IR Sensor: This sensor receives infrared (IR)
commands from the remote control. It is important to ensure that it
is not blocked. If covering the sensor is unavoidable, use an optional
Harman Kardon HE 1000, or other infrared receiver, connecting it to
the Remote IR Input on the AVR 7550HD’s rear panel.
AVR 7550HD OM.qxd 2/25/09 11:52 AM Page 8