


SYSTEM SETUP 27
ENGLISH
System Setup
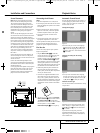
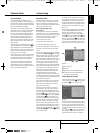
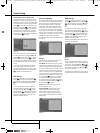
Automatic Search (For analog TV only)
The Automatic Search Menu allows you to auto-
matically search for available TV channels. With
the TV Set Up Menu on the screen, press the
L
Button
9
until the Automatic Search text line
is highlighted. Press Enter
6
to select, followed
by pressing the
N
Button
9
to access the dif-
ferent automatic search settings. The TV’s tuner
has a memory for 99 TV stations.
-
Figure 2f
Country: The country line lets you select the
country you reside in to do a country-specific
sorting sequence of the TV channels. Should you
wish to change this setting, press the Enter
Button
6
once it is highlighted.
The blue bar will disappear and the rest of the
settings will fade out. Select the country you
reside in by pressing the
N
or
M
Buttons
9
until the requested country is shown. Press the
Enter Button
6
to confirm.
Search Form: Selects whether you would like to
search for All Stations or New Stations. Should
you wish to change this setting, press the Enter
Button
6
once it is highlighted. The blue bar
will disappear and the rest of the settings will
fade out. Select the search form by pressing the
N
or
M
Buttons
9
. Press the Enter Button
6
to confirm.
Start Search: Starts the search for all or new TV
stations, depending on the setting made in the
previous line. To start the search, press the Enter
Button
6
once it is highlighted. The automatic
search menu will be replaced by the Auto Search
Progress Menu during the time of the search.
When the search is finished the Edit Channel List
Menu will appear on the screen. Follow the
instructions on page 28 should you wish to make
changes to the order of the presets or would like
to delete presets from the list.
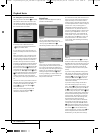
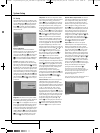
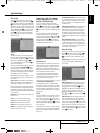
Manual Search (For analog TV only)
The third submenu in the TV Set Up Menu is the
Manual Search Menu that allows you to manual-
ly search for available TV channels. With the TV
Set Up Menu on the screen, press the
L
Button
9
until the Manual Search text line is high-
lighted. Press Enter
6
to select, followed by
pressing the
N
Button
9
to access the differ-
ent manual search settings.
Figure 2g
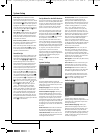
Pre-set Station: Selects a new preset station
number. Should you wish to change this position,
press the Enter Button
6
once the line is high-
lighted. The blue bar will disappear and the rest
of the settings will fade out. Select the requested
position by pressing the
N
or
M
Buttons
9
until it is shown. Press the Enter Button
6
to
confirm.
Type: Selects whether you would like to search
for Channels or S-Channels (Special Channels,
Cable channels). Should you wish to change the
channel type, press the Enter Button
6
once it
is highlighted. The blue bar will disappear and
the rest of the settings will fade out. Select the
requested type from the list by pressing the
N
or
M
Buttons
9
. Press the Enter Button
6
to
confirm.
The next steps depend on which information
about the TV station to add you have on hand.
Depending on whether you have the correct
channel number or the correct frequency, follow
one of the two steps described below.
Channel: Assigns the TV station’s channel num-
ber. If you know the correct channel number of
the TV station to add, press the Enter Button
6
once the line is highlighted. The blue bar will dis-
appear and the rest of the settings will fade out.
Select the correct station number by pressing the
N
or
M
Buttons
9
from the list or by typing it
with the Numeric Keys
S
on the remote con-
trol. Press the Enter Button
6
to confirm. Note
that once confirmed, the frequency matching this
channel will automatically be shown.
Frequency: Assigns the TV station’s frequency. If
you know the correct frequency of the TV chan-
nel to add, press the Enter Button
6
once the
line is highlighted. The blue bar will disappear
and the rest of the settings will fade out. Type
the station’s frequency with the help of the
Numeric Keys
S
on the remote control. Press
the Enter Button
6
to confirm. Note that once
confirmed, the channel number matching this
frequency will automatically be shown.
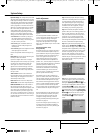
Name: The line shows the input for the TV
station’s name and can contain up to five
characters. To enter the name, press the Enter
Button
6
once the line is highlighted. The blue
bar will disappear and the rest of the settings
will fade out. Press the
K
or
L
Buttons
9
to
scroll through the available characters to form
the stations name. When the first position con-
tains the right character, move the cursor to the
right by pressing the
N
Button
9
and select
the next character. Repeat this until all characters
are filled or until the correct name shows on the
line. Press the Enter Button
6
to confirm.
TV Standard: Selects the TV standard. Should
you wish to change the TV standard, press the
Enter Button
6
once it is highlighted. The blue
bar will disappear and the rest of the settings
will fade out. Select the requested TV standard
from the list by pressing the
N
or
M
Buttons
9
.
Press the Enter Button
6
to confirm.
Note: If you do not know which TV standard to
choose, we recommend that you run the auto-
matic channel search procedure.
Color Standard: Selects the Color standard.
Should you wish to change the color standard,
press the Enter Button
6
once it is highlighted.
The blue bar will disappear and the rest of the
settings will fade out. Select the requested TV
standard from the list by pressing the
N
or
M
Buttons
9
. Press the Enter Button
6
to
confirm.
Note: If you do not know which color standard
to choose, we recommend that you run the auto-
matic channel search procedure.
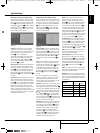
Decoder: Older Pay TV systems that require an
external decoder can be connected to either one
of the 2 Scart inputs. Depending on the decoder
type, change the Decoder Settings according to
the table below.
Decoder
TV channel
Sound Picture
Normal Uncoded Uncoded
Decoder A SCART1 Uncoded Coded
Decoder B SCART1 Coded Coded
Decoder A SCART2 Uncoded Coded
Decoder B SCART2 Coded Coded
0007CSK - DigitalLounge 632_640_646 ENG v11.qxp:0007CSK - DigitalLounge 632,640,646 UK 12/06/08 11:10 Side 27 (Sort/Black plade