


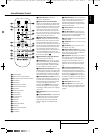


20 INSTALLATION AND CONNECTIONS
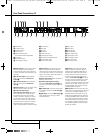
Connecting a PC
If you wish to connect your PC to the screen, the
best way is to connect the DVI output of the com-
puter to the DVI Input
K
on the rear panel of the
screen. At the same time connect the audio output
of your computer to the PC Audio Input
I
on the
rear panel of the screen. If your PC does not have a
DVI output, but VGA only, use an adapter cable
VGA->DVI to connect your PC to the DVI input of
the screen. If the grafic card of your PC has also
other video outputs, please use any of the available
outputs of your computer to the matching input of
the screen.
Connecting a Digital Set Top Box or
Satellite Receiver
If you wish to connect your digital set top box or
satellite receiver to the screen, the best way is to
connect the HDMI output of the satellite receiver to
any of the HDMI 1 or HDMI 2
RS
on the rear
panel of the screen. Both inputs are capable of
accepting up to 1080p signals.
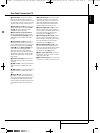
Optional Audio Connections
Aux Input for External Source
You may connect a line-level stereo analog audio
source such as a Sat receiver, tape deck, phono pre-
amp of a record player, etc. to the controller's rear
panel AUDIO IN Input
6
sockets to enjoy the bene-
fits of your system with other source components.
• VCR Connection-Audio (Cables Not Included). To
listen to the sound from your stereo VCR through
the speakers of this system, connect the Left/Right
audio output jacks of your stereo VCR to the
Left/Right audio input jacks AUDIO IN
6
of this
system.
Aux Output for Recording
To record the sound of the system with your VCR or
any audio recording device (tape deck, MD, CDR
and some others.) the Audio Out jacks
A
should be
connected to the analog Record In jacks of the
appropriate device.
Digital In- and Outputs
Connect the optical digital output of any digital
sources such as an optional CD or DVD changer or
player, advanced video game, a digital satellite
receiver, HDTV tuner or digital cable set-top box or
the output of a compatible computer sound card to
the Optical Digital Inputs 1, 2 or 3
PXW9
.
The Coaxial Digital ouput of those devices may be
connected with the Coaxial Digital input
P
on
the screen, (for PCM only) or the Coaxial Digital
Input
8
on the unit (for all formats), see page 19.
Connect the Coaxial Digital Output
E
on the
rear panel of the Digital Lounge system to the
matching digital input connections on a CD-R or
MiniDisc recorder.
Note: When connecting the optical digital audio
cable (optional).
n Gently push the cable plug through the built-in
shutter that covers the optical digital audio out-
put and connect the cable firmly so that the con-
figurations of both the cable and the connector
match.
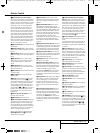
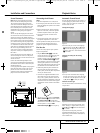
Speaker Placement
The placement of speakers in a multichannel
home-theater system can have a noticeable
impact on the quality of sound reproduced.
If you use the screen with the supplied table
stand, place the center loudspeaker in the desig-
nated place between the two feet of the stand.
Install the speaker from behind, and push it
gently forward until it can not go any further.
If you do not wish to use the supplied table
stand, place the center speaker either directly
above or below your TV. A wall bracket is supplied
for the Center Speaker for this purpose. Once the
center-channel speaker is installed, position the
left-front and right-front speakers so that they are
as far away from one another as the center-chan-
nel speaker is from the preferred listening position.
Ideally, the front-channel speakers should be
placed so that their tweeters are no more than
60cm above or below the tweeter in the center-
channel speaker. Depending on the specifics of
your room acoustics, you may find that imaging is
improved by moving the front-left and front-right
speakers slightly forward of the center-channel
speaker. If possible, adjust all front loudspeakers so
that they are aimed at ear height when you are
seated in the listening position.
Using these guidelines, you’ll find that it takes
some experimentation to find the correct location
for the front speakers in your particular installa-
tion. Don’t be afraid to move things around until
the system sounds correct. Optimize your speak-
ers so that audio transitions across the front of
the room sound smooth.
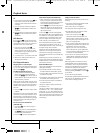
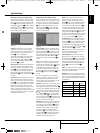
The preferred location for surround speakers is on
the side walls of the room, at or slightly behind
the listening position.
Rear surround speakers may also be used in 5.1
channel mode as an alternative mounting posi-
tion when it is not practical to place the main
surround speakers at the sides of the room.
Speakers may be placed on a rear wall, behind
the listening position. As with the side speakers,
the center of the rear surrounds should face you.
The speakers should be no more than 2 meters
behind the rear of the seating area.
The supplied pair of loudspeaker stands can be
used to either place the front- or rear loudspeak-
ers. Follow the instructions in the manual of the
stands for proper installation of the loudspeakers
on the stands.
Subwoofers produce largely nondirectional
sound, so they may be placed almost anywhere in
a room. Actual placement should be based on
room size.
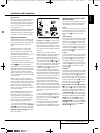
Installation and Connections
White
Red
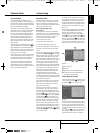
A) Front Channel Speaker Installation
with table stand
Center Front�
Speaker
Optional Rear-Wall Mounting
TV or Projection Screen
Right Front�
Speaker
Left Front�
Speaker
No more than 2m�
when rear-mounted�
speakers are used
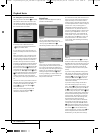
B) The distance between the left and right
speakers should be equal to the distance from
the seating position to the viewing screen.
You may also experiment with placing the left
and right speakers slightly forward of the center
speaker. Rear speaker mounting is an alternate
location for 5.1 systems.
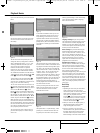
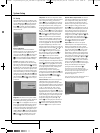
One method of finding the optimal location for a
subwoofer is to begin by placing it in the front
of the room, about 15cm from a wall, or near
the front corner of the room. Another method is
to temporarily place the subwoofer in the spot
where you will normally sit, and then walk
around the room until you find a spot where the
subwoofer sounds best. Place the subwoofer in
that spot.
0007CSK - DigitalLounge 632_640_646 ENG v11.qxp:0007CSK - DigitalLounge 632,640,646 UK 12/06/08 11:10 Side 20 (Sort/Black plade