


SYSTEM SETUP 25
ENGLISH
Playback Basics System Setup
Surround Mode
One of the most important features of the
Digital Lounge system is its ability to reproduce a
full multichannel surround sound field from digi-
tal sources, analog matrix surround encoded pro-
grams and standard stereo programs.
Selection of a surround mode is based on per-
sonal taste, as well as the type of program source
material being used. For example, motion pic-
tures, CD’s or TV programs bearing the logo of
one of the major surround encoding processes,
such as Dolby Surround should be played in
either the Harman proprietary Logic 7 Movie or
Dolby Pro Logic II Movie (with movies) or Logic 7
Music or Dolby Pro Logic II Music (with music)
surround mode.
Surround modes and audio formats are selected
using the remote. Press the AUDIO button
5
to
toggle between the surround modes/audio for-
mats available on the DVD disc. As you press the
button, the Surround mode/ audio format name
will appear on your video display.
When a digital source is present, the DVD receiv-
er will automatically select and switch to the cor-
rect mode (Dolby Digital or DTS), regardless of
the mode that has been previously selected.
To listen to a DVD-program in traditional two
channel stereo, using the front left and front
right speakers only plus the subwoofer, follow
the instructions shown in the chapter DVD Sound
Mode, in the Audio Settings Menu.
System Defaults
The final step of the installation is to establish
the system’s defaults. It is helpful to take a few
minutes to famili arize yourself with these set-
tings, as they may require change before the first
use and later from time to time.
General Functionality of the
User Interface
The complete setup and control of the Digital
Lounge takes place in an advanced Guided User
Interface menu system. The Guided User Interface
integrates four individual menu structures, all
easily accessible via the remote control:
• Set Up Menu for the Screen
• Set Up Menu for the DVD receiver
• On Screen Display Menu for the Screen
• On Screen Display Menu for the DVD receiver
All menus are easily accessible via the remote
control.
The main menu of the DVD-Receiver is available
by pressing the OSD Button
V
on the remote,
being in receiver mode (see page 24). It consists
of a DISC Menu, RADIO Menu, TV Menu, AUX
Menu, DIGITAL Menu, USB Menu, DMP menu
and a SET-UP Menu. The DISC Menu will show all
infor mation and options available for the disc
currently playing. The RADIO Menu will show
radio and RDS options. The TV, AUX and DIGITAL
Menus show the surround options for these spe-
cific audio inputs. The USB Menu will show all
information and options available when USB
thumb devices or portable hard disks are con-
nected. The DMP menu helps you browse
through your music library once your iPod is con-
nected to your Bridge.The SET-UP Menu will help
you configure all audio and video settings which
are normally only made once.
As the connection between the screen and the
DVD receiver is over HDMI, you will be able to
benefit from having high resolution interface
images, that are text based.
Many menus contain Submenus or text lines.
These submenus are shown on the left side of
the menu. They can be highlighted by a white
square around the text by moving the cursor with
the ARROW
9
buttons. Text can be activated
by pressing ENTER
6
when they are highlight-
ed. When ENTER
6
has been pressed, the
color of the circle behind the text will change to
light blue, and you will see that the current set-
tings of this submenu will appear on the right
side of the menu. Although some Menus have
various Submenus and Settings, they are all navi-
gated in the same way. All sub menus, settings
and options can be accessed with the help of the
ARROW (
KLNM
9
) and ENTER
6
buttons
on the remote control.
To change a setting, simply move the cursor to
the setting you wish to change. This setting will
be high lighted in a white square, and a brief
expla na tion will appear in the Upper Menu Line
on the bottom of your screen, together with the
available options for this setting on the Lower
Menu Line.
Once the setting is highlighted, pressing ENTER
will show an
M
and
N
icon next to the current
setting to indicate that the setting can be
changed by pressing the left or right ARROW
Button
9
. Press the ARROW Buttons
9
until
the requested setting is shown, and confirm this
setting by pressing ENTER
6
. Note that when
you cycle though the options for this setting, the
cursor cycles though the options on the Lower
Menu Line, and the rest of the Display fades out.
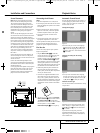
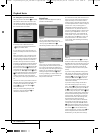
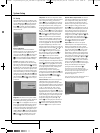
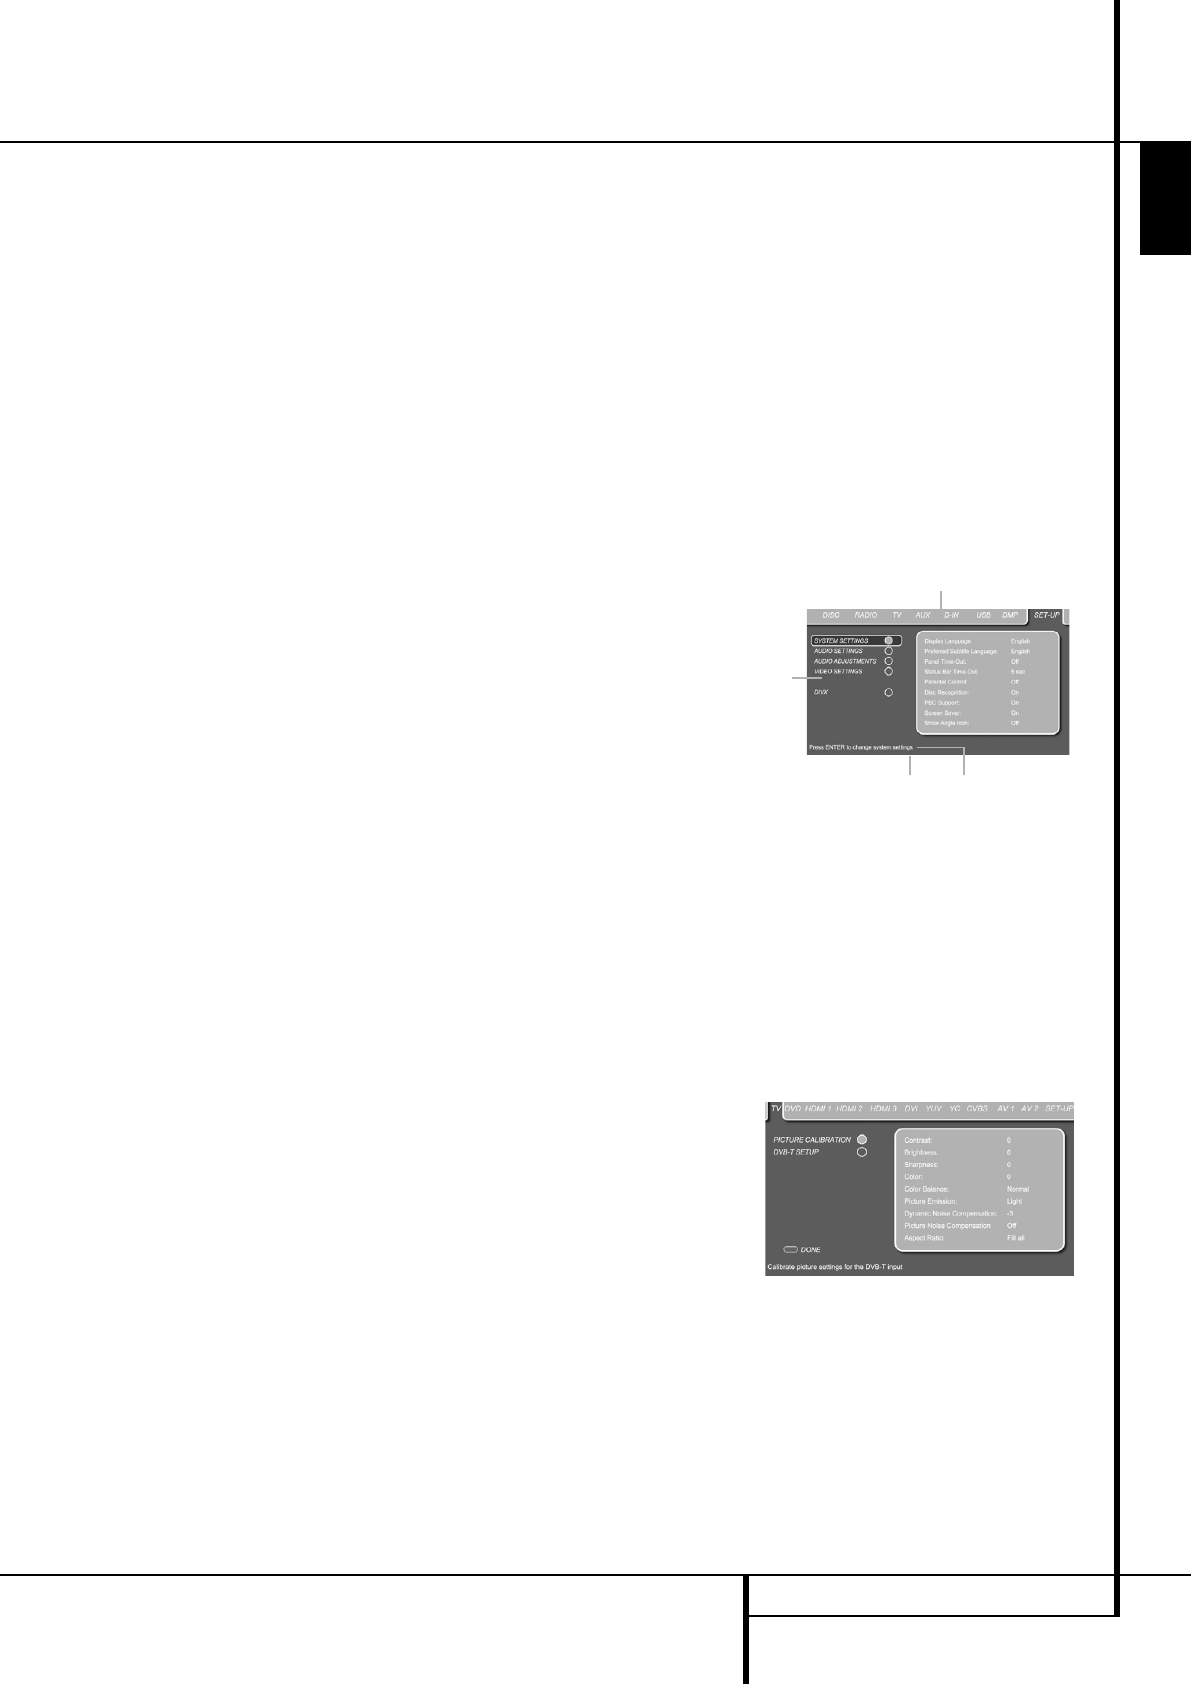
Figure 2a
(A) Main Menu Line
(B) Submenus
(D) Upper Menu Line with Brief Explanation
(E) Lower Menu Line with Possible Options
(not shown in the menu here)
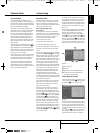
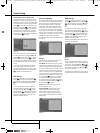
Set Up Menu for Screen
If the Screen Set Up Menu is not already on the
screen, press the TV Button
0
followed by the
Set-Up Button
8
to call it on the screen.
-
Figure 2b
The Screen Setup Menu handles picture calibra-
tion and set up of each individual input connect-
ed to the screen. All possible video inputs are
listed on the top of the menu, and can be select-
ed by moving from one tab to the next one using
the
NM
Buttons
9
on the remote control. The
selected input is highlighted by a dark blue lit
tab, all other tabs will be shown in light blue.
(B)
(A)
(E) (D)
0007CSK - DigitalLounge 632_640_646 ENG v11.qxp:0007CSK - DigitalLounge 632,640,646 UK 12/06/08 11:10 Side 25 (Sort/Black plade