


DVI DL 201 Tx/Rx • Installation
2-7
N
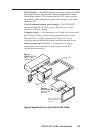
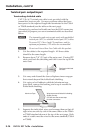
On the side mounting plates, the device is typically
mounted on the outside of the bracket. On the front
mounting plate, the device is mounted on the inside of
the bracket.
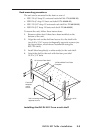
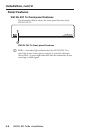
a. Use the two 4-40 x 3/16" screws (provided) to secure
the receiver to the bracket
b. If required, secure the power supply using the plastic
ties provided with the kit.
N
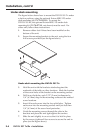
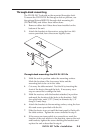
The projector pole can be clamped to the back surface of
the clamping plate on the PMK 300, as shown in the
figure on the previous page.
Alternatively, the PMK 300 has a hole in the bottom
plate that allows the projector pole to be inserted through
the center of the plate. In this configuration, slide the
PMK 300 up from the bottom of the pole before the
projector is installed.
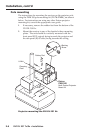
3. Attach the rubber pad to the surface of the clamping plate
that will be in contact with the pole.
4. Place the U-bolt around the projector pole and insert the
two ends through the slotted holes in the clamping plate
and then through the round holes in the backing brace.
N
The provided U-bolt fits a pole with an external diameter
of 1.5" to 2.0". For larger or smaller diameter poles,
obtain a U-bolt from a local hardware store. The slotted
holes in the clamping plate can accommodate U-bolts
that are 1.0" to 2.5" in width.
5. Secure the bracket to the projector pole with the U-bolt and
the provided hex nuts and washers. Use an appropriately-
sized socket wrench to tighten the hex nuts.