


ELECTRO-VOICE
®
X-Line Very Compact
TM
Rigging Manual
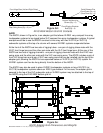
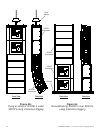
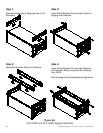
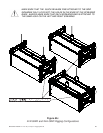
Hold the back of the bottom XS212 enclosure and adjust the enclosure to the desired angle.
Rotate the rear swing arms up and insert the arms into the rigging channels of the enclosure
above. Install the rear quick-release pins into the rigging channel (in the appropriate hole for the
desired angle) and through the hole in the swing arm as shown in Step 3.
ALWAYS MAKE SURE THAT THE QUICK-RELEASE PINS FOR EVERY SWING
ARM PASS THROUGH THE HOLE IN THE SWING ARM AND ARE FULLY
LOCKED IN THE RIGGING CHANNELS ON ALL ENCLOSURES.
Because the XLD281 is a trapezoidal enclosure and the rigging hinges from the front, the bottom
enclosure is tilted
down
relative to the top enclosure when the rear corners are pulled together.
However, because the XS212 is a rectangular enclosure and the rigging hinges from the front, the
bottom enclosure is tilted
up
relative to the top enclosure when the rear corners are spread apart.
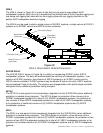
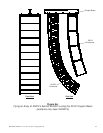
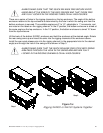
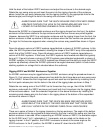
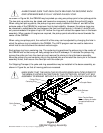
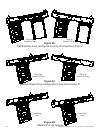
The logic for this becomes apparent when viewing the various array possibilities shown in Figure
6.
Figure 6a shows a column of XS212 systems rigged behind a column of XLD281 systems. In this
case, the XS212 systems face backward, allowing the shape of the XS212 array to be adjusted to
match that of the XLD281 array. Figure 6b shows a column of XS212 systems rigged above a
column of XLD281 systems. In this case, the XS212 systems face forward and would be typically
hung at 0°. Figure 6c shows a column of XS212 systems groundstacked underneath a column of
XLD281 systems. In this case, the XS212 systems face forward and the ability to angle the XS212
systems up effectively allows the XLD281 systems to be angled downward (which is useful when
stacking systems on a stage that is elevated above the audience).
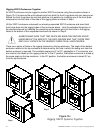
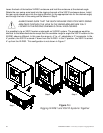
Rigging XS212 and XLD281 Enclosures Together
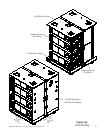
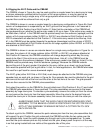
An XLD281 enclosure may be rigged below an XLD281 enclosure using the procedure shown in
Figure 7c. First remove the quick-release pins from both the front hinge bars and rear swing arms
of the XLD281. Extend the front hinge bars up and lock each bar into position by installing one of
the front quick-release pins into the holes in the side of the rigging tubes as shown in Step 1.
Rotate the rear swing arms of the XLD281 as far forward as they can go, then lift the XLD281
enclosure underneath the XS212 enclosure and insert both front hinge bars into the rigging tubes
of the enclosure above. Lock the extended hinge bars in the above enclosure by installing the
remaining quick-release pins into the holes in the rigging tubes at the bottom of the suspended
enclosure as shown in Step 2.
ALWAYS MAKE SURE THAT TWO QUICK-RELEASE PINS SECURE EVERY
HINGE BAR AT THE SIDES OF THE ENCLOSURES AND THAT THOSE PINS
ARE FULLY LOCKED IN THE RIGGING TUBES ON ALL ENCLOSURES.
There are a series of holes in the rigging channels on the top enclosure. The angle of the bottom
enclosure relative to the top enclosure is determined by the hole in which the swing arm from the
bottom enclosure is secured. When suspending an XLD281 below an XS212, the available angles
for the XLD281 are 0° to 5°, adjustable in 1° increments, and are noted on the labels on the
rigging channel. In the 0° position, the XLD281 enclosure is aimed at the same angle as the
XS212 enclosure. In the 5° position, the XLD281 is aimed 5° down from the XS212.
22