


6
ENGLISH
ENGLISH
4
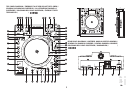
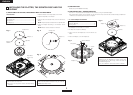
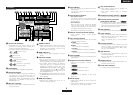
PART NAMES AND FUNCTIONS
(Refer to page II.)
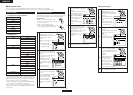
q
USB B terminal
• Connect a computer.
• MP3/WAV files and playlist files are transferred
between the computer and the DN-HS5500.
w
USB A terminal
• Connect a mass storage device, USB keyboard or
USB hub.
e
D-SYNC terminals
• These are cable terminals for connecting another
DN-HS5500.
The D-SYNC function can be used when another
DN-HS5500 is connected here.
✽Only a DN-HS5500 can be connected to the cable
end.
r
Digital output terminals
(DIGITAL OUT)
• Digital data is available from these terminals.
•Use 75 Ω/ohms pin cord for connection.
•We recommend you use braided wire type shielded
cable.
NOTE:
• The playback level after analog conversion is set to –6
dB below the usual level to avoid digital distortion.
t
Analog output terminals (LINE OUT)
• This is unbalanced RCA output terminals.
• Audio signals outputs.
y
Fader start terminals
• Use this when your mixer has the Fader Start
function.
u
POWER button (¢ON £OFF)
• Push this button to turn power on and off.
(1) Rear panel (2) Top panel
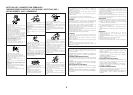
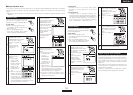
i
PLAY/PAUSE button (13)
•This button will start or pause playback.
• Push once to start playback, once again to pause
playback, and once more to resume playback.
o
CUE/STUTTER button
• Pushing this button in play mode will force the file
back to the position which playback started. While
in search mode, it makes new Cue point. (Cue)
• In Cue mode, by pushing the CUE button makes a
Stutter sound from the Cue point. This is called
Stutter play. (Stutter)
!0
Platter/scratch disc
This is used for the manual search, pitch bend and
scratch playback functions.
• Platter:
The platter turns when playback of the scratch
source selected with the PLATTER SOURCE button
starts.
NOTICE:
The platter does not turn when the scratch source is set
to “BEND/SEARCH”.
• Scratch:
When the scratch disc is turned, scratch playback of
the source selected with the PLATTER SOURCE
button is performed.
NOTE:
Do not forcibly stop the rotation of the platter as it is
turning.
Doing so could damage the platter’s rotation mechanism.
Also, if the rotation of the platter is forcibly stopped, the
pause mode will be set.
!1
FILTER button
• One of three filters (LOW PASS, MID PASS and
HIGH PASS) can be selected.
!2
FLANGER button
• The depth and delay time can be selected.
CAUTION:
• Note that there are many buttons working two
different function selected by short time pushing or
long pushing (1second or more). The “ ” mark
indicates short time push function and “ ” mark
indicates long time push function.
!3
ECHO/LOOP button
• ECHO LOOP:
The ECHO and LOOP functions can be selected.
The feedback level and delay time can be selected.
Looping for the delay time (ECHO LOOP) is
possible by setting the feedback level to “MAX”.
• Tail ECHO:
Echo playback is only performed when the file is
stopped (play/cue operation).
The tail echo function is turned on and off by
pressing the button and holding it in for 2 seconds.
!4
TAP, LOCK, AUTO/INPUT BPM
button
• TAP:
When you push this button repeatedly, the Auto
mode turns off and starts measuring your Beats
Per Minute (BPM) by tapping.
• LOCK:
When this button is pressed once while the Auto
BPM counter is operating, the data measured by
the Auto BPM counter is locked.
• AUTO:
When pushing the TAP button for 1 second,
activates AUTO BPM mode.
The measured BPM is displayed in the character
section of the display.
• INPUT BPM:
When the TAP button is pressed and held in for
more than 2 seconds, the BPM input mode is set
and the BPM value can be input directly with the
PARAMETERS knob. When the TAP button is
pressed again, the BPM input mode is turned off.
NOTE:
• If you select a new file, AUTO BPM mode turns on
automatically.
• BPM data can be saved to the MEMO function.
!5
EFFECTS knob
• Use this knob to set the internal effector’s
parameters.
!6
Scratch playback direction selector
lever
Use this to select the direction of scratch playback.
• BOTH:
When the scratch disc is turned, the scratch
playback sound is output from both the reverse and
forward directions.
• FWD:
When the scratch disc is turned, the scratch
playback sound is output from the forward
direction only.
!7
TIME, UTIL. button
• TIME:
When this button is pressed, the time indicator
switches between “ELAPSED” (elapsed time),
“REMAIN” (remaining time), “T.ELAPSED” (total
elapsed time) and “T.REMAIN” (total remaining
time). (The “T.ELAPSED” and “T.REMAIN”
indicators only light when in the playlist play mode.)
• UTIL.:
The Utility mode is set when this button is long-
pressed while both Layers are in the cue.
!8
Function1 button
Use this to register files on the hotlist.
• In the file search mode, the selected file is added
to the hotlist.
!9
LAYER1 button
Use this to select the deck to be operated.
• The LED on the left side of the LCD lights when
Deck 1 can be operated.
• The LED on the right side of the LCD lights when
Deck 2 can be operated.
@0
Function2 button
Use this to mark files on the hotlist as already having
played and to delete files from the hotlist.
• When the cursor is set to a file on the hotlist, that
file is marked as already having played.
When this is done, a check mark is added in front
of the file name.
@1
DISPLAY MODE button
• Use this to switch the display between the full and
dual modes.
When the display is switched from the dual to the
full mode, the display for the operable deck is
displayed.
@2
NEXT FILE button
If this button is pushed during playback, the NEXT
FILE mode will be selected. The next file can be
selected with the PARAMETERS knob.
@3
Function3 button
• When in the mirror mix mode, this is used to start
and stop the mirror mix operation.
@4
MEMO, PRESET button
• MEMO:
The MEMO mode starts when this button is
pushed once in the Cue mode.
• PRESET:
When this button is pushed for more than 1 sec,
the PRESET mode menu is displayed.
The machine status must be in CUE, PAUSE or No
JOG mode before entering the preset mode.