


12
Saving Audio Files with pyro Audio Creator
To Save Files in MP3 Format
This is a very popular format for compressing files in order to send them over the
Internet or prepar
e them to be played on portable players.
To Save Files in MP3 Format:
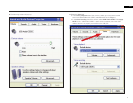
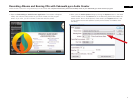
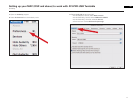
1. Use the File-Save As-MP3 command to open the Save As dialog.
2. Navigate to where you want to store the new MP3 file, and if you are only saving
one file, and not using track markers to separate your saved files (see step 4),
type a name for the new file.
3. Usually you will leave the Channel Format field set to Stereo (unless you want a
mono file), the Sample Rate set to 44100, and the Bit Depth set to 16.
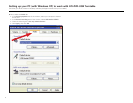
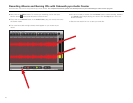
4. If you want to use track markers to create separate files during the save process,
enable the Use Markers As T
rack Indicators checkbox. Each marker marks the
start of a new file and also names the new file. Make sure you have a marker at
the beginning of your project if you want that part of the project to be included in
the save process.
5. Click the Save button. The MP3 Save Options dialog appears.
6. Select the options you want. Click the Help button to open the help file for this
dialog.
7. Click OK to finish saving your file. If you are saving multiple files, this dialog will
appear one time for each file you are saving. Y
our files are saved with the .MP3
file extension.
NOTE: The MP3 encoder supplied with this version of Cakewalk pyro Audio Creator is valid
for 30 days from the point that you load the software. After that, you have the choice of
continuing your MP3 encoder subscription through Cakewalk or using a freeware version
available through various online sources. You will still have full Cakewalk recording capabilities
including the ability to save in the .WAV and .WMA file formats after the initial 30-days; this
trial period only affects the MP3 encoding portion of the software.
To Save Files in WMA Format
This is Microsoft's file format for compressing files. It is a high-quality format similar
to MP3.
T
o Save Files in WMA Format:
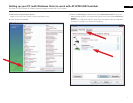
1. Use the File-Save As-WMA command to open the Save As dialog.
2. Navigate to where you want to store the new WMA file, and if you are only saving
one file, and not using track markers to separate your saved files (see next step),
type a name for the new file.
3. If you want to use track markers to create separate files during the save process,
enable the Use Markers As T
rack Indicators checkbox. Each marker marks the
start of a new file and also names the new file. Make sure you have a marker at
the beginning of your project if you want that part of the project to be included in
the save process.
4. Usually you will leave the Channel Format field set to Stereo (unless you want a
mono file), the Sample Rate set to 44100, and the Bit Depth set to 16.
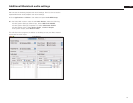
5. Click the Save button. The Windows Media Format Encode Options dialog appears.
6. Select the options you want. Click the Help button to open the help file for this
dialog.
7. Click OK to finish saving your file. If you are saving multiple files, this dialog will
appear one time for each file you are saving. Y
our files are saved with the .wma
file extension.
To Save Your Project
This command simply preserves all the files and edits you've done in a project, so
that you can open it later to do more editing.
T
o Save Your Project:
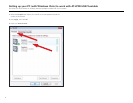
1. Use the File-Save As-Project command to open the Save As dialog.
2. Navigate to where you want to store your project.
3. Type a file name for your project, and click Save. Your Project is saved under the
name that you chose, with a .pac file extension.