


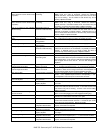
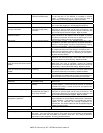
PAGE
35
Community XLT / XLTE Series Owner’s Manual
10 SERVICING THE LOUDSPEAKER
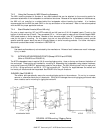
10.1 ACCESSING THE DRIVERS
The drivers (LF, MF, or HF) are accessed by removing the grille (See SECTION 7.1.1). This is done by removing all
the screws that hold the grille to the enclosure then carefully pulling the grille out of its recess. The grille is
purposely tight fitting so some force may be required. Use a small screwdriver to pry it up near one corner or an
Allen wrench or similar tool to hook it through one of the perforations to assist in removing it.
CAUTION:
The grille has sharp points along its edge so use caution when handling the grille edges to avoid injury. The
grille is shear-cut to size and because of the arrangement of the perforations, it is impossible to avoid cutting
through some of the holes. Consequently, some of the land areas between the holes form sharp points.
10.1.1 LF Drivers
Once the grille is removed, the LF driver(s) may be taken out by removing the eight screws that secure the outer edge
of its frame to the enclosure baffle. Once the screws are removed, a small screwdriver may be needed as a lever
under the outer rim of the driver’s frame to help lift it up. Carefully lift it out far enough to access the connections.
Note which wire color goes to which terminal so that the driver can be reinstalled with the correct polarity. Remove
the wires to uninstall the driver.
To reinstall, reverse the process. Firmly tighten, but do not over tighten any of the screws to avoid stripping the
holes. Be sure to reinstall each wire on its correct terminal. Failure to do this will result in uneven frequency
response.
10.1.2 MF and HF Drivers
Once the grille is removed, the MF (on the model 46) and HF driver is accessed by removing the screws around the
mounting flange of the horn that secures it to the enclosure baffle. Carefully lift out the horn far enough to access the
connections to the HF driver. Note which wire color goes to which terminal so that the driver can be reinstalled with
the correct polarity. Remove the wires, then unfasten the driver from the horn by undoing the nuts on the threaded
driver studs to uninstall the driver.
To reinstall, reverse the process. To avoid stripping the holes, firmly tighten, but do not over tighten, any of the
screws that hold the horn and grille. Be sure to reinstall each wire on its correct terminal. Failure to do this will
result in uneven frequency response.
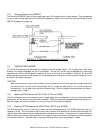
10.2 SERVICING THE CROSSOVER
Should the crossover need service, it is completely removable from the rear of the enclosure (side on monitors).
Remove the screws around the outside flange and carefully lift out the crossover. To disconnect the crossover from
the loudspeaker, pull out the Molex plug used to connect the crossover to the driver wiring harness. When
re-installing the crossover, the Molex plug is keyed so it can be inserted only in one direction. It will plug in easily
when properly oriented. Ensure that it is fully seated into the receptacle on the crossover board.